We are back again with another new topic for the day. Today’s topic, as mentioned above, is com.android.cts.priv.ctsshim. Needless to say, com.android.whatever is some package that ships with the Android OS. Their functionalities are related to different functions of your android device. We have recently dealt with com.android.documentsui and com.android.gallery3d related errors and explanations (do check them out). Today, we will be dealing with com.android.cts.priv.ctsshim and com.android.cts.ctsshim. So without any further delay, let’s get started.
Before jumping into main topic lets get a clear understanding about android package. A package is a generally a directory where our source code resides. Normally, this is a directory structure that uniquely identifies your application; such as com.example.app and it is stored under /data/app/com/com/.
What is com.android.cts.priv.ctsshim?
com.android.cts.priv.ctsshim is a package that comes with the Android OS. CTS stands for “Compatibility Test Suite,” and priv stand for private. You will find two package name in your system apps: First one is privately used and second (com.android.cts.ctsshim) used globaly. Basically, CTS is a tool for developers. Many compatibility issues arise when we talk about Android apps and their versions. Newly developed apps aren’t designed to work with old Android versions. So, CTS helps developers to resolve such compatibility issues with applications on different Android versions.
Location – “/system/priv-app/CtsShimPrivbuilt/CtsShimPrivPrebuilt.apk”
CTS resides on the partition of your system. It serves for verifying certain upgrade scenarios. This test is run by the vendors to ensure that their hardware are compatible with the version of Android OS. CTS basically has two parts, one of which is run on the development computer (Mac or 64-bit Linux). The other is a system file that is present in Android by default. This is a developer preview. As a result, the com.android.cts.priv.ctsshim or com.android.cts.ctsshim is a pre-installed thing, so you should not mess with it. Also, you can’t delete it from your device. To do so, you need to root your android device. However, deleting these system files gives rise to various problems. They turn your device numb.
com.android.cts.priv.ctsshim Used for
Now you know com.android.cts.priv.ctsshim, or more precisely CTS (Compatibility Test Suite), is a developer tool use to find and solve compatibility problems with applications on different versions of Android. This is done in order to test the compatibility where the vendors run to ensure their hardware is compatible with the Android OS. It consists of two parts:
- One runs on a PC (Linux or Mac)
- The second is on the side of the Android device (phone or tablet)
Moreover, CTS is a package that resides on a devices/system partition to verify specific upgrade scenarios. It contains code and specifies the singular APK that can be used to upgrade it. It is an essential part of SafetyNet, an API by Google that ensures that your phone is original and not tampered with any critical system parameters. If we built our own android app, then the name “com.android.cts.priv.ctsshim” will be included there by default. If you are trying to run a program, remove the line and run it in your own android studio; it will work correctly.
Note: If you have root rights, then this application can be removed easily. But if it does not make your phone slow, eating battery, then it is better to leave it. The application is a system app, and it should not harm.
Download Latest CTS
In the Mi Community forum, it is written that CTS is a free suite of compatibility tests. It can run on a computer and perform test tasks on a connected device.
CTS is a suite of unit tests designed to integrate into the daily workflow of device engineers. The task of tests to identify incompatibilities at an early stage also ensures software compatibility throughout the development process.
The latest update and download is always available on the android source site. You will not only get the CTS for current android but also for the old one. Directly visit to site then come back to read more. Click here to download.
How to set up the environment, desktop and android device for CTS?
To run CTS, you first need to prepare three main things:
- The physical environment
- Your desktop machine (64-bit Linux or Mac)
- Your android device on which you will carry out the test
Physical environment setup:
Bluetooth LE Beacons
- The Device put under test be called DUT (Device Under Test) from now on. Let’s say the DUT supports Bluetooth. In that case, you need to keep at least three Bluetooth LE Beacons within a range of 5 metres from the DUT. This serves for Bluetooth LE Scan testing.
- Note that the beacons do not require to be configured. They may be of any type, like Eddystone, or iBeacon. Devices simulating BLE Beacons may also be used for this purpose.
Cameras
- It is recommended to use normal lighting conditions when you’re running Camera CTS. A test pattern chart, for example, checkerboard pattern, is also to be used.
- Approximate the minimum focus distance of the device under test. Place the pattern chart according to that. This ensures that the pattern is not placed too close to the lens.
- You need to get the sensors under test reach the maximum targeted FPS. For this, point the camera to a scene where the lighting is sufficient. Not only one camera sensor though, do this for all camera sensors. This is because the test iterates over the scheduled devices. Hence, the performance of each is measured individually.
- In case the device under test supports external cameras, plug it in when you are running CTS. External cameras may include USB Webcams or other webcams. The CTS test might fail if you do not do so.
GPS/GNSS
- GPS means Global Positioning System, and GNSS, when expanded, reads Global Navigation Satellite System.
- In case the device under test supports the GPS/GNSS feature, provide the respective signal to it. This should be done at a suitable signal level for better response and accurate GPS location approximation.
- The GPS should be complaint with ICD-GLS-200C. Otherwise, there is no bar to the type of signal, be it satellite simulator or a repeater of outdoor signals. The better option is to place the device under test in open air or close to a window. This allows it to directly receive enough GPS/GSS signal for it to work correctly.
Wi-Fi and IPv6
- During CTS tests, the DUT needs to be treated as an isolated client (a configuration where the device cannot broadcast messages on the sub network). For this, it requires a Wi-Fi connection supporting IPv6. An internet connection is a must.
- This may be achieved with a Wi-Fi AP configuration. Running the device under test on an isolated subnetwork, in which no other device is connected, is also a solution.
- You can use an IPv6 tunnel or Wi-Fi AP too. This is especially when you don’t have access to some IPv6 carrier network or VPN.
Desktop Setup:
To begin with, please note that CTS does not support Windows OS. Hence, you require a 64-bit Linux or a Mac device for setting up the test.
ADB and AAPT
- You have to install the recent versions of AD and AAPT and add their locations to the system path of your desktop. ADB stands for Android Debug Bridge. AAPT stands for Android Asset Packaging Tool.
- Download the Android SDK Tools package for your OS. This is mainly for installing the Android Debug Bridge. Then you need to open it. Locate the Readme file and follow the instructions written in it.
JDK for Ubuntu
You need to install the required version of JDK (Java Development Kit).
- Install OpenJDK11 for Android 11.
- Install OpenJDK9 for Android 9(P) and Android 10(Q).
- For old, Install OpenJDK8 for Android 7 and Oreo.
CTS Files
From Compatibility Test Suite Downloads, download and open the CTS packages. It should match the Android version of your device and all the ABIs that it supports.
Note: ABI stands for Application Binary Interface.
Android Device Setup
Screen and Storage
- If the device doesn’t have an embedded screen, you have to connect it to a screen. External screens or LCD displays are easily available.
- Plug in an empty SD card if your device has a memory card slot. If the card supports UHS (Ultra High Speed) Bus with SDXC, then it’s an additional addon.
- You must plug in an empty SD card because CTS testing might delete all the existing data. You don’t want any sensitive information to get deleted, so use empty SD card.
Other measures
- Change the default language of your device to English (United States). Head on to Settings > Language and Input > Language for achieving it.
- Turn on the Location of your android device. You may pull down the notification bar and turn the location on, or head on to Settings > Location and turn it on.
- Set your device time to 12-hour format, if it’s in 24-hour format. Head on to Settings > Date and Time > Use 24-hour format. Turn it off.
- Turn on Developer options in your device by tapping 6-7 times on Build number. Then, enable USB debugging.
- For various purposes and a speedy test process, you might consider doing a factory data reset. Head on to Settings > Backup & Reset > Factory Data Reset. Note that this erases all the data from your device. Make sure you have a backup of all the sensitive and important data.
How to run Android CTS?
- Connect the device first.
- Press the home button of your DUT to set it to the home screen at the beginning of the test.
- You must not use the DUT for any other tasks when the test is running. This is because more the memory the test gets when it runs, the better the performance. Do not move with the device either, it should be kept stationary. This avoids triggering sensor activities.
- The cameras pointing at an object should be well-focused.
- When the CTS is running, avoid pressing any keys. This interferes with the running tests which leads to failure, hence defeating your purpose.
- Locate the folder where CTS package was unzipped. Launch the CTS console by running the cts-tradefed script from the folder.
- Start the default test plan. This kicks off all CTS tests that are required for compatibility.
Is com.android.cts.priv.ctsshim a Virus?
- In short, No. Although some antivirus softwares identify com.android.cts.priv.ctsshim or com.android.cts.ctsshim as Trojan, however it’s not a virus.
- It is a pre-made package for Google’s native CTS Compatibility test, which is mandatory. You don’t need to bother about it much if your antivirus reports it as virus.
- If it asks for certain permissions, there may be other installed applications disguised under it, asking for those permissions. You can afford to ignore them.
- To be sure, match the signature of the files with the signature of the known source files. If it doesn’t match, then it is probable that it is a malware. Remove or uninstall it.
com.android.cts.priv.ctsshim as well as com.android.cts.ctsshim may be regarded as dangerous software. But in fact, these applications are part of the operating system, and they are system applications. Whenever we scan our system via antivirus [recommended one are ESET NOD32 mobile security, Comodo antivirus, Dr. Web, Kaspersky Mobile Security], then antivirus programs can easily send flag alerts bases on program behavior. Since this is a developer preview, the Android CTS files are already installed, and since they are system files, it cannot be removed unless you have root privileges.
Warning
If you have recently installed an app that is masquerading under this name and now wants root access. All you need to do is do not grant permission. We have to very cautious while granting permission to any app. After downloading a new app, do not grant permission like access to media files or your location, camera, or microphone. Never download suspicious apps, or even if you are using one, be alert and selective on what you do on the app. We can only save ourselves. If we are careless about technology, then we have to pay the price.
How to fix com.android.cts.priv.ctsshim
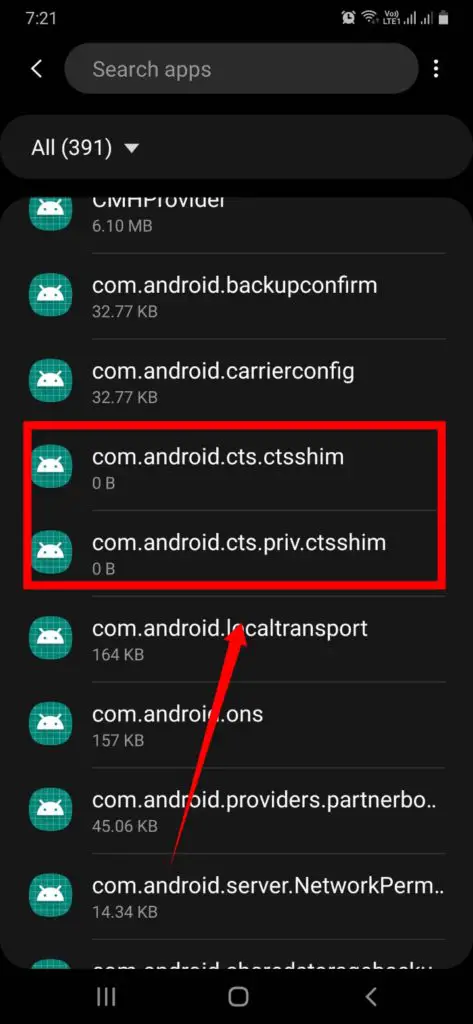
- Go to setting then Apps
- Next on the top right corner you will see three dots, click on it.

- You will see many options, select “Show System Apps.”
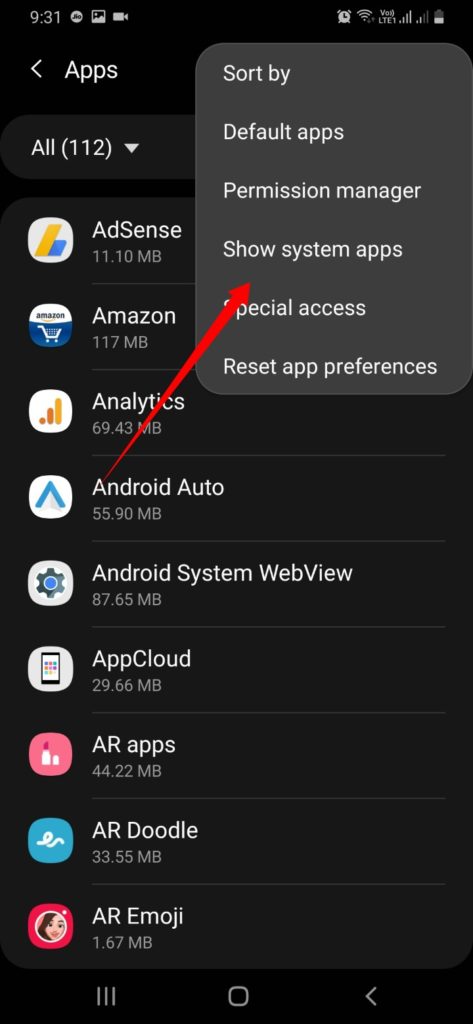
- Now you can easily find the package com.android.cts.priv.ctsshim and com.android.cts.ctsshim, choose one by one.
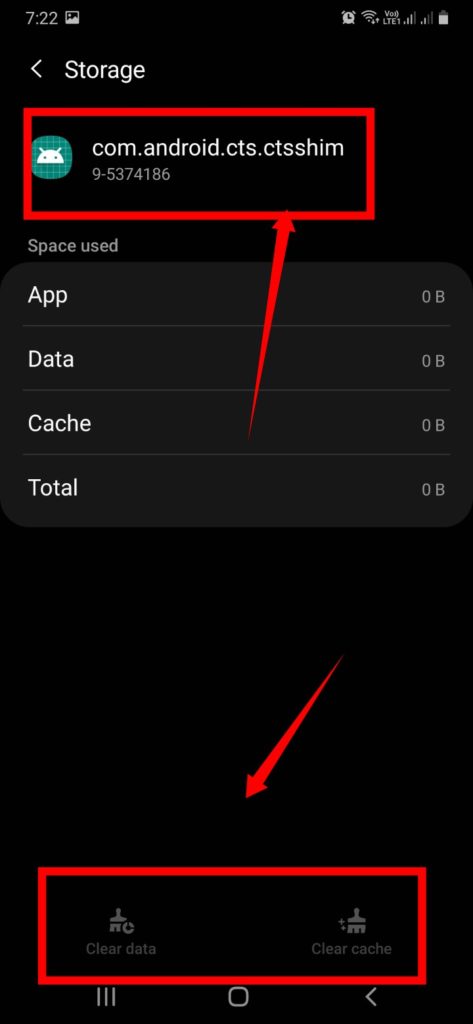
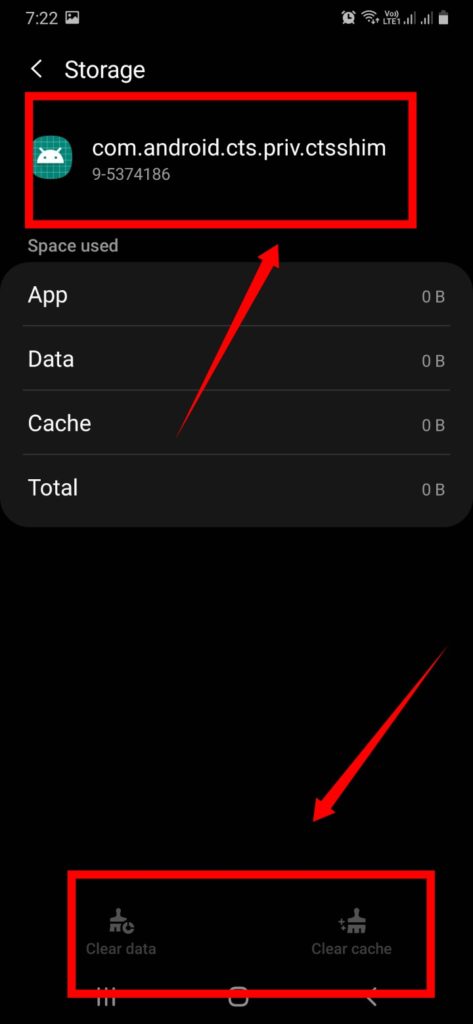
- Go to storage of each one.
- Click on clear cache then clear data. This will fix the issue.
Note: If above mentioned method does not work, then force stop the both package and restart. Last option is the factory reset. But, take a backup of your phone before doing any experiment.
Conclusion
Thus, we conclude that com.android.cts.priv.ctsshim is an android package for Compatibility testing. It can be concluded that com.android.cts.ctsshim is related to device testing. It is neither a virus nor harmful for your device. Even you can run compatibility tests on your device, after setting up the physical environment, desktop and android device correctly. If done correctly, you will get accurate test results.

I am a tech enthusiast. I have a keen curiosity in Data Science, Machine Learning, Deep Learning and Neural Networks. I have acquired knowledge in Python, SQL, Java, Amazon Web Services (AWS) and IoT (Internet of Things). I have built a couple of ML models and worked on datasets in IBM Watson Studio. Besides, I take great delight in content writing, which makes me come here, as I believe that this is one of the most reliable techniques for sharing one’s skill.


