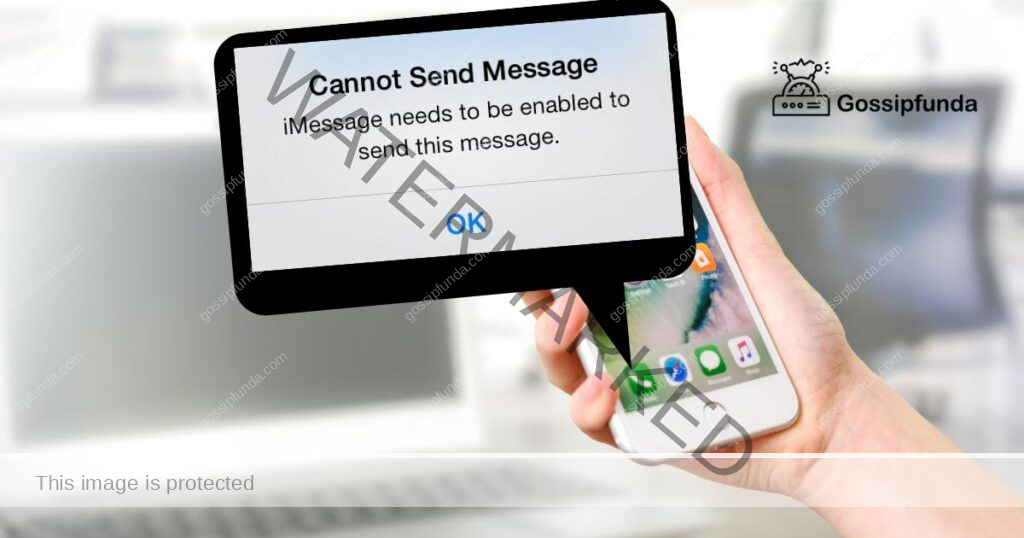
Have you ever attempted to send an iMessage only to be met with the frustrating alert that reads, “iMessage needs to be enabled to send this message?” Don’t worry; you’re not alone. This issue plagues many Apple users, but the good news is that there are several solutions to rectify it. This comprehensive guide aims to unravel the problem, its causes, and provide you with step-by-step solutions to get your iMessage up and running again.
Understanding iMessage
iMessage is an instant messaging service developed by Apple Inc. Exclusive to Apple devices, it’s lauded for its seamless integration across devices and user-friendly features. However, like all tech tools, it sometimes runs into hitches such as the “iMessage needs to be enabled to send this message” error.
Causes of The Problem
Understanding the causes of the problem is the first step in solving it. There are various reasons why you might see the “iMessage needs to be enabled” message:
- Outdated iOS: An outdated operating system may be incompatible with newer iMessage features, causing glitches.
- Incorrect Settings: If the iMessage settings on your device are not correctly configured, you might encounter this issue.
- Network Issues: iMessage needs a stable internet connection to function. Hence, weak or unstable Wi-Fi or cellular data can cause this problem.
- Apple Server Problems: If Apple’s iMessage servers are down, it can affect the messaging service.
How to fix iMessage needs to be enabled to send this message
The solutions below offer comprehensive steps to resolve the “iMessage needs to be enabled to send this message” problem.
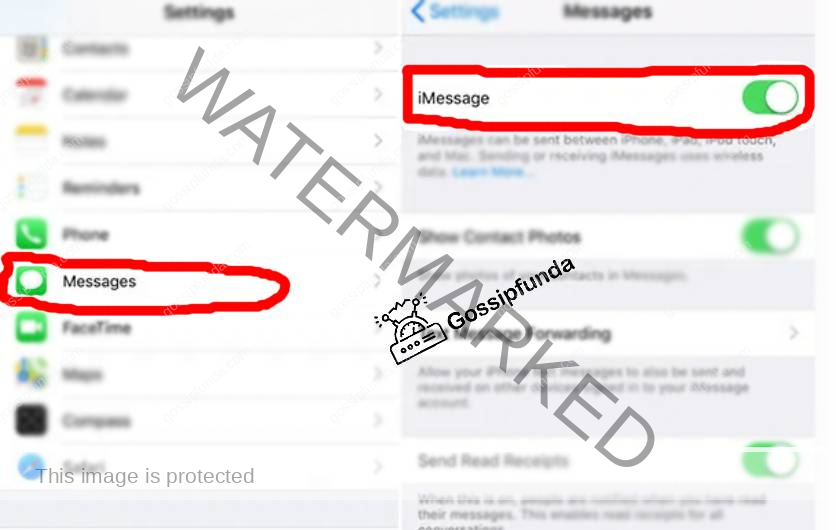
Enable Your iMessage
To enable iMessage on an iOS device, such as an iPhone or iPad, you can follow these steps:
- Open the “Settings” app on your device.
- Scroll down and tap on “Messages.”
- On the Messages settings page, make sure the “iMessage” toggle is switched on. If it’s already enabled, you’ll see it in the green position.
- If you haven’t set up iMessage before, you might be prompted to sign in with your Apple ID. Follow the on-screen instructions to sign in or create an Apple ID if you don’t have one.
- Once iMessage is enabled, you can customize additional settings like enabling read receipts, configuring message forwarding, or adjusting other preferences within the “Messages” settings.
If none of the above solutions work, you may have to contact Apple Support for further assistance. They can provide additional troubleshooting steps and guide you through any more technical processes if necessary.
Check Network Connection
To check the network connection on your iPhone, you can follow these steps:
- Open the “Settings” app on your iPhone.
- Scroll down and tap on “Wi-Fi” or “Cellular,” depending on which network you’re connected to or want to check.
- If you’re connected to a Wi-Fi network:
- On the Wi-Fi settings page, you’ll see a list of available Wi-Fi networks. Make sure the Wi-Fi toggle at the top of the page is turned on (green). If it’s off, tap on the toggle to enable Wi-Fi.
- If you’re connected to a specific Wi-Fi network, you’ll see a checkmark next to its name. If there’s no checkmark, tap on the network name and enter the password to connect to it.
- If you’re using cellular data:
- On the Cellular settings page, make sure the Cellular Data toggle at the top of the page is turned on (green). If it’s off, tap on the toggle to enable cellular data.
Once you’ve verified that Wi-Fi or cellular data is enabled, you can also check the signal strength by looking at the bars displayed next to the network name.
If you’re still experiencing issues with your network connection, you can try the following troubleshooting steps:
- For Wi-Fi issues:
- Restart your iPhone and try connecting to the Wi-Fi network again.
- Forget the Wi-Fi network by tapping on its name in the Wi-Fi settings, then tap on “Forget This Network.” Afterward, reconnect to the network and enter the password if required.
- If the issue persists, try resetting your network settings. Go to “Settings” > “General” > “Reset” > “Reset Network Settings.” Note that this will remove your saved Wi-Fi passwords, so you’ll need to re-enter them.
- For cellular data issues:
- Ensure that you have cellular data enabled by following the steps mentioned above.
- Restart your iPhone.
- If the problem persists, you can contact your cellular service provider for further assistance.
These steps should help you check and troubleshoot your network connection on your iPhone.
Reset iMessage Settings
To reset iMessage settings on an iPhone, you can follow these steps:
- Open the “Settings” app on your iPhone.
- Scroll down and tap on “Messages.”
- If you’re using iOS 14 or later:
- On the Messages settings page, scroll down to find the “iMessage” section.
- Tap on “iMessage” to access its settings.
- Towards the bottom of the iMessage settings, you’ll see an option called “Reset iMessage.” Tap on it.
- A confirmation pop-up will appear. Tap on “Reset” to confirm.
- If you’re using an earlier version of iOS:
- On the Messages settings page, you’ll see an option called “Send & Receive.” Tap on it.
- At the top of the “Send & Receive” settings, you’ll find your Apple ID and phone number(s) associated with iMessage.
- Tap on your Apple ID at the top of the screen.
- In the Apple ID settings, you’ll see an option called “Sign Out.” Tap on it.
- After signing out, tap on the “Use your Apple ID for iMessage” option.
- Sign in with your Apple ID credentials.
- Once signed in, you can reconfigure your iMessage settings and choose the phone number and email addresses you want to associate with iMessage.
By resetting iMessage settings, you’re essentially refreshing the configuration and allowing it to start afresh. It will not delete any of your conversations, but it may remove the association of your phone number and Apple ID from iMessage. You’ll need to reconfigure the settings according to your preferences after the reset.
Remember that iMessage requires an active internet connection and both parties need to have iMessage enabled to exchange iMessages instead of regular SMS or MMS messages.
Check the server of iMessage
To check the server status of iMessage using Apple’s System Status page, you can follow these steps:
- Open a web browser on your device.
- Go to Apple’s System Status page by visiting the following URL: https://www.apple.com/support/systemstatus/
- On the System Status page, you’ll find a list of Apple services and their respective status indicators.
- Look for “Messages” or “iMessage” on the list and check the corresponding status indicator.
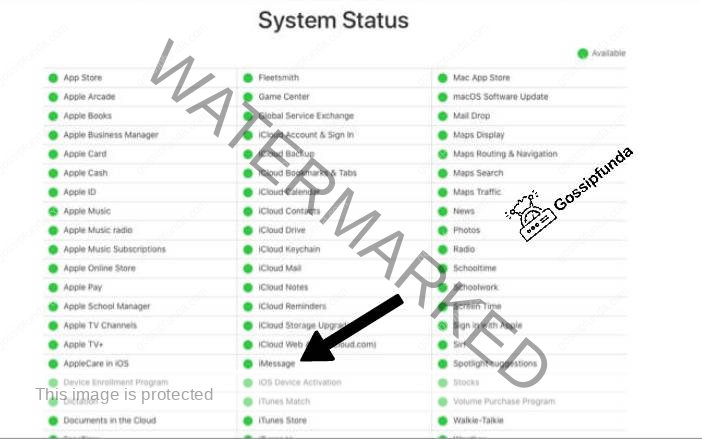
If the status indicator for iMessage is green or shows no reported issues, it means the iMessage servers are operating normally. If the indicator is yellow or red, it indicates there may be an ongoing issue or service disruption with iMessage. In such cases, Apple is typically aware of the issue and is working to resolve it.
Delete and reinstall iMessage
To delete an iMessage app from your iPhone, you can follow these steps:
- Open the Messages app on your iPhone.
- Open a conversation where you have previously used or accessed the iMessage app you want to delete.
- Tap and hold the App Drawer icon located at the bottom-left corner of the text input field. The App Drawer will slide up from the bottom of the screen.
- In the App Drawer, swipe left or right to find the iMessage app you want to delete.
- Once you locate the app you want to remove, tap and hold its icon.
- A pop-up menu will appear. Tap on “Delete App” or “Remove App” (the wording may vary slightly depending on your iOS version).
- Confirm the deletion by tapping on “Delete” or “Remove” in the confirmation prompt that appears.
The iMessage app will be deleted from your iPhone, and it will no longer appear in the App Drawer when you access the associated conversation.
Read more: Dealing with the ‘iMessage Activation Error’: Let’s FIX it!
To use iMessage on your iPhone, follow these steps to ensure it is set up and enabled:
- Open the “Settings” app on your iPhone.
- Scroll down and tap on “Messages.”
- On the Messages settings page, ensure that the “iMessage” toggle is switched on. If it is already enabled, it will be in the green position.
- If prompted, sign in with your Apple ID. iMessage uses your Apple ID to associate your device with the service and enable messaging across multiple devices.
- Once iMessage is enabled, you can customize additional settings such as enabling read receipts, configuring message forwarding, or adjusting other preferences within the “Messages” settings.
Preventive Measures
To prevent future occurrences of the “iMessage needs to be enabled to send this message” error, follow these preventive measures:
- Regular iOS Updates: Regularly updating your iOS ensures you have the latest features and bug fixes.
- Correct Settings Configuration: Always ensure your iMessage settings are correctly configured. Regularly check to ensure that iMessage is enabled.
- Strong Network Connection: Always ensure that your device is connected to a stable and strong internet connection. Weak or unstable connections can cause issues with iMessage and other internet-dependent applications.
Conclusion
While the “iMessage needs to be enabled to send this message” error can be quite frustrating, it’s usually relatively easy to solve with a little troubleshooting. By understanding the root causes of this issue, you can also prevent it from happening in the future. By taking proactive measures like regular iOS updates and ensuring a strong network connection, you’ll be able to enjoy a seamless iMessage experience.
If you do run into this error, don’t fret. Remember, every tech issue comes with a solution. Use this guide to troubleshoot, and if all else fails, remember that Apple Support is always there to assist you.
FAQs
This error occurs due to outdated iOS, incorrect iMessage settings, network issues, or Apple server problems.
Check your internet connection, update your iOS, check iMessage settings, restart your device, or check Apple’s system status.
Yes, iMessage requires a stable internet connection to function properly. A weak connection can cause issues.
Regularly update iOS, ensure iMessage is enabled in settings, and maintain a strong, stable internet connection.
Rahul Kumar is a highly skilled and experienced technology professional with expertise in search engine optimization (SEO), website development on WordPress, and content writing. With over 5 years of experience in the industry, Rahul has helped numerous businesses to achieve their online marketing goals through effective SEO strategies and high-quality website development.
As an SEO expert, Rahul has a deep understanding of the algorithms used by search engines to rank websites. He is skilled in using a variety of techniques to optimize websites for search engines, including keyword research, on-page optimization, link building, and content creation. He has a track record of achieving significant increases in search engine rankings and organic traffic for his clients.
Rahul is also highly skilled in website development on WordPress, one of the most popular content management systems (CMS) used by businesses worldwide. He has expertise in designing and developing custom WordPress websites that are responsive, user-friendly, and optimized for search engines.
In addition to his SEO and website development skills, Rahul is a talented content writer. He has written high-quality content for websites, blogs, and social media platforms in a variety of industries, including healthcare, technology, and education.
Overall, Rahul is a highly talented and motivated technology professional with a wealth of experience and expertise in SEO, website development, and content writing. He is dedicated to helping businesses achieve their online marketing goals and is committed to staying up-to-date with the latest trends and developments in the industry.


