Valorant, Riot Games’ popular tactical first-person shooter, has garnered immense popularity among gaming enthusiasts. However, even the most dedicated players can experience technical hiccups that can hinder their gaming experience. One such issue is the infamous “Valorant Error Code VAL 59.” In this article, we will delve into the reasons behind this error code and provide a step-by-step guide on how to fix it. With the help of our comprehensive guide, you can get back to dominating the battlefield in no time!

What is Valorant error code 59?
Valorant error code 59, also known as “LoginQueueFetchTokenFailure,” indicates an issue with the login queue. In this case, it is recommended to restart the Riot Client and check for any Support Site banners.
Tip 1: Connectivity and Network Issues
The most common cause of Valorant Error Code VAL 59 is a poor or unstable internet connection. This issue can manifest in different ways, such as slow loading times, disconnections, or even crashes during gameplay. To resolve this issue, follow these steps:
- Check your internet connection to ensure it is stable and reliable. You can do this by running an online speed test or simply browsing the web to gauge its performance.
- Restart your modem and router to refresh the connection.
- If you are connected via Wi-Fi, consider switching to a wired connection using an Ethernet cable for better stability.
Tip 2: Firewall or Antivirus Interference
Another possible reason behind Valorant Error Code VAL 59 is interference from your computer’s firewall or antivirus software. These programs are designed to protect your system, but they may mistakenly block Valorant from accessing the internet. To address this issue, try these steps:
- Temporarily disable your firewall or antivirus software. Remember to re-enable it once you’ve resolved the issue.
- Add Valorant and its launcher to your firewall’s list of trusted applications.
- Ensure that your antivirus software is not mistakenly flagging Valorant as malicious. If it is, you may need to whitelist the game in your antivirus settings.
Tip 3: Outdated Graphics Drivers
Your computer’s graphics drivers play a crucial role in delivering optimal performance while playing Valorant. Outdated drivers can lead to issues like Error Code VAL 59. Here’s how to update your graphics drivers:
- Identify your graphics card model and manufacturer (NVIDIA, AMD, or Intel).
- Visit the official website of your graphics card manufacturer and search for the latest driver updates compatible with your system.
- Download and install the updated driver, then restart your computer for the changes to take effect.
Tip 4: Corrupted Game Files
Corrupted or missing game files can also trigger Valorant Error Code VAL 59. To fix this issue, you can try verifying the integrity of your game files through the game launcher:
- Open the Valorant launcher and navigate to the settings menu.
- Locate the “Repair” or “Verify” option and click on it.
- The launcher will automatically scan your game files and repair or replace any corrupted or missing files.
Tip 5: Administrative Privileges
Sometimes, Valorant Error Code VAL 59 can occur if the game does not have the necessary administrative privileges to run smoothly. Granting administrative access can resolve this problem:
- Locate the Valorant game icon on your desktop or in your game folder.
- Right-click on the icon and select “Run as administrator.”
- If prompted, click “Yes” to allow the game to run with administrative privileges.
Tip 6: Set VGC Service to Automatic
Valorant, like many online games, relies on various background services to run smoothly and provide a seamless gaming experience. One such service is the Vanguard Anti-Cheat System, or VGC, which is responsible for ensuring fair gameplay and preventing cheating. Sometimes, Valorant Error Code VAL 59 might occur if the VGC service is not set to run automatically. In this tip, we will explain how to set the VGC service to automatic, allowing you to enjoy uninterrupted gameplay in Valorant.
Step 1: Access Windows Services
The first step in setting the VGC service to automatic is to access the Windows Services application. Follow these instructions:
- Press the Windows key + R on your keyboard to open the Run dialog box.
- Type “services.msc” (without quotes) into the Run dialog box and press Enter.
- The Windows Services application will open, displaying a list of various system services.
Step 2: Locate and Modify the VGC Service
Now that you have the Windows Services application open, you need to locate the VGC service and modify its settings:
- Scroll through the list of services until you find “VGC” or “vgc” (the name may vary slightly depending on your system). This is the Vanguard Anti-Cheat service.
- Right-click on the VGC service and select “Properties” from the context menu.
- In the Properties window, locate the “Startup type” dropdown menu. Click on it and change the setting to “Automatic.”
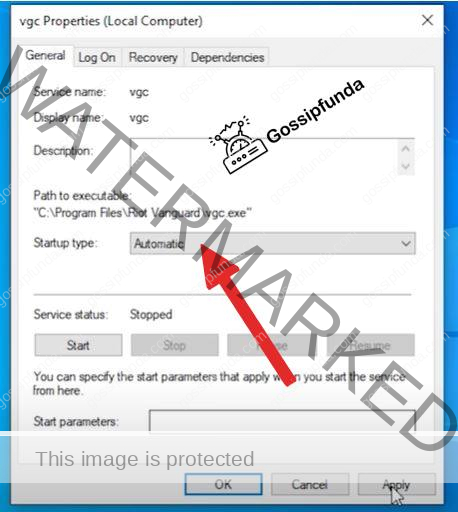
- If the VGC service is not currently running, click the “Start” button to manually start it. If it is already running, you may skip this step.
- Click “Apply” and then “OK” to save your changes and close the Properties window.
Step 3: Restart Your Computer and Launch Valorant
After setting the VGC service to automatic, restart your computer to ensure the changes take effect:
- Close any open applications and save your work.
- Restart your computer using the Start menu or by pressing Ctrl + Alt + Delete and selecting “Restart.”
- Once your computer has rebooted, launch Valorant and check if the Error Code VAL 59 is resolved.
Tip 7: Reinstall the Riot Vanguard
Riot Vanguard is the anti-cheat system used in Valorant to ensure fair gameplay and prevent cheating. Sometimes, issues with Vanguard can cause various problems, such as error codes or crashes, affecting your gaming experience. In these cases, reinstalling Riot Vanguard can help resolve these issues and allow you to get back to enjoying Valorant. In this tip, we will walk you through the process of reinstalling Riot Vanguard step by step.
Step 1: Uninstall Riot Vanguard
Before reinstalling Riot Vanguard, you must first uninstall the current installation. Follow these steps:
- Close Valorant if it’s running.
- Press the Windows key + R on your keyboard to open the Run dialog box.
- Type “appwiz.cpl” (without quotes) into the Run dialog box and press Enter. This will open the “Programs and Features” window.
- Locate “Riot Vanguard” in the list of installed programs. Click on it to select it, then click “Uninstall.”
- Follow the on-screen prompts to complete the uninstallation process.
- Restart your computer to ensure all Vanguard components are removed.
Step 2: Reinstall Riot Vanguard
Now that you’ve uninstalled Riot Vanguard, it’s time to reinstall it. Here’s how:
- Launch the Valorant game client. The client should automatically detect that Riot Vanguard is missing and prompt you to install it.
- Follow the on-screen prompts to download and install Riot Vanguard. You may need to grant the installer administrative privileges to proceed.
- Once the installation is complete, restart your computer to ensure the new Vanguard installation takes effect.
Step 3: Verify the Installation and Launch Valorant
After reinstalling Riot Vanguard and restarting your computer, you should verify that the installation was successful:
- Press the Windows key + R on your keyboard to open the Run dialog box.
- Type “services.msc” (without quotes) into the Run dialog box and press Enter. This will open the Windows Services application.
- Scroll through the list of services to locate “VGC” or “vgc” (the name may vary slightly depending on your system). This is the Vanguard Anti-Cheat service.
- Ensure that the VGC service is running. If it’s not, right-click on the VGC service, and select “Start” from the context menu.
- Launch Valorant and check if the issues you were experiencing have been resolved.
Awill Guru is a technology enthusiast with degrees in VLSI Engineering (B.Tech, M.Tech) and Android Development. Their passion for education drives them to teach and share knowledge through their blog. He also hold qualifications in Sociology (M.A.) and Education (B.Ed), along with NIELIT O and A Level certifications.


