Ever found yourself lost in the forest of online ads, just when all you wanted was a clean, crisp printout of that insightful article? We’ve all been there. Ads play a crucial role in keeping content on the web free, but when it comes to putting ink on paper, we often wish for a clutter-free version. So, if you’re yearning for a seamless way to transform that web page into a neat, ad-free physical copy, you’re in the right place! Let’s dive into the art of printing articles without those pesky ads.
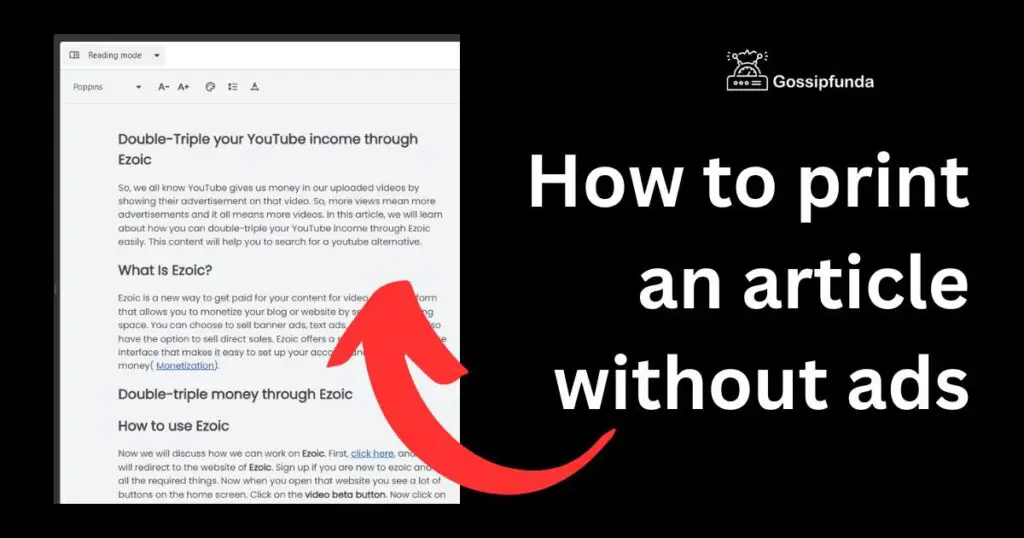
Use Reader Mode
Getting the pure essence of an article without distractions like ads is easy if you utilize the “Reading Mode” in most modern browsers. This feature isn’t just for a clutter-free reading experience; it’s also a great tool for printing! Once activated, you’re presented with a version focusing on the main text and crucial images. Ready to get started? Here’s your step-by-step guide:
How to activate Reader Mode?
How to Enable Reader Mode on Google Chrome:
- Open Google Chrome on your computer.
- In the address bar, type
chrome://flags/and press Enter. - In the search box at the top, type “Enable Reader Mode”.
- You’ll see the “Enable Reader Mode” option appear in the list. Click the drop-down menu next to it and select “Enabled.”
- A prompt will appear at the bottom of your screen asking you to “Relaunch” the browser. Click on “Relaunch” to restart Chrome with the new setting enabled.
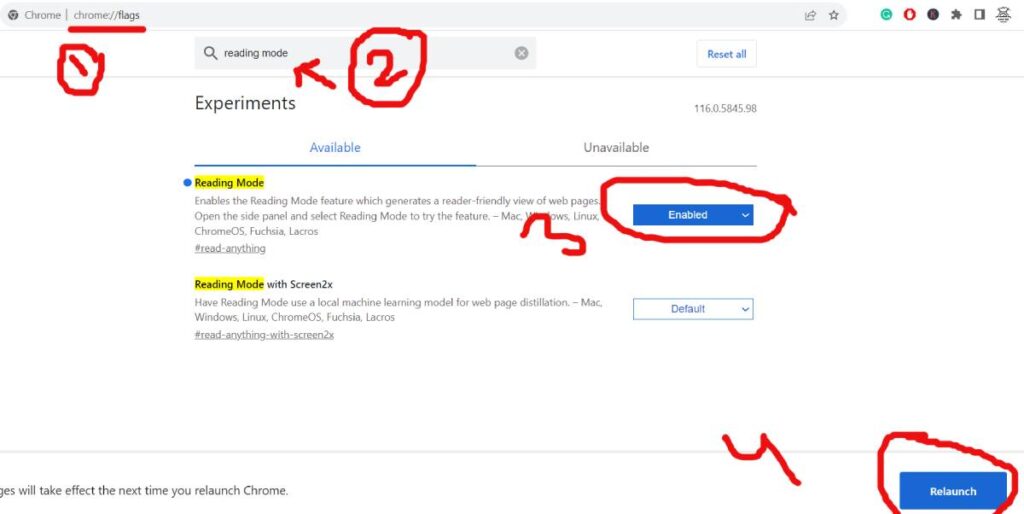
- After relaunching, when you’re on an article or a content-rich page, click on the three vertical dots (menu icon) in the upper right corner.
- From the dropdown menu, select “Distill Page” to activate Reader Mode for that page.
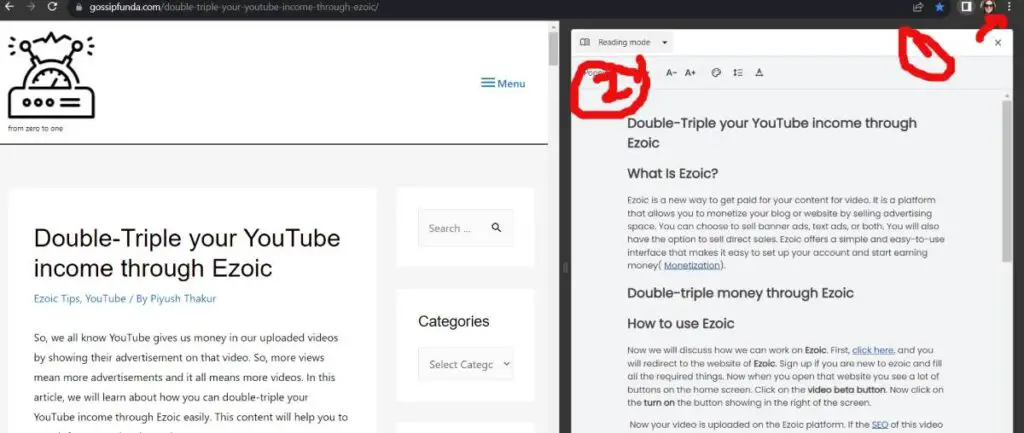
Now, Google Chrome will display the content in Reader Mode, eliminating most ads and distractions.
How to Enable Reader Mode on Mozilla Firefox:
- Open Mozilla Firefox on your computer.
- Navigate to the article or webpage you wish to view in Reader Mode.
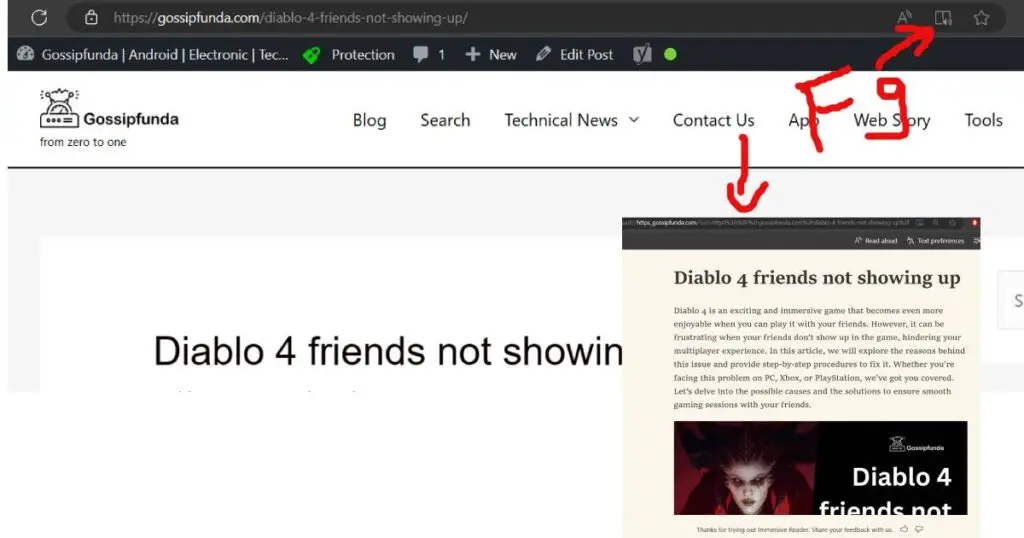
- Look for an icon resembling a page (often described as an “article” icon) in the address bar.
- Click on this “Toggle Reader View” icon.
- The webpage will now be displayed in Reader Mode, with a clutter-free appearance focusing on the main content.
(Note: You can also activate Reader Mode by pressing the F9 key on your keyboard.)
Don’t miss: Can’t take screenshot due to security policy
Enabling Reader Mode on Microsoft Edge:
- Open Microsoft Edge browser.
- Navigate to the article or webpage you want to read.
- Look for the “Reading View” icon in the address bar. It resembles a book.
- Click on the “Reading View” icon.
- The page will refresh, presenting the content in Reader Mode.
How to Enable Reader Mode on Apple Safari:
- Open Apple Safari on your device.
- Navigate to the web article you wish to view in Reader Mode.
- Locate the “Reader” icon on the left side of the address bar. It looks like a few horizontal lines of text.
- Click on the “Reader” icon.
- The page will instantly transform, showing only the main content of the article without any additional distractions.
That’s it! Your article is now in Reader Mode, providing a clean and streamlined reading experience.
Final Step: Once “Reading Mode” is activated, access the browser’s menu, select “Print” as usual, and you’ll see a minimalistic version in the print preview window. This is what you’ll get on paper—a neat, clutter-free article.
Remember, the “Reading Mode” icon might be missing or inactive for web pages that aren’t articles. That’s because the browser identifies and simplifies article content specifically.
Using an Ad Blocker to Print an Article Without Ads
Ad blockers are software solutions designed to prevent advertisements from displaying on websites. Beyond providing an uncluttered browsing experience, ad blockers can also make printing web pages easier by eliminating ads. Here’s a simple guide on how to use an ad blocker for a cleaner print:
1. Choose an Ad Blocker
There are several ad blockers available, each with its own set of features. Some of the most popular include:
- AdBlock: A widely-used ad blocker compatible with various browsers.
- AdBlock Plus: Another popular option that offers additional privacy features.
- uBlock Origin: Known for its efficiency and lower resource consumption.
2. Installation Process
For this guide, let’s use AdBlock as an example:
On Google Chrome:
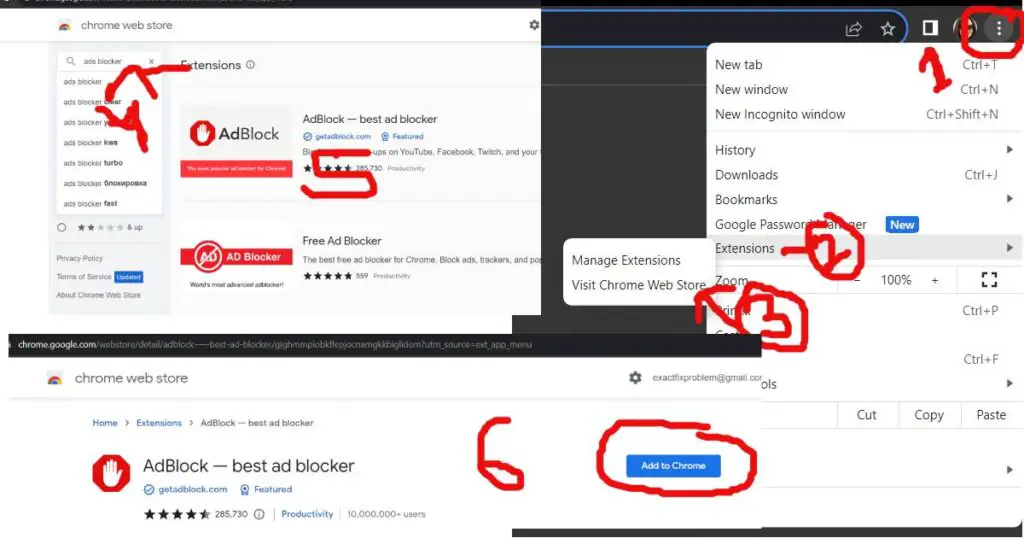
- Open Google Chrome and go to the Chrome Web Store.
- In the search bar, type “AdBlock” and hit Enter.
- From the results, click on “AdBlock — best ad blocker.”
- Click on the “Add to Chrome” button.
- In the pop-up window, click “Add extension.”
On Mozilla Firefox:
- Open Firefox and go to the Firefox Add-ons site.
- Search for “AdBlock” in the search bar.
- Find “AdBlock for Firefox” from the results and click on it.
- Click the “Add to Firefox” button.
- Approve the permissions request by clicking “Add.”
3. Configure Ad Blocker
After installing the ad blocker, you might want to tweak some settings:
- Click on the ad blocker icon in your browser’s toolbar.
- Go to “Options” or “Settings.”
- Customize the settings based on your preference. Most ad blockers allow you to whitelist specific websites, block additional elements, and more.
4. Printing Without Ads
- With your ad blocker active, navigate to the article you want to print.
- The ads should be blocked, presenting a cleaner version of the page.
- Proceed to print the article as you usually would.
Note: Remember that advertisements are the primary revenue source for many websites. If you frequently visit and appreciate content from a specific site, consider whitelisting it or supporting the content creators in other ways.
Manual Removal of Ads
While online tools and ad blockers can be nifty for ad-free prints, there might be times when the old-fashioned manual route is the way to go. Manually removing ads can offer more precision, ensuring that only the content you want gets onto paper. Here’s how to do it:
1. Browser’s Print Preview:
Most browsers offer a print preview option that lets you choose which parts of a page to print:
- Navigate to the article you want to print.
- Press
Ctrl + P(Windows/Linux) orCmd + P(Mac) to open the print dialogue. - In the preview pane, deselect any pages that contain just ads or irrelevant information.
2. Use Developer Tools:
The browser’s developer tools can be a powerful ally in removing unwanted page elements, like ads, before printing:
- Right-click on the ad or unwanted section of the web page.
- Select “Inspect” or “Inspect Element” from the dropdown menu.
- This will open the browser’s developer tools and highlight the code for the selected element.
- Right-click on the highlighted code within the developer tools pane.
- Select “Delete” or “Delete Element.”
- The ad or unwanted section should now be removed from the page.
- Proceed with printing the page as usual.
3. Copy, Paste, and Edit in a Word Processor:
If all else fails, or if you want more control, this tried-and-true method always works:
- Highlight the portion of the article you want to print.
- Copy the selected content (Press
Ctrl + Con Windows/Linux orCmd + Con Mac). - Open a Word processor, like Microsoft Word or Google Docs.
- Paste the content (Press
Ctrl + Von Windows/Linux orCmd + Von Mac). - Manually remove any remaining ads or unwanted sections within the word processor.
- Format the content as desired and then print.
Points to Remember:
- Always respect copyright rules when manually manipulating content.
- Some websites may employ measures to prevent copying content, so always ensure you’re not violating terms of service.
Manually removing ads may sound tedious, but it offers the advantage of customizing the content exactly to your preference, ensuring that your printout is perfect for your needs.
Conclusion
In today’s digital era, while advertisements serve as the lifeblood for many content creators, they can sometimes disrupt our quest for a seamless reading or printing experience. Whether you’re adopting automated tools or going the manual route, removing ads can offer a clearer, more focused glimpse into the heart of an article. Remember, though, while it’s great to have a neat printout, supporting content creators is also paramount. If you frequently enjoy content from specific sources, consider ways to back them, ensuring the digital landscape remains rich and informative. Here’s to clutter-free, insightful reading — on screens or paper!
Rahul Kumar is a highly skilled and experienced technology professional with expertise in search engine optimization (SEO), website development on WordPress, and content writing. With over 5 years of experience in the industry, Rahul has helped numerous businesses to achieve their online marketing goals through effective SEO strategies and high-quality website development.
As an SEO expert, Rahul has a deep understanding of the algorithms used by search engines to rank websites. He is skilled in using a variety of techniques to optimize websites for search engines, including keyword research, on-page optimization, link building, and content creation. He has a track record of achieving significant increases in search engine rankings and organic traffic for his clients.
Rahul is also highly skilled in website development on WordPress, one of the most popular content management systems (CMS) used by businesses worldwide. He has expertise in designing and developing custom WordPress websites that are responsive, user-friendly, and optimized for search engines.
In addition to his SEO and website development skills, Rahul is a talented content writer. He has written high-quality content for websites, blogs, and social media platforms in a variety of industries, including healthcare, technology, and education.
Overall, Rahul is a highly talented and motivated technology professional with a wealth of experience and expertise in SEO, website development, and content writing. He is dedicated to helping businesses achieve their online marketing goals and is committed to staying up-to-date with the latest trends and developments in the industry.


