Error codes can be frustrating, especially when they interrupt your daily tasks or impede your system’s performance. One such error that has left many Windows users scratching their heads is Error Code 0x8007025d. This cryptic combination of numbers and letters often appears during activities like installing or upgrading the operating system. If you’ve encountered this error, you’re not alone, and there’s no need to panic. In this comprehensive guide, we’ll delve into the reasons behind Error Code 0x8007025d and provide you with detailed step-by-step instructions to fix it, ensuring a smooth computing experience.
Understanding Error Code 0x8007025d
Before diving into the solutions, it’s crucial to understand what Error Code 0x8007025d represents. This error code is primarily associated with issues during data transfer or storage, often occurring during Windows installation, backup processes, or when copying files. It signifies that there’s a problem with your computer’s storage medium, such as your hard drive, SSD, or even external storage devices.

Common Causes of Error Code 0x8007025d
Several factors can trigger Error Code 0x8007025d. Understanding these causes can help you pinpoint the root of the problem more effectively. Some common culprits include:
- Corrupted Installation Media: If the Windows installation media (USB or DVD) you’re using is corrupted or damaged, it can lead to this error.
- Faulty Hardware: Issues with your computer’s hardware components, particularly the storage drive, can trigger Error Code 0x8007025d.
- Incompatible Hardware: Mismatched or incompatible hardware can cause conflicts during installation or data transfer, resulting in this error.
- Malware or Virus Infections: Malicious software can disrupt normal processes, including data transfer and installation, leading to error codes like 0x8007025d.
- Driver Problems: Outdated or incompatible device drivers can also contribute to this error.
Now that we’ve identified the potential causes, let’s move on to the solutions.
How to fix error code 0x8007025d?
Fixing Error Code 0x8007025d requires a systematic approach. Here’s a step-by-step guide to resolving this issue:
Fix 1: Verify the Integrity of Installation Media
If you’ve encountered Error Code 0x8007025d during a Windows installation or upgrade, the first step is to ensure that your installation media is in perfect condition. This fix addresses the possibility of a corrupted or damaged installation source causing the error. Follow these detailed steps to verify the integrity of your installation media:
- Gather Your Installation Media (USB/DVD): Locate the USB drive or DVD containing your Windows installation files. Ensure it’s not physically damaged, scratched, or bent.
- Backup Important Data: Before proceeding, back up any crucial data on the installation media if necessary, as the verification process may require formatting the media.
- Use the Windows Media Creation Tool (Optional): If you suspect your current installation media is corrupted, it’s advisable to create a new one using the official Windows Media Creation Tool. This tool ensures a fresh and error-free installation source.
- Insert or Connect Installation Media: Insert the USB drive or insert the DVD into the appropriate drive on your computer.
- Boot from Installation Media (Restart Your PC): Restart your computer. During the boot process, you may need to press a specific key (e.g., F2, F12, Del) to access the boot menu or BIOS settings. Select the installation media as the boot device.
- Windows Setup Screen: Once the installation media boots, you’ll see the Windows Setup screen. Choose your language, time, currency, and keyboard preferences.
- Click “Install Now”: Click the “Install Now” button to begin the installation process.
- Enter Product Key (if required): If prompted, enter your Windows product key. Ensure it’s correct and valid.
- Accept License Terms: Carefully read and accept the Microsoft Software License Terms.
- Choose Installation Type: Select the installation type you prefer. For most users, “Custom: Install Windows only (advanced)” is the appropriate choice.
- Select Installation Partition: You’ll see a list of available partitions. Choose the partition where you want to install Windows. If you’re unsure, select the one with the most available space.
- Begin Installation: Click “Next” to start the installation process. Windows will copy files and install necessary features.
- Restart Your Computer: After the files are copied, your computer will restart automatically. Ensure that you don’t remove the installation media during this phase.
- Follow On-Screen Instructions: Follow the on-screen prompts to complete the installation, including setting up your user account and preferences.
- Remove Installation Media: Once the installation is complete, and Windows boots from the newly installed system, safely remove the installation media (e.g., eject the DVD or remove the USB drive).
Don’t miss: Nue Glider Not Showing Up: Causes and Solutions
Fix 2: Scan for Malware and Virus Infections
Malware and virus infections can wreak havoc on your system’s functionality, leading to various errors, including Error Code 0x8007025d. Running a comprehensive malware and virus scan can help identify and eliminate these threats. Follow these detailed steps to scan for malware and viruses:
- Update Your Antivirus Software: Begin by ensuring your antivirus software is up-to-date. Launch your antivirus application and check for updates. If you don’t have antivirus software installed, consider downloading a reputable one.
- Initiate a Full System Scan: Run a full system scan using your antivirus software. This scan will thoroughly examine all files, directories, and processes on your computer for potential malware or viruses. It may take some time to complete.
- Quarantine or Remove Detected Threats: If the scan detects any threats, your antivirus software will provide you with options to quarantine or remove them. Follow the prompts to take the necessary actions. Quarantining allows you to isolate the threat without permanently deleting it, which can be useful for further analysis.
- Repeat the Scan (if necessary): After quarantining or removing detected threats, it’s a good practice to run another scan to ensure your system is clean. Sometimes, malware can hide in multiple locations and may require multiple scans to completely eradicate.
- Review Scan Logs (Optional): If you’re curious about the details of the scan, check the scan logs provided by your antivirus software. This can help you understand which files or processes were affected.
- Regularly Update and Schedule Scans: To prevent future infections, enable automatic updates for your antivirus software and schedule regular system scans. This proactive approach can help keep your system secure and error-free.
- Consider a Second Opinion Scan: If your primary antivirus scan doesn’t detect any threats but you’re still experiencing Error Code 0x8007025d, consider using a reputable secondary malware scanner to cross-verify. Different scanners may identify different threats.
- Practice Safe Browsing and Downloading: Going forward, practice safe browsing habits and exercise caution when downloading files or clicking on links. Avoid suspicious websites and only download files from trusted sources.
Fix 3: Update Device Drivers
Outdated or incompatible device drivers can lead to a variety of system errors, including Error Code 0x8007025d. Ensuring that your drivers are up-to-date and compatible with your system is crucial. Follow these detailed steps to update your device drivers:
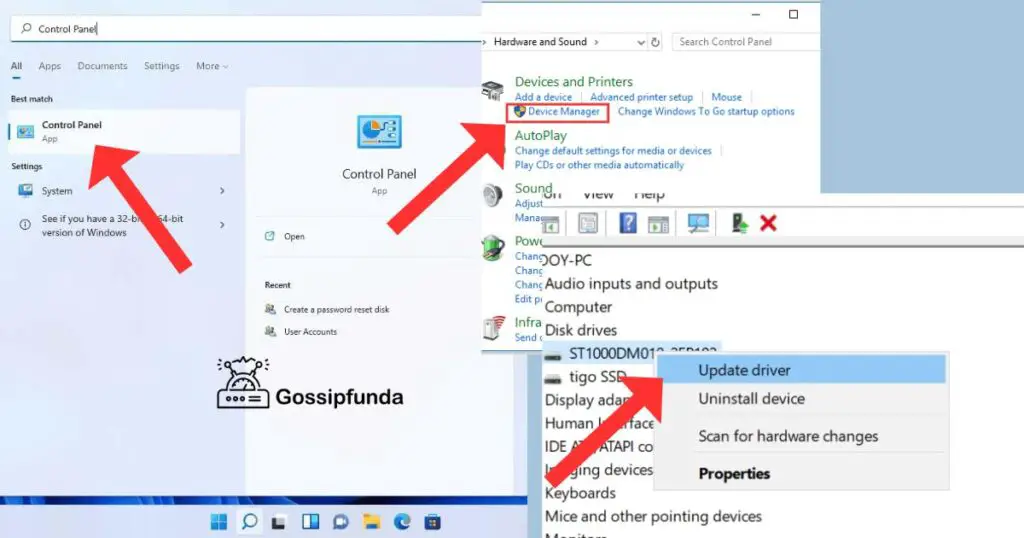
- Identify Problematic Drivers: Before updating drivers, it’s essential to identify which drivers may be causing the error. Look for any devices in Device Manager (accessible by right-clicking the Start button and selecting “Device Manager”) with a yellow triangle icon, indicating an issue.
- Visit Manufacturer Websites: Go to the official websites of your computer’s hardware manufacturers (e.g., motherboard, graphics card, storage drive) to obtain the latest driver updates. Be sure to download drivers specifically designed for your Windows version (e.g., Windows 10, Windows 11).
- Access Device Manager: Open Device Manager again and right-click on the problematic device(s). Select “Update driver” from the context menu.
- Search Automatically for Updated Driver Software: Choose the option to search automatically for updated driver software. Windows will search your computer and the internet for the latest drivers.
- Install Updated Drivers: If Windows finds updated drivers, it will prompt you to install them. Follow the on-screen instructions to complete the installation. Be patient as this process may take some time.
- Repeat for All Problematic Devices: If you identified multiple devices with driver issues, repeat steps 3 to 5 for each of them. Ensure that all essential drivers, including graphics, network, and storage drivers, are updated.
- Restart Your Computer: After updating all necessary drivers, restart your computer to apply the changes.
- Verify Device Manager: After the restart, open Device Manager again and ensure that there are no more yellow triangle icons indicating driver problems.
- Check for Windows Updates: In some cases, Windows updates can include driver updates. Make sure your operating system is up-to-date by checking for and installing any available Windows updates.
- Driver Update Tools (Optional): If manually updating drivers seems challenging, you can use third-party driver update tools that automate the process. However, be cautious and only use reputable tools to avoid potential security risks.
Fix 4: Check Hardware Health
If you’ve followed the previous fixes and Error Code 0x8007025d still persists, it’s time to investigate the health of your computer’s hardware components, particularly the storage drive where Windows is installed. Here’s how to do it step by step:
- Back Up Your Data: Before conducting any hardware tests, it’s crucial to back up your important data. Use an external storage device or cloud backup service to ensure your files are safe.
- Open Command Prompt as Administrator: Right-click on the Start button and select “Windows Terminal (Admin)” or “Command Prompt (Admin)” to open Command Prompt with administrative privileges.
- Run Disk Check (Chkdsk): In the Command Prompt window, type the following command and press Enter:
bashCopy code
chkdsk C: /f
Replace “C:” with the drive letter where Windows is installed if it’s different. The “/f” switch indicates that Chkdsk should fix any found errors.
- Schedule Disk Check at Next Restart: If prompted to schedule a disk check at the next restart, type “Y” and press Enter. Close all open applications and restart your computer.
- Allow Chkdsk to Complete: During the boot process, Chkdsk will scan and repair any disk errors. This process may take some time, so be patient and let it finish.
- Check for Bad Sectors: After Chkdsk completes, it’s a good idea to check for bad sectors on your storage drive. In Command Prompt, type the following command and press Enter:
bashCopy code
chkdsk C: /r
Again, replace “C:” with the appropriate drive letter if necessary. The “/r” switch locates and repairs bad sectors.
- Monitor S.M.A.R.T. Data (Optional): Some drives provide S.M.A.R.T. (Self-Monitoring, Analysis, and Reporting Technology) data that can indicate potential issues. You can use third-party tools to view this data, but it’s usually accessible through your computer’s BIOS/UEFI settings or manufacturer-specific software.
- Consider a Drive Diagnostic Tool (Manufacturer-Specific): Many drive manufacturers offer diagnostic tools specific to their products. These tools can perform in-depth tests and provide detailed information about your drive’s health.
- Replace or Repair Faulty Hardware: If Chkdsk or other tests reveal significant hardware issues or bad sectors that can’t be repaired, it may be necessary to replace or repair the affected hardware component. Consult a professional if you’re unsure about this step.
- Restore Data from Backup: If you had to replace the storage drive, restore your data from the backup you created earlier.
Fix 5: Disable Overclocking (If Applicable)
Overclocking your computer’s components, such as the CPU or RAM, can lead to system instability and errors like Error Code 0x8007025d. If you have overclocked your system, consider reverting to default settings to see if it resolves the issue. Follow these detailed steps to disable overclocking:
- Access BIOS/UEFI Settings: Restart your computer and access the BIOS/UEFI settings. The key to enter these settings varies depending on your motherboard manufacturer (common keys include F2, Del, F12, or Esc). Refer to your motherboard’s manual or look for an on-screen prompt during boot.
- Locate Overclocking Options: Within the BIOS/UEFI settings, look for options related to overclocking. These may be labeled as “CPU Clock Ratio,” “CPU Frequency,” or similar. Different motherboards may have varying terminology.
- Reset to Default Settings: To disable overclocking, navigate to the overclocking options and reset them to their default values. This often involves setting the CPU clock ratio, base clock, and voltage settings to their original settings.
- Save Changes and Exit: After resetting the overclocking options, save the changes and exit the BIOS/UEFI settings. This action is typically performed by pressing a key like F10 or following on-screen instructions.
- Reboot Your Computer: Your computer will restart with the overclocking settings reverted to default. Check if Error Code 0x8007025d still occurs during any system operations.
- Monitor for Stability: After disabling overclocking, monitor your system’s stability over a period of time. Ensure that the error no longer appears during routine tasks, such as software installations or file transfers.
- Consider Adjusting Overclocking Settings (Optional): If you want to continue overclocking your system, do so cautiously and gradually. Incrementally increase clock speeds or other settings, testing for stability after each adjustment. This approach helps you identify the overclocking settings that trigger errors like Error Code 0x8007025d.
Fix 6: Perform a Clean Windows Installation
If you’ve exhausted all the previous fixes and Error Code 0x8007025d stubbornly persists, it may be time for a clean Windows installation. This step should be considered a last resort, as it involves reinstalling your operating system from scratch. Ensure you have backups of your important data before proceeding. Follow these detailed steps to perform a clean Windows installation:
- Back Up Your Data: Prior to reinstalling Windows, back up all your essential files to an external drive, cloud storage, or another secure location. A clean installation will erase everything on your current system drive.
- Obtain Windows Installation Media: You’ll need a bootable Windows installation USB drive or DVD. If you don’t have one, create it using the official Windows Media Creation Tool or obtain it from another trusted source.
- Insert or Connect Installation Media: Insert the installation USB drive or DVD into the appropriate port on your computer.
- Boot from Installation Media: Restart your computer. During the boot process, access the BIOS/UEFI settings by pressing the appropriate key (e.g., F2, F12, Del). Set the installation media as the primary boot device.
- Windows Setup Screen: Once the installation media boots, you’ll see the Windows Setup screen. Select your language, time, currency, and keyboard preferences.
- Click “Install Now”: Click the “Install Now” button to begin the Windows installation process.
- Enter Product Key (if required): If prompted, enter your Windows product key. Ensure it’s correct and valid.
- Accept License Terms: Carefully read and accept the Microsoft Software License Terms.
- Choose Installation Type: Select the installation type you prefer. For a clean installation, choose “Custom: Install Windows only (advanced).”
- Select Installation Partition: You’ll see a list of available partitions. Choose the partition where you want to install Windows. If you want to wipe the entire drive and start fresh, select the drive, click “Delete,” and then click “New” to create a new partition.
- Begin Installation: Click “Next” to start the installation process. Windows will copy files and install necessary features.
- Complete Installation: Follow the on-screen instructions to complete the installation, including setting up your user account and preferences.
- Install Drivers and Software: After Windows is installed, you’ll need to reinstall device drivers and any software you use. Use the backups you created earlier to restore your data.
- Activate Windows: Activate Windows using your product key, if required.
Fix 7: Check for BIOS/UEFI Updates
Outdated or incompatible BIOS/UEFI firmware can sometimes lead to compatibility issues and result in Error Code 0x8007025d during system operations. To address this, you can check for and update your motherboard’s BIOS/UEFI firmware. Follow these detailed steps:
- Identify Your Motherboard Model: To update your BIOS/UEFI firmware, you need to know your motherboard’s model and manufacturer. This information is typically found on the motherboard itself or in your computer’s documentation.
- Access BIOS/UEFI Settings: Restart your computer and access the BIOS/UEFI settings. The key to enter these settings varies (common keys include F2, F12, Del). Refer to your motherboard’s manual or look for an on-screen prompt during boot.
- Note Current BIOS/UEFI Version: Inside the BIOS/UEFI settings, find and note the current version of your firmware. This information will help you determine whether an update is available and necessary.
- Visit the Manufacturer’s Website: Go to the official website of your motherboard’s manufacturer (e.g., ASUS, MSI, Gigabyte). Look for a support or downloads section.
- Search for BIOS/UEFI Updates: Use the motherboard model number to locate the latest BIOS/UEFI updates for your specific motherboard on the manufacturer’s website. Ensure that the update is compatible with your current Windows version.
- Download the Update: Download the latest BIOS/UEFI update file to your computer. It’s often in the form of a .zip or .exe file.
- Read the Documentation: Review any documentation or release notes provided with the update to understand what changes or improvements it offers.
- Create a Backup: Before proceeding with the update, it’s crucial to create a backup of your current BIOS/UEFI settings. Most BIOS/UEFI interfaces provide an option to save settings to a USB drive or storage device.
- Install the Update: Follow the manufacturer’s instructions to install the BIOS/UEFI update. This typically involves running an executable file from within your existing operating system.
- Restart Your Computer: After the update is installed, your computer will automatically restart. During the restart process, the BIOS/UEFI firmware will be updated.
- Verify the Update: Upon booting back into your operating system, access the BIOS/UEFI settings again and confirm that the firmware version has been successfully updated.
Fix 8: Seek Professional Assistance
If you’ve attempted all the previous fixes, including clean installation, and Error Code 0x8007025d still persists, it’s time to seek professional assistance. This error can sometimes be indicative of deeper hardware issues or complex system conflicts that require specialized knowledge and tools to diagnose and resolve. Here are the steps to consider when seeking professional help:
- Research and Find a Reliable Technician: Look for a reputable computer technician or a service center that specializes in diagnosing and repairing hardware and software issues. Check online reviews and ask for recommendations from friends or family if needed.
- Prepare a Detailed Description: Before contacting a professional, prepare a detailed description of the problem, including when it started, the actions you’ve taken to resolve it, and any error messages or codes you’ve encountered. This information will help the technician diagnose the issue more efficiently.
- Backup Your Data: Ensure that you have a complete backup of your important data, as the technician may need to perform extensive diagnostic tests or repairs that could result in data loss.
- Consult with the Technician: Schedule an appointment or visit the service center. Explain the issue to the technician, providing them with the description and any error codes. Allow the technician to perform a comprehensive assessment of your computer.
- Follow Technician Recommendations: Based on their assessment, the technician will provide recommendations for repairs or replacements. Discuss the options with them and make an informed decision about how to proceed.
- Stay Informed: Throughout the repair process, stay informed about the progress and any potential costs involved. Ask questions if you have concerns or need clarification.
- Keep Documentation: Keep all documentation related to the repairs, including receipts, service reports, and any warranties or guarantees provided.
- Prevent Future Issues: After your computer is repaired, consider implementing preventive measures, such as regular system maintenance, backups, and software updates, to avoid encountering similar problems in the future.
Conclusion
Error Code 0x8007025d can be a vexing problem, but armed with the knowledge of its common causes and the step-by-step solutions provided in this guide, you can tackle it with confidence. Remember to start with the basics, such as checking your installation media and scanning for malware, and progressively move to more advanced troubleshooting steps if necessary. By following these procedures, you can resolve Error Code 0x8007025d and enjoy a stable and error-free computing experience. Don’t let technical glitches stand in your way – take control of your system and get back to work or play without interruption.
FAQs
Error Code 0x8007025d is a common Windows issue that often occurs during system upgrades or installations.
You can fix it by verifying installation media, scanning for malware, updating drivers, and more.
Prachi Mishra is a talented Digital Marketer and Technical Content Writer with a passion for creating impactful content and optimizing it for online platforms. With a strong background in marketing and a deep understanding of SEO and digital marketing strategies, Prachi has helped several businesses increase their online visibility and drive more traffic to their websites.
As a technical content writer, Prachi has extensive experience in creating engaging and informative content for a range of industries, including technology, finance, healthcare, and more. Her ability to simplify complex concepts and present them in a clear and concise manner has made her a valuable asset to her clients.
Prachi is a self-motivated and goal-oriented professional who is committed to delivering high-quality work that exceeds her clients’ expectations. She has a keen eye for detail and is always willing to go the extra mile to ensure that her work is accurate, informative, and engaging.


