Android releases system updates when new features are added and any bugs are resolved. It is necessary to update all these for a better and simple experience. It is easy to install or update the software, but there are chances that while updating or installing you may get errors like ‘couldn’t install Android system, update verification problem’ or updating process is failed. You have to update the device to enjoy all its features and experience its usability. So it is necessary to install or update the latest version of apps or software.
You have to resolve the issues you came across while updating. There are certain methods to follow to find out the reasons for the issue and resolve it. In this article, you will get to know the reasons for this problem and different ways to resolve them. It will be difficult to install the system update if you can’t find the reasons. So let us see the reasons first.
Reasons for the system update failed error.
- Device is not compatible.
- Shortage of storage.
- Poor internet connection.
- No supporting previous versions.
- Google Play store error in updating.
Reason 1: The device is not compatible
The Android device you have may not be compatible with the latest version released. It is found that if you are using older versions of an Android device then it affects the working flow. In some cases, even if it is installed, it won’t be able to provide the features that are deployed in the latest version. So it is recommended to check the basic requisites or necessary features that your device must have to install the latest version.
Reason 2: Shortage of storage
The target device you want to install in the latest version must have enough space to install it. The devices with no space or the least space compared to the space required to install will throw you errors by popping messages. Sometimes it will show the exact reason like storage is full or Shortage of storage, in some cases it pops the message ‘couldn’t install Android system update verification problem’. If this is the case add external storage to install it.
Reason 3: Poor internet connection
This could be the common reason for most of the issues related to installing apps or the latest versions of software. Check for data in your device, and its network while installing the software. If you are finding issues using your mobile data try using wifi, and check its installation. There might be errors in device network connections also.
Reason 4: No supporting previous version
The version that is available on your device right now, is not supporting the latest version. This occurs only if you have missed the previous version installation. Because the latest version published will have some necessary accessibilities and features related to its previous versions.
Reason 5. Google Play store error in updating
When you use the play store for installing more applications, there is a possibility that it had cached files which will restrict some of the installation processes regarding the latest versions and software. If you think other reasons mentioned above may not be the issue for your problem, then this might be the one.
Now you got to know the causes of this issue, after finding the reason you can resolve it and try to update it. To resolve this we will provide some preliminary methods to resolve this problem. Try these solutions out.
Ways to fix the ‘Update verification problem’
Way 1: Restart the phone
This could be the first and foremost method to try if we are facing any problem with the phone because it refreshes the setting and stops all running applications in the background on the phone. As it resolves most of the glitches we face while using the phone. By knowing this, with no further a do restart your phone. To restart long-press the right side button of the phone, will show options to Power off, Restart, etc. Click on Restart, it will take a few seconds or a minute to restart After this check whether your problem is resolved. If not follow the other ways below.
Way 2: Check the internet connection
Internet is while downloading or updating any application or software. Many times, poor internet connection may be the reason for the update fail error. On the update page, it will be mentioned to use Wi-Fi in order to download updates. If you use your mobile or cellular data it may have extra charges. Even if in the middle of the update it stops, you may have to do it again from start. So it is better to use your cellular or mobile data for downloading.
Way 3: Check phone compatibility
To install or update any versions of the software, the target device model must have to be compatible with the latest Operating system. If you get to know that a specific model is needed to update, check your phone’s model if it meets the requirements then start the process of updating, else don’t waste your data and energy to make it work.
Way 4: Free some space (storage)
For the updating process, you might have seen the minimum space required to update it. Make sure you have a little more than the mentioned space. It has the maximum chance that the update may fail in between for no storage or the least space. So whenever there is a need to update the device first check that the device has space to update successfully. If suppose the storage space is less then find out unnecessary apps, files, or duplicate files and delete them, it will provide some space. After this try to update.
Way 5: Clear data and cache of Google Play Store
The data and cache of the old version may be the most common reason which causes the issue, it may be the issue. So to fix it, try clearing the data and cache. Follow the steps to do so.
- Step 1: Click on Settings of the phone.
- Step 2: Look for Apps.
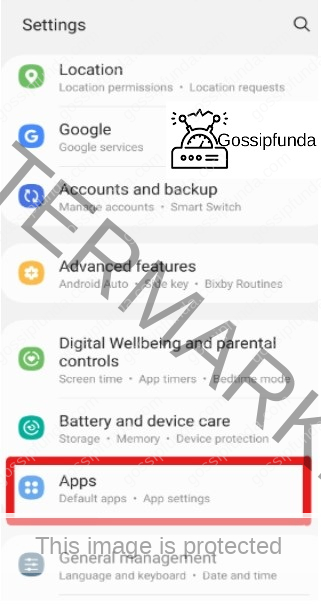
Click on Apps from the list
- Step 3: Find the Google Play Store and click on it.
- Step 4: Tap on the Storage option.
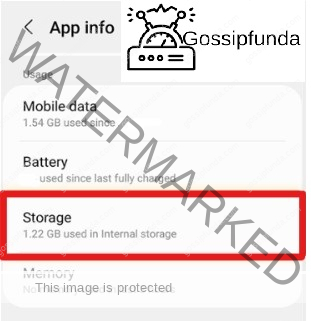
Open the Google play store on your phone.
- Step 5: Now click on clear data first it will take a few seconds.
- Step 6: Similarly, click on clear cache.
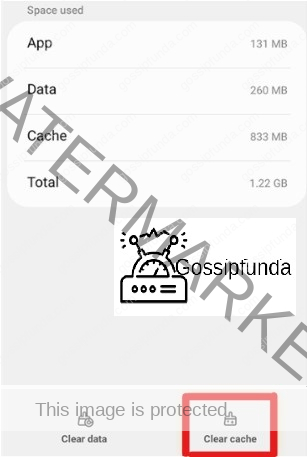
Clear data and cache
After this, check whether the updating process is working correctly or not.
Way 6: Update Google Play Store
If clearing the data and cache won’t help you to update the software or app then try to update the Google Play Store app. It automatically reloads the new files and updates settings to the default settings. Follow the below steps carefully.
- Step 1: Firstly, Open the Google Play Store app.
- Step 2: After that, click on the profile icon on the top right side.
- Step 3: Look for settings and click on it.
- Step 4: Click on About from the list.
- Step 5: Here it will show a few options like About Google Play, Open-source licenses, and Play Store version.
- Step 6: Below the Play Store version, click on Update Play Store.
This will update the Google Play Store, which allows you to fix the Android system update error and updates the system easily.
Way 7: The extra method explained below will be helpful for Samsung users
After following and trying the above methods, if it won’t work then it is recommended to clear the cache partition of your Samsung mobile. To do so follow the below instructions correctly.
Instruction 1: Switch off your Samsung Mobile.
To Switch off, long-press the right side button of the phone will show options to Power off, Restart, etc. Click on Power off. Switching off the mobile stops all the apps running in the background which provides main priority to one thread as an active process.
Instruction 2: Press and hold the Bixby button, Power button, and Volume button simultaneously.
This step is the important one to work this method so press all the above-mentioned buttons at a time. When you are able to see a screen with the recovery menu, then leave the buttons.
Instruction 3: Select Wipe Cache Partition using the Volume button.
You may wonder how to select this particular option, to do that use the volume button to step above and below options. Once you are on the Wipe Cache Partition option, don’t press it again and again, follow the next step.
Instruction 4: Finally, Confirm it.
After you will get Wipe Cache Partition option, to confirm press the power button. Lastly, it will automatically reboot the device which clears the partition cache.
This is one of the most used methods to fix the Android system update verification problem. But it will work for the Samsung mobiles which have the Bixby feature in it. If suppose you are not using Samsung mobile or it doesn’t have the Bixby feature follow the next method to fix the issue.
Way 8: Using Android Repair software
One of the effective solutions for all kinds of Android users is to solve Android system updates not installing issues and t is more efficient than other solutions.
What is Android Repair?
This is one of the best one-click Android Repair Tools, it makes the process easy to resolve the issue with just one click. Android Repair tool is a professional software to fix any kind of error on Android devices. This tool is designed to fix most errors and issues on Android phones. This is easy work for users to use in any situation.
Some of the most powerful features are listed below:
- Fixes the issue without any skills required.
- It has the most success rate for fixing Android issues.
- Resolves issues like the black screen of death.
- Supports most models of Android phones.
It resolves
- Stuck in a boot loop.
- Apps keep creasing.
- Black screen.
- Play store error.
- Android system UI not working.
- Android device gets bricked.
- Android OTA update failed or error.
- Android won’t turn on or turn off.
If you want to solve the issue without any task, simply download the Android Repair and fix the Android system update verification problem. It is designed in a way, that helps users to work with it, without any prior knowledge. Follow these above mentioned methods to fix the Android system update verification problem.
Conclusion
In this article, you got to know the reasons for the system update failed errors, we have suggested some of the best and most efficient solutions to fix the Android system update verification problem. The first-mentioned solutions are simple ones, for any user to work. If the error or the issue continues to happen try the Android Repair software tool which helps you to fix most of the errors on your Android phone.
FAQ
Firstly, download the Android Repair software, launch the tool and connect to your phone. You have to confirm the device which is giving you the error. The next step is to boot your phone in Download Mode only. At this step, it will fix Android’s fault and resolve it. At last, install the update for Android phones. This is one of the best software used to resolve most errors on Android phones as it is simple, not need to have any technical skills. But it is easy and efficient to use.
But this might affect the working of your phone, if you want it to be done continue with the process as mentioned here. Open Settings and look for Apps. Check for Google Play Services in the list and click on it. Click on three dots i.e. more options in the top right corner, and it will show the option to Uninstall updates. Select Uninstall Updates it shows a pop-up message, to confirm click on OK. Now you have uninstalled the previously updated software from your mobile.
It is recommended to install or update the latest version as and when it is released. Because most of the updates cover the loops or issues that exist in older versions. Your device or mobile will be prone to any attacks that lead to the crashing of the app, heating of the device, high battery drain, and other variety of problems including malware. Updates are necessary for your devices to run smoothly, and avoid hacks, attacks, breaches, etc. Hence try to update your phone or any other device like a computer, laptop, tablet, etc.
Ragini P. Anvekar is a distinguished professional with a Bachelor’s degree in Computer Science Engineering. With a profound expertise in her field, Ragini has made significant strides in the tech industry. Her passion for technology and its applications is evident in her technical writing. Through her articles, she simplifies complex technical concepts, making them accessible to a broader audience. Her work reflects a deep understanding of current trends and technologies in computer science. Ragini is recognized for her ability to convey intricate details with clarity and precision, making her a valuable asset in the tech community. Her contributions extend beyond writing, as she actively participates in various tech forums, sharing her knowledge and insights.


