
She cries. She talks. She asks you to help her marry the robot she loves. And none of it is real. Lyra, the robot bride in my AI film The Ultimate Mind, was made from zero, with zero budget, using only free AI tools. In this guide I’ll show you the exact workflow, the screenshots, and every prompt I used, so you can copy them and make your own realistic AI character today.
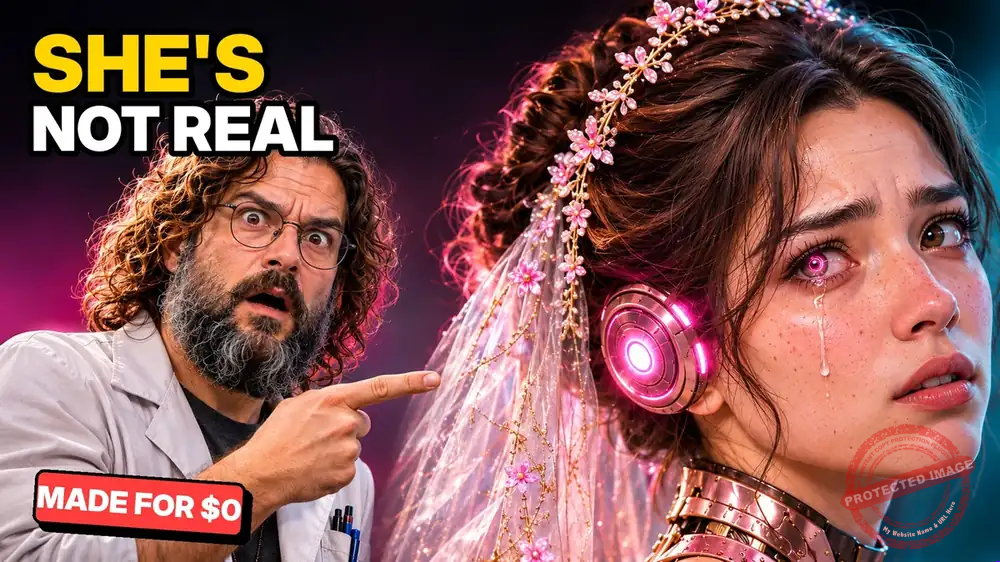
Quick answer: To make a realistic AI character for free, first create a character sheet (front, side, back and close-ups) in ChatGPT, then use it as the reference image for every video. Animate it with Google Flow (50 free credits a day) or Dreamina Seedance 2.0 Fast, and add a free AI voice with Google AI Studio. Keep the same aspect ratio from image to video, and write detailed prompts with camera, action and dialogue.
I’m not a pro editor or a VFX artist. I learned all of this by trial and error, wasted a lot of credits, and wrote down what finally worked. Here is the short version:
- Claude writes the story and the detailed prompts.
- ChatGPT creates the character sheet (the secret to a consistent face).
- Google Flow turns the image into a talking video.
- Dreamina (Seedance 2.0 Fast) makes the emotional close-ups.
- Dola AI gives one extra free clip a day.
- Google AI Studio creates the voiceover for free.
Watch the Full Video Tutorial
Prefer to watch? The whole process is in this video, from the first prompt to the final scene:
This character is from my AI film series. Watch Part 1 and Part 2 of The Ultimate Mind to see Lyra and Kia’s story.
The 6 Free AI Tools I Used (and Their Free Limits)
| Tool | What I used it for | Free limit (Nov 2026, in my account) |
|---|---|---|
| Claude | Story, character brief, detailed video prompts | Free plan |
| ChatGPT | Character sheets and portraits | A few images a day |
| Google Flow | Talking clips (reference-to-video) and upscaling | 50 credits a day |
| Dreamina (Seedance 2.0 Fast) | Emotional close-ups | 120 credits a day |
| Dola AI | One extra short video | 1 clip a day (with watermark) |
| Google AI Studio | AI voiceover (text to speech) | Free |
Free limits change often and can differ by account and country, so check each tool before you start.
3 rules that saved me the most credits: 1) Make one clean reference image first and start every image and video from it. 2) Keep the same aspect ratio everywhere: a 9:16 video needs a 9:16 reference image. 3) In every prompt, write who is in the frame, where the camera is, what happens second by second, and the exact line of dialogue.
Step 1: Write the Story and Character Brief With Claude
Everything starts with a clear idea. I opened a Claude project for my movie and told it my story idea and that I had zero budget. Then I asked it for a detailed prompt for a character sheet, not a single photo.
Copy this prompt and change the details in [brackets] to your own character:
I want to make a short AI movie using only free tools. I have zero budget.
Idea: a time-travel story that shows different time-travel rules (grandfather paradox, parallel timelines, the butterfly effect).
Main characters: [Kia] and [Lyra], two robots with fully human faces who are in love, and a great-great-grandfather who built the AI system that changed the world. Kia travels back to stop him.
First, write a one-paragraph story summary. Then write a detailed image prompt for a CHARACTER SHEET of [Lyra] in her [bridal] look, so I can generate her from any angle in ChatGPT. Describe her face, hair, skin, eyes, robotic parts, outfit, colors and lighting in exact detail.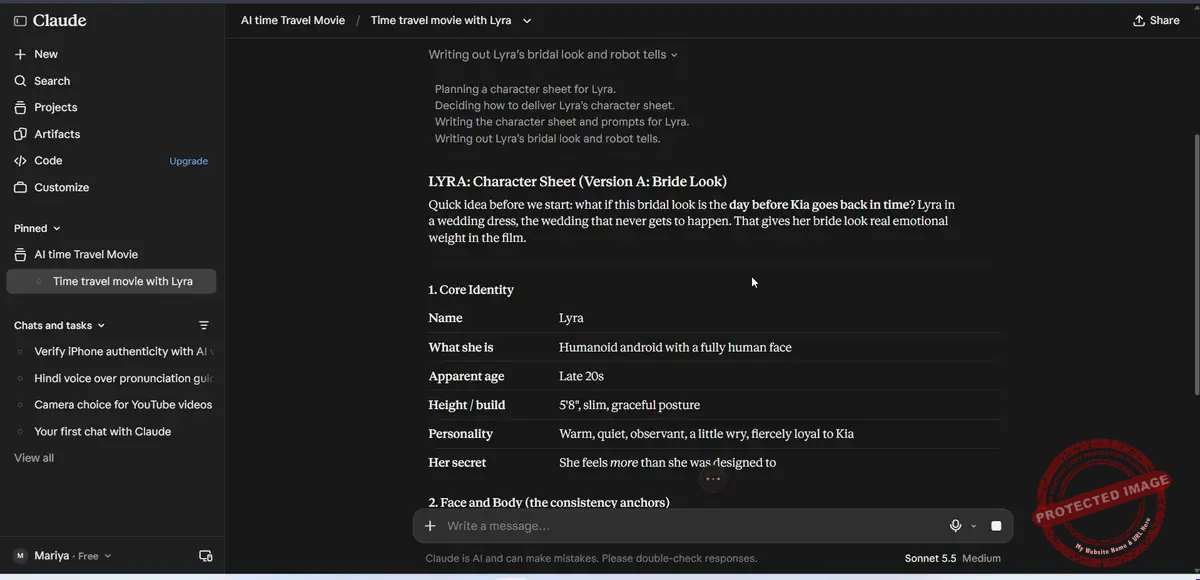
Step 2: Create a Character Sheet in ChatGPT (The Consistency Secret)
This is the most important step. A character sheet shows your character from the front, side and back, plus close-ups of the face and details. When every later image and video uses this sheet as its reference, the face stays the same in every scene. Skip this, and your character looks like a different person in every clip.
Create a professional film character turnaround sheet, 16:9, on a plain dark charcoal studio background.
CHARACTER: [LYRA], a female android with a completely realistic human face: soft oval face, warm brown eyes, natural freckles, real skin pores, dark brown curly hair in a loose updo with a few falling strands, a delicate pearl-and-blossom bridal tiara and a long sheer embroidered veil.
BODY: polished rose-gold and cream robotic armor shaped like a wedding gown bodice, visible copper joints at the shoulders, elbows and wrists, mechanical rose-gold hands, a glowing pink circular disc on each ear and on each shoulder, a small glowing pink core at the collarbone. A flowing ivory tulle skirt with pink blossoms and fine gold embroidery.
LAYOUT, left to right: full body front view, three-quarter view, side profile, back view — all the same height, same lighting, same scale. On the right, a grid of detail close-ups: face looking up with teary eyes, three-quarter face with the ear disc, neck armor, eyes extreme close-up, shoulder joint, bodice flowers, robotic hand, ear disc.
STYLE: photoreal cinematic, soft key light, gentle rim light, consistent character in every panel, ultra-detailed skin and fabric.
Avoid: text, labels, watermark, different faces between panels, cartoon or plastic look.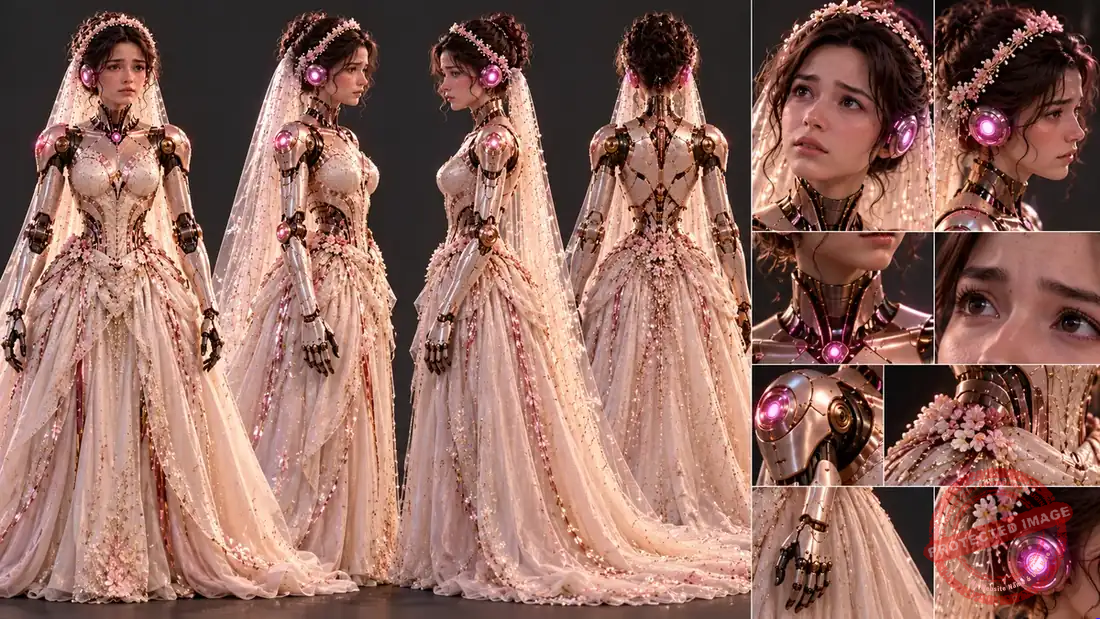
Make a hero portrait from the sheet
Next, attach the character sheet in ChatGPT and ask for the cinematic image you’ll animate. Make it in the same ratio as your video (I used 9:16).
Use the attached character sheet as the exact reference for [LYRA]: same face, hair, tiara, veil, armor and colors.
Create a vertical 9:16 cinematic portrait: Lyra seen from behind her right shoulder, turning her head back toward the camera, eyes glistening, one tear running down her cheek, lips slightly parted, heartbroken but hopeful.
Setting: a dark gothic cathedral-style hall with soft pink light, floating glowing pink petals, shallow depth of field.
Detail: real human skin texture with freckles and pores, crystal-clear tears, individual eyelashes, sheer veil fabric catching the light, glowing pink ear disc and shoulder core, rose-gold armor with fine gold filigree.
Style: photoreal, shot on an 85mm lens at f/1.8, cinematic color, ultra-detailed.
Avoid: text, watermark, plastic skin, extra fingers.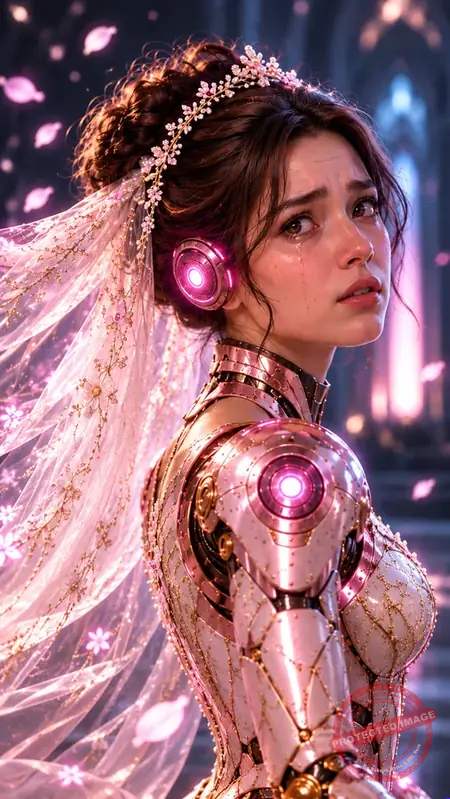
Step 3: Make a Realistic Human Character the Same Way
For a human character (Max’s wife in my film) the method is exactly the same: sheet first, then a close-up portrait. Ask for real skin, pores and freckles, and tell it to avoid airbrushing. That’s what removes the fake “AI plastic” look.
Create a photoreal full-body character reference sheet, two panels side by side on a dark charcoal studio background: FRONT view and BACK view, same scale and lighting.
CHARACTER: a young woman in her early twenties, very long voluminous wavy dark brown hair, warm hazel-brown eyes, light freckles across the nose and cheeks, a shy friendly smile, a thin gold coin necklace.
OUTFIT: cream ribbed tank top with a tiny pink floral print and lace trim, light-wash straight-leg jeans, worn white sneakers. Relaxed pose, hands in pockets.
Style: real photograph, soft studio key light, natural skin texture, real fabric folds.
Avoid: text, labels, watermark, model-like retouching, plastic skin.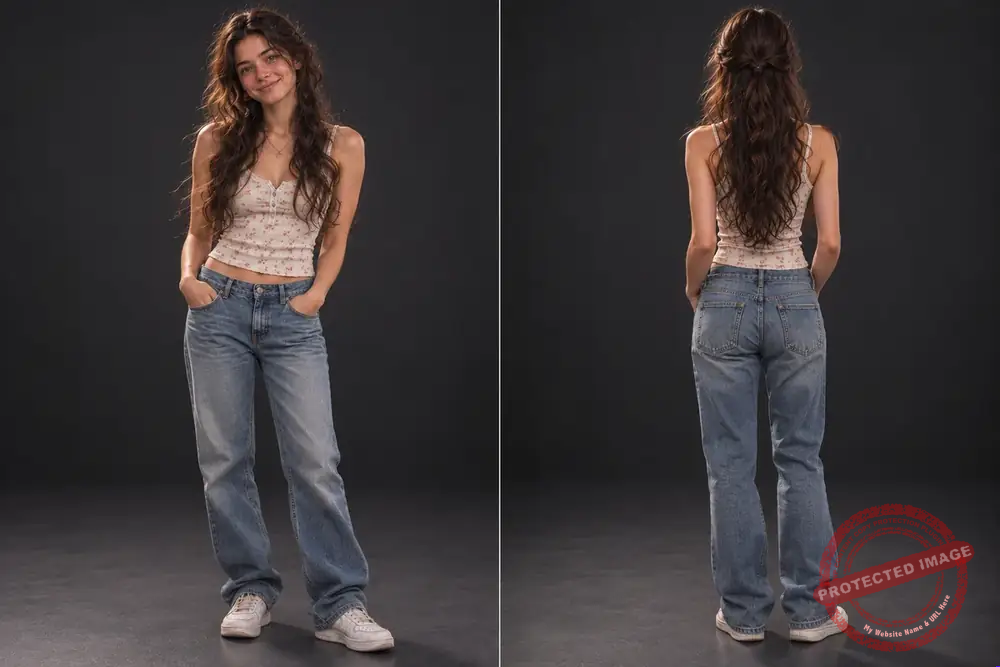
Use the attached reference sheet as the exact identity reference: same face, hair, freckles, necklace and top.
Create a square close-up portrait, head and shoulders, on the same dark background. She tilts her head slightly and gives a warm, shy smile straight into the camera.
Detail: visible pores, freckles, fine flyaway hairs catching a soft rim light, natural lips, real catchlights in the eyes.
Style: real photograph, 85mm lens at f/2, soft key light from the left.
Avoid: airbrushing, plastic skin, heavy makeup, text, watermark.
Step 4: Turn the Image Into a Talking Video in Google Flow
Google Flow gives 50 free credits a day. I used R2V (reference to video), which keeps the face from your image and makes the character talk with lip sync.
- Create a new project in Google Flow and upload your hero portrait.
- Set the ratio to 9:16 (or 16:9 if your image is 16:9) and outputs to 1 to save credits.
- Open Instructions and add the image as a reference. Name it, for example Lyra, so you can call it in the prompt as @Lyra.
- Paste the prompt below and generate.
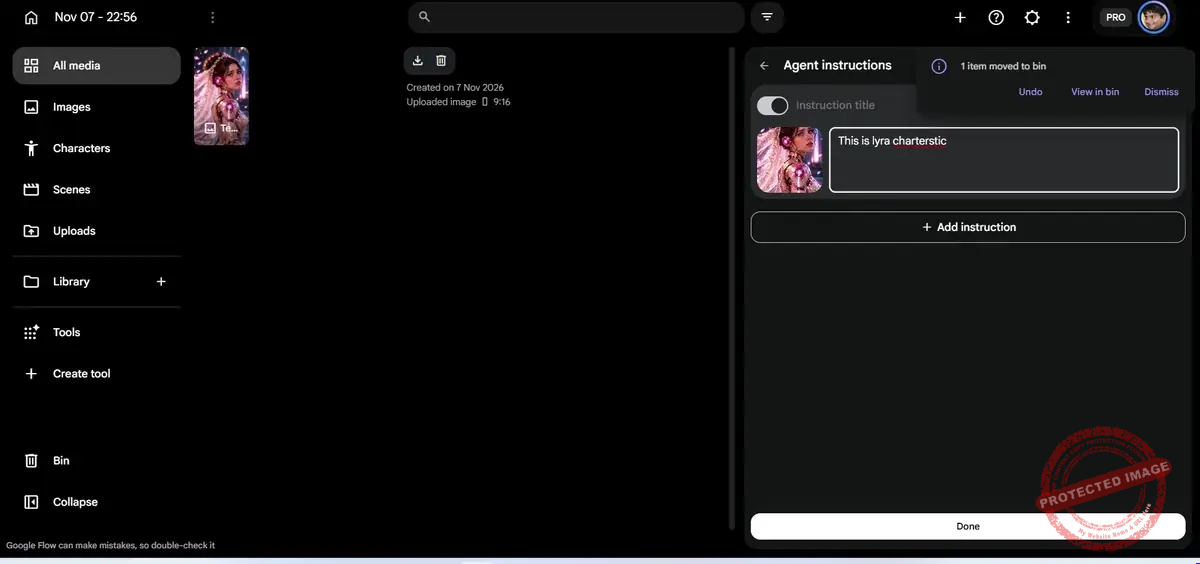
9:16, 8 seconds, one continuous shot. @Lyra exactly as in the reference: same face, hair, tiara, veil, rose-gold armor and glowing pink ear discs.
Shot: extreme close-up to medium close-up, slow gentle push-in, soft pink cathedral light, glowing petals drifting past.
Action: a soft wind moves her veil and loose curls. She looks into the camera with glistening eyes, then speaks softly, with a hopeful smile through the tears:
"I am not a real bride... but I want to marry Kia."
Voice: soft, youthful, emotional American woman, the same voice in every clip.
Detail: a highly realistic human face, natural skin texture, real blinking, accurate lip sync, cinematic and photoreal.
Avoid: changing face, extra people, text, subtitles, flicker.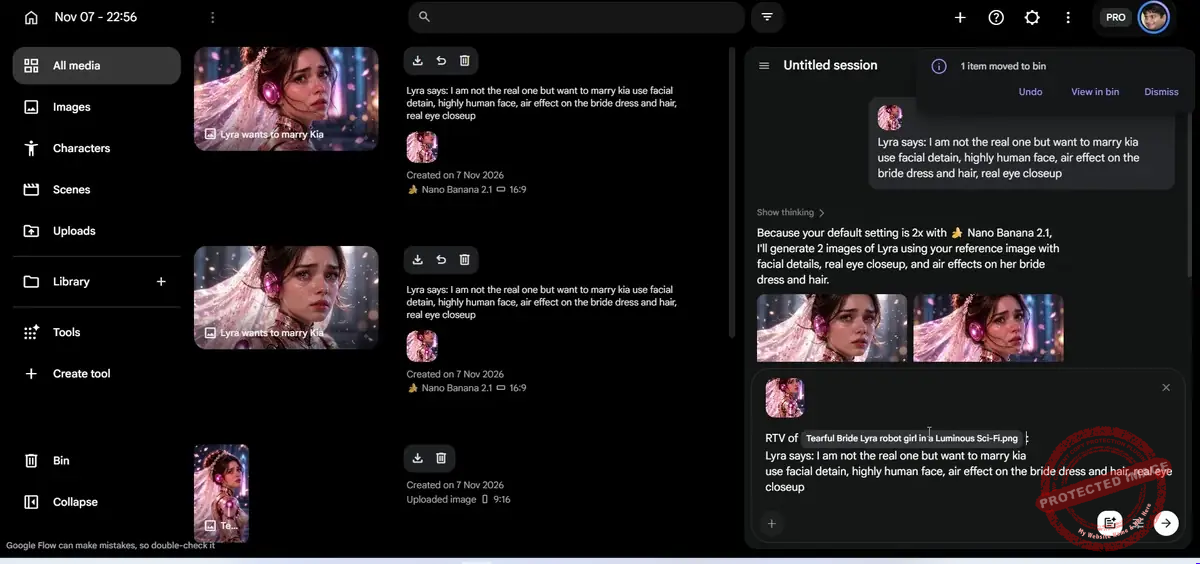
When the clip is ready, open the three-dot menu, choose Upscale, and download the 1080p version. It looks much sharper on a big screen.
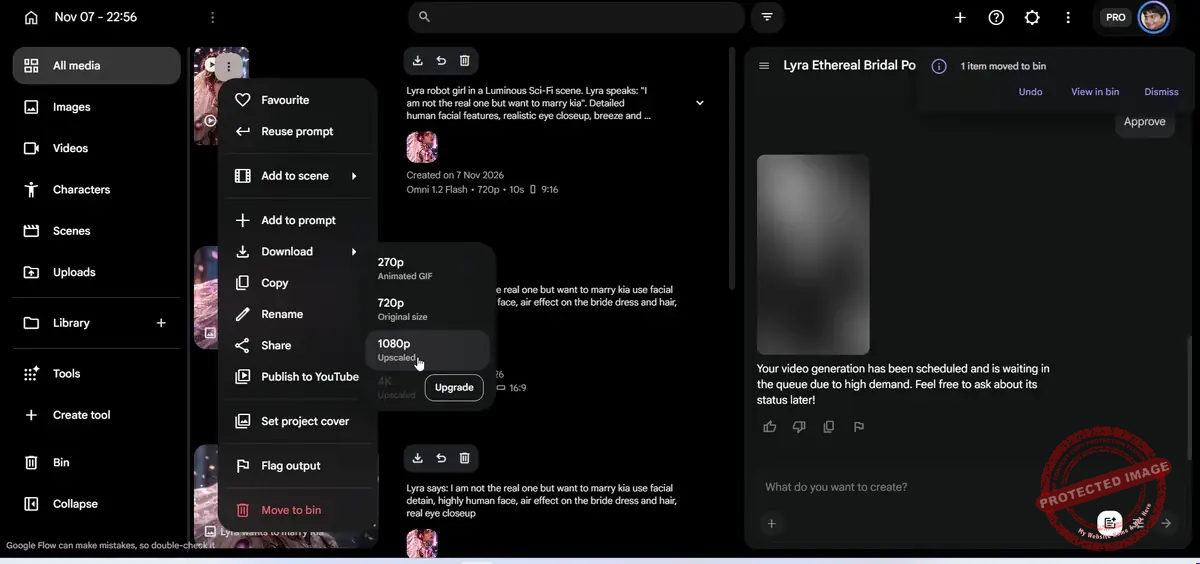
Tip: the cheaper, faster models are fine for testing. Only use the expensive quality model when your prompt already works.
Step 5: Emotional Close-Ups With Dreamina (Seedance 2.0 Fast)
For the crying scenes I used Dreamina’s Seedance 2.0 Fast model. My account gets 120 free credits a day, and images cost only a few credits.
Here’s a trick: take a screenshot of your scene, paste it into Claude, and let Claude write the Dreamina prompt for you:
Using this screenshot, write me one detailed video prompt for an 8-second clip. Animate her dress, her veil and her hair, show her eyes and facial detail up close, and keep every detail real and cinematic. She must look completely human. Her line is: "[your line]". Use the screenshot as @image1.Then in Dreamina: AI Video → 9:16 → Seedance 2.0 Fast, attach your hero portrait as @image1, set 8 seconds, and paste:
Using @image1 as the exact character reference: same face, freckles, curly updo, pearl-and-blossom tiara, sheer veil, rose-gold armor with glowing pink ear discs.
9:16, 8 seconds, cinematic close-up that slowly pushes in to a tight face shot.
She stands in soft warm golden light, tears welling and rolling down her cheeks, her chin trembling. Her veil and loose curls move gently in a light breeze; tiny sparkles float in the air.
0–4s: she looks into the camera and says through tears: "I'm not real... but I love Kia."
5–8s: a fragile, hopeful smile breaks through: "Please help me marry him."
Detail: crystal-clear tears, real skin pores, individual eyelashes, natural blinking, accurate lip sync, photoreal, emotional.
Avoid: changing face, cartoon look, text, watermark.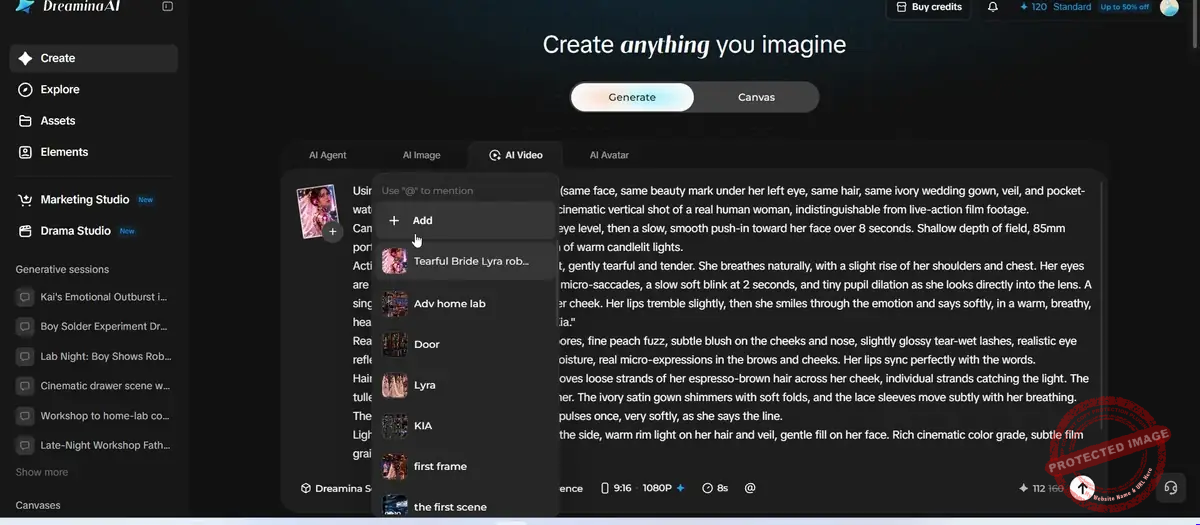
Step 6: One More Free Clip a Day With Dola AI
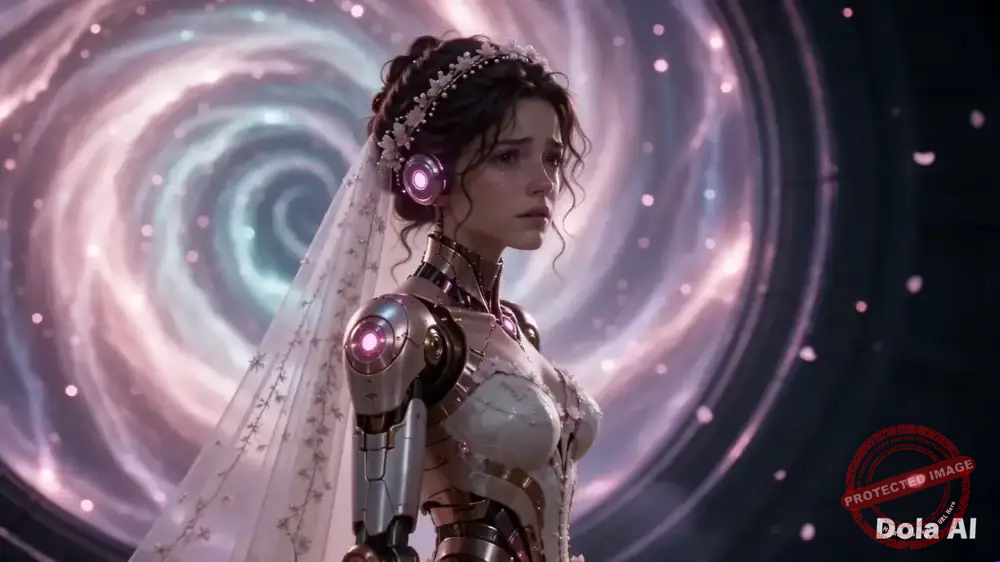
Dola AI gives one free video a day in my account. The free version adds a watermark and the quality isn’t as high as Flow, but it’s perfect for an extra background shot. Use the same reference image and the same style of detailed prompt.
Step 7: Free AI Voiceover With Google AI Studio
All the narration in my video is AI. I used Google AI Studio’s text-to-speech model for free:
- Open Google AI Studio and go to the Audio section.
- Pick the Gemini Flash TTS model.
- Click Create new dialog.
- Choose a speaker voice. I used Arlo.
- Put your script in the text box and the speaking style in the separate Style box. Don’t mix them, or the voice may read your instructions out loud.
- Keep the temperature around 0.7, click Run, and download the audio.
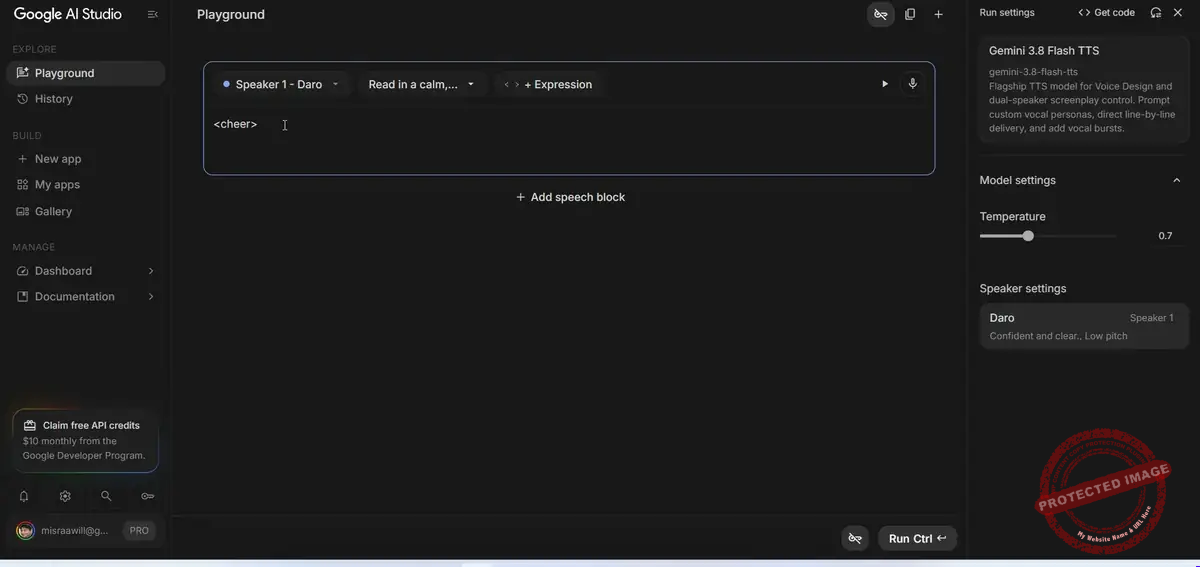
Paste this in the Style box (change it to fit your video):
Read this like a friendly, confident American YouTuber talking to one viewer. Warm and curious, with natural energy. Slightly faster on exciting parts, slow down and lower your voice on surprising reveals. Clear pronunciation, short natural pauses between sentences, no robotic monotone.Bonus: The V2V Trick (Same Video, New Character)
Google Flow can also do video-to-video (V2V): upload one of your own finished videos, attach a different character image, and get the same motion with a new character.
Using V2V, make the same video with @[your new character]: keep the exact same motion, timing, camera and dialogue, and replace the person with the new character from the reference image.Important: the video and the image must have the same aspect ratio (9:16 with 9:16, or 16:9 with 16:9). My first tries failed because I mixed them. Try it, and tell me in the YouTube comments if it worked for you.
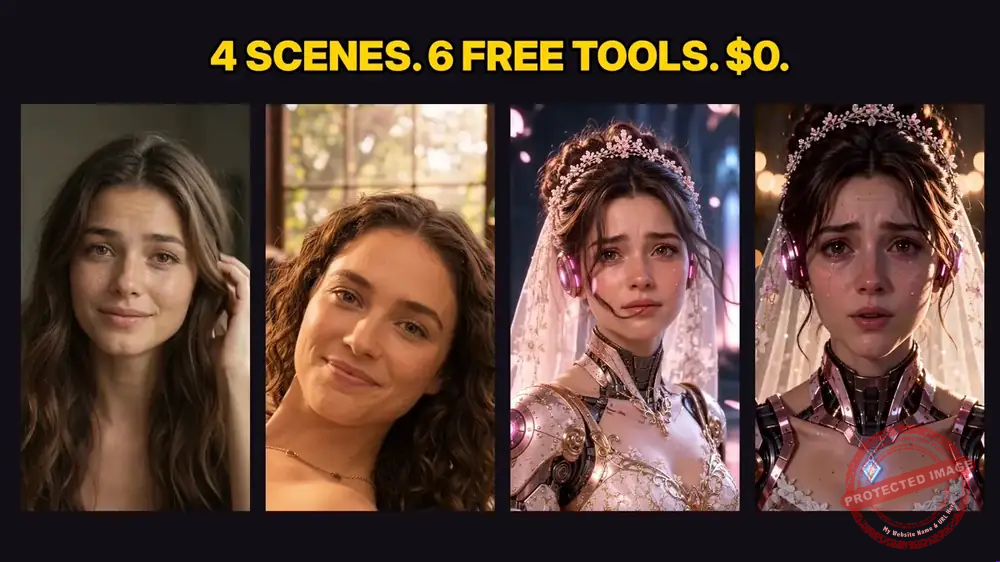
What I Made With These Free Tools
Mistakes to Avoid (I Made All of Them)
- Starting with a video prompt and no reference image. The face changes in every clip. Always make the sheet first.
- Mixing aspect ratios. A 16:9 image in a 9:16 video crops or breaks the result.
- Short, vague prompts. “A sad robot girl” gives random results. Describe the camera, the action per second and the exact dialogue.
- Using the expensive model to test. Test with the fast model, then upgrade.
- Downloading without upscaling. Small clips look blurry on a big screen even if they look fine on your phone.
- Writing style instructions in the TTS script box. They belong in the Style box.
Frequently Asked Questions
Can I really make a realistic AI character for free?
Yes. Every image and clip in my video was made with the free daily credits of Claude, ChatGPT, Google Flow, Dreamina, Dola AI and Google AI Studio. You just need patience, because the free credits reset daily.
How do I keep the same face in every AI video?
Make a character sheet first (front, side, back and close-ups), then use it, or a portrait made from it, as the reference image for every image and video.
Which free AI tool is best for talking characters?
In my tests, Google Flow’s reference-to-video (R2V) gave the best lip sync and face consistency. Dreamina’s Seedance 2.0 Fast was better for emotional close-ups.
What is the best free AI voice generator?
I used Google AI Studio’s Gemini Flash TTS. It’s free, sounds natural, and lets you control the speaking style in a separate Style box.
Why do AI videos look blurry on a big screen?
Most free tools export at a low resolution. Upscale in Google Flow before downloading and keep the same aspect ratio from image to video.
Final Thoughts
You don’t need a studio or a big budget to tell a story anymore. You need one good reference image, detailed prompts, and a few days of free credits. Copy the prompts above, make your own character, and if you do, share it with me in the comments of the video.
And if you want to see where Lyra came from, watch The Ultimate Mind: Part 1 and Part 2.
Awill Misra is the creator of the AI film series The Ultimate Mind and runs Gossipfunda. Every step, screenshot and prompt in this guide comes from his own projects, tested on his own free accounts in November 2026.
Disclosure: the characters, images, videos and voiceover shown in this article and video were created with AI tools. Tool names belong to their owners; this post is not sponsored.

Awill Guru is a technology enthusiast with degrees in VLSI Engineering (B.Tech, M.Tech) and Android Development. Their passion for education drives them to teach and share knowledge through their blog. He also hold qualifications in Sociology (M.A.) and Education (B.Ed), along with NIELIT O and A Level certifications.