Experiencing issues with your Windows 11? A factory reset might be the solution you need. This process restores your system to its original settings, potentially resolving many performance issues. Understanding how to safely and effectively factory reset Windows 11 is crucial for maintaining your PC’s health. In this comprehensive guide, we’ll walk you through every step, ensuring a smooth and successful reset.
Understanding Factory Reset
Before diving into the process, it’s important to understand what a factory reset entails. Essentially, this procedure wipes your computer clean, removing all personal files, applications, and settings. It returns your system to its initial state, similar to when it was first purchased. This method is often used to resolve significant system issues, remove viruses, or clean up before selling the device.
Preparing for Reset
Preparing for a factory reset on Windows 11 is a critical step to safeguard your data. It involves backing up all important files to avoid any loss. This can be done using an external hard drive, USB drive, or cloud storage services like OneDrive or Google Drive. Make sure to save documents, photos, videos, and other personal files. Additionally, note down any software licenses or settings you might need to reinstall and reconfigure programs post-reset. Finally, ensure your system is up-to-date with the latest Windows updates. This preparation helps in a smoother reset process and protects your valuable data.
Don’t miss: How to fix Windows 11 error 0xc1900107
Initiating the Reset Process
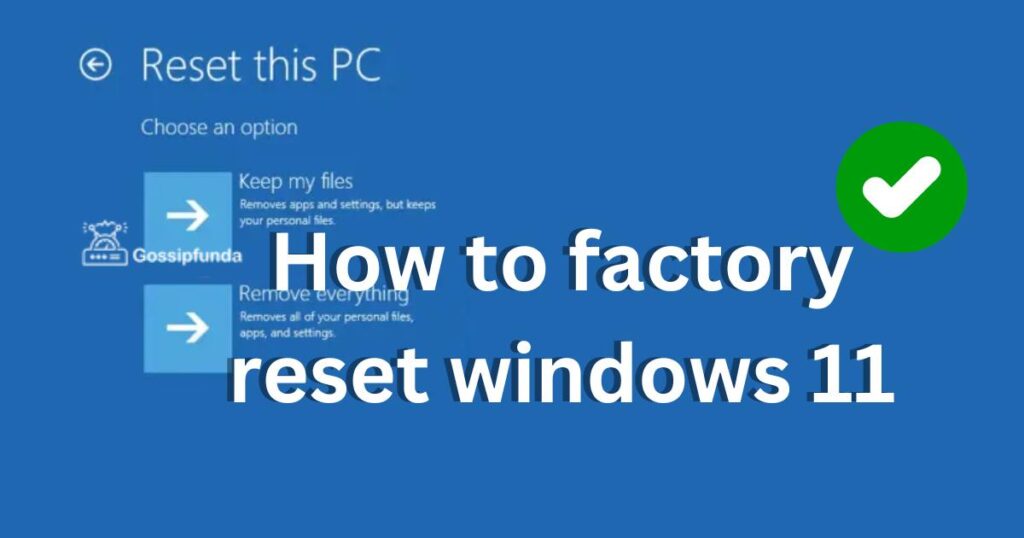
Initiating the reset process in Windows 11 is straightforward. First, open the ‘Settings’ app, typically found in the Start menu. In Settings, navigate to the ‘Update & Security’ section. Here, you’ll find a ‘Recovery’ option. Click on it to reveal the ‘Reset this PC’ feature. Upon selecting ‘Get started’, Windows presents two choices: ‘Keep my files’, which erases apps and settings while keeping personal files, and ‘Remove everything’, which deletes all files, apps, and settings. Choose the option that best fits your needs. This process starts the reset, leading you through prompts to complete the action.
Choosing the Right Reset Option
Choosing the right reset option in Windows 11 depends on your specific needs. If you’re facing minor issues or want to refresh your system without losing personal files, opt for ‘Keep my files’. This option will remove apps and settings but keeps your documents, photos, and other personal files intact. It’s a suitable choice for troubleshooting common problems.
On the other hand, if you’re dealing with more severe issues like persistent malware or you’re planning to sell or give away your PC, ‘Remove everything’ is the better choice. This option completely erases all your data, including files, apps, and settings, offering a clean slate. It’s crucial for ensuring privacy and system integrity in such scenarios. Remember, always back up important files before choosing this option.
Reset Process
The reset process in Windows 11 begins once you’ve chosen your preferred reset option. After selecting either ‘Keep my files’ or ‘Remove everything’, Windows will prompt you to confirm your choice. Upon confirmation, the system will start preparing to reset, which may take some time. During this phase, Windows re-installs the operating system, either preserving your files or removing them based on your selection.
Throughout the reset process, your PC may restart several times. It’s crucial to ensure your computer remains connected to a power source to avoid any interruptions. Interruptions could potentially harm your system. The entire process can vary in duration depending on your PC’s specifications and the amount of data involved.
Once the reset is complete, Windows will boot up as if it were a new installation. You’ll be greeted with the initial setup screens where you’ll configure settings, create or log into your Microsoft account, and possibly reinstall various applications. This process marks the completion of the factory reset, leaving you with a fresh version of Windows 11.
Post-Reset Setup
After the reset, you’ll be guided through the initial setup process. This includes configuring settings, creating or logging into a Microsoft account, and installing necessary drivers and applications. It’s like setting up a new PC, providing a fresh start.
Restoring Data
If you’ve backed up your files, now is the time to restore them. Carefully select the files you need, avoiding unnecessary clutter on your fresh system. This step is crucial for those who chose the ‘Remove everything’ option.
Conclusion
Factory resetting Windows 11 is a powerful tool for resolving various system issues. By following these steps, you can ensure a successful reset, giving your PC a new lease on life. Remember, preparation and understanding your reset options are key to a smooth process. Whether you’re troubleshooting or preparing your PC for a new owner, a factory reset can be the perfect solution.
FAQs
It’s a process that returns your PC to its original, out-of-the-box state, deleting all data and settings.
It’s useful for fixing major system issues, removing viruses, or preparing your PC for sale.
Yes, unless you choose the ‘Keep my files’ option, which saves your personal files but not your settings or apps.
Use an external drive or cloud storage to save your important files.
Yes, updating ensures a smoother reset process and prevents potential issues.
Prachi Mishra is a talented Digital Marketer and Technical Content Writer with a passion for creating impactful content and optimizing it for online platforms. With a strong background in marketing and a deep understanding of SEO and digital marketing strategies, Prachi has helped several businesses increase their online visibility and drive more traffic to their websites.
As a technical content writer, Prachi has extensive experience in creating engaging and informative content for a range of industries, including technology, finance, healthcare, and more. Her ability to simplify complex concepts and present them in a clear and concise manner has made her a valuable asset to her clients.
Prachi is a self-motivated and goal-oriented professional who is committed to delivering high-quality work that exceeds her clients’ expectations. She has a keen eye for detail and is always willing to go the extra mile to ensure that her work is accurate, informative, and engaging.