Welcome to the world of Destiny 2, where seamless communication is as vital as your in-game strategy. However, encountering issues with voice chat can be a common yet frustrating hurdle, disrupting the harmony of your gameplay. Whether you’re coordinating a complex raid or simply enjoying a casual play session with friends, an unresponsive voice chat can significantly dampen the spirit of your interstellar journey. In this introduction, we will explore the various factors that might be silencing your calls to arms, from technical glitches to more elusive settings. Understanding these challenges is the first step in restoring your voice to its rightful place in the Destiny 2 universe. Let’s dive into troubleshooting and fixing these issues, ensuring that your voice is heard loud and clear, and your gaming experience remains uninterrupted.
Reasons Behind Destiny 2 Voice Chat Not Working
- Audio Input/Output Device Misconfiguration: Inadequate selection of microphone and speaker settings can lead to voice chat failure.
- Network Connectivity Problems: Unstable internet connections can disrupt communication with fellow players.
- In-Game Settings Misconfiguration: Incorrect audio settings within Destiny 2 might hinder voice chat functionality.
- Software Conflicts: Third-party applications like Discord or Skype may clash with Destiny 2’s voice chat.
- Outdated Audio Drivers: Using obsolete audio drivers can cause compatibility issues and silence voice chat.
- Platform-specific Settings: Console and PC players should verify their respective audio configurations.
- Firewall and Antivirus Settings: Over-protective security software can block voice chat features.
- Port Forwarding Issues: Improper port settings on routers can affect voice communication stability.
- DNS Settings: Using faulty DNS configurations may result in poor network performance.
By identifying these reasons, you can unleash the potential of seamless voice chat and immerse yourself fully in the captivating world of Destiny 2!
How to fix destiny 2 voice chat not working?
There are several methods to fix this error:
Fix 1: Check Audio Settings in Destiny 2
To resolve Destiny 2 voice chat issues related to audio input/output device misconfiguration, follow these detailed steps:
- Launch Destiny 2: Start the game and enter the main menu.
- Access Settings: Navigate to the settings menu within Destiny 2.
- Open Audio Settings: Look for the “Audio” or “Sound” section in the settings menu.
- Verify Input Device: Ensure that the correct microphone is selected as the input device. If you’re using an external microphone, make sure it’s properly connected to your system.
- Verify Output Device: Check that the correct speakers or headphones are selected as the output device. If you’re using headphones, ensure they are connected securely to your device.
- Adjust Volume Levels: Ensure that both the microphone and speaker volumes are set at appropriate levels to avoid any audio imbalance.
- Save Changes: After making any necessary adjustments, save the changes in the audio settings.
- Test Voice Chat: Enter a game or a party with friends to test the voice chat functionality. Communicate with your team to see if the issue is resolved.
Following these steps should help you fix any audio misconfigurations and re-establish smooth voice chat communication in Destiny 2. Enjoy your seamless gaming experience!
Fix 2: Verify Network Connectivity
When Destiny 2 voice chat issues seem to be related to network connectivity problems, follow these comprehensive steps to troubleshoot:
- Check Internet Connection: Ensure that you have a stable internet connection. If using Wi-Fi, position yourself closer to the router to improve signal strength.
- Restart Router and Modem: Power off your router and modem, wait for a few seconds, and then power them back on. This can refresh your connection and resolve any temporary network glitches.
- Close Bandwidth-Intensive Applications: Close any bandwidth-intensive applications or downloads running in the background. These can consume your internet’s resources and affect voice chat quality.
- Use Wired Connection (Recommended): If possible, connect your gaming device to the internet using an Ethernet cable. Wired connections offer more stability and lower latency compared to Wi-Fi.
- Check Network Ports: Ensure that the necessary ports for Destiny 2 are open on your router. Refer to Destiny 2’s official website for a list of required ports.
- Contact Internet Service Provider (ISP): If the issue persists, reach out to your ISP to inquire about any known network problems in your area or potential issues with your connection.

By following these steps, you can troubleshoot network-related problems and enjoy uninterrupted voice chat sessions in Destiny 2, fostering seamless teamwork and camaraderie among players.
Fix 3: Update Audio Drivers
Outdated or faulty audio drivers can cause compatibility issues and disrupt Destiny 2 voice chat. Follow these step-by-step instructions to update your audio drivers:
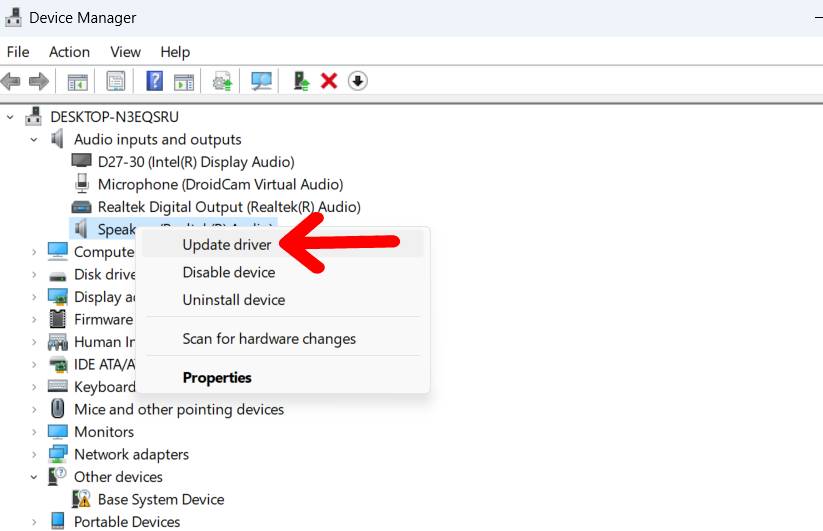
- Identify Your Audio Device: Right-click on the “Start” button and select “Device Manager.” Expand the “Audio inputs and outputs” section to find your microphone and speaker devices.
- Visit Manufacturer’s Website: Note down the names of your microphone and speaker devices. Visit the respective manufacturers’ websites to find the latest drivers for your devices.
- Download Latest Drivers: Look for the “Support” or “Downloads” section on the manufacturer’s website. Search for the latest drivers for your specific devices and download them.
- Uninstall Old Drivers: In the Device Manager, right-click on your microphone and speaker devices and select “Uninstall device.” Check the box that says “Delete the driver software for this device” and click “Uninstall.”
- Install New Drivers: Run the downloaded driver installation files and follow the on-screen instructions to install the new drivers for your audio devices.
- Restart Your System: After the installation is complete, restart your computer to apply the changes.
- Test Voice Chat: Launch Destiny 2, enter a game or party, and test the voice chat to ensure the issue is resolved.
By updating your audio drivers, you can enhance compatibility and restore proper voice chat functionality in Destiny 2, immersing yourself in the collaborative spirit of this thrilling online gaming experience.
Fix 4: Disable Conflicting Software
Certain third-party applications or services running in the background may conflict with Destiny 2’s voice chat, leading to disruptions. To overcome this, follow these steps to disable conflicting software:
- Identify Potential Conflicts: Make a list of applications or services that might interfere with Destiny 2’s voice chat. Common examples include Discord, Skype, or other communication software.
- Close Conflicting Software: Close any conflicting software before launching Destiny 2. Right-click on the applications’ icons in the system tray (bottom right corner of your screen) and choose “Exit” or “Quit.”
- Temporarily Disable Antivirus/Firewall: Some antivirus or firewall software might block certain features of Destiny 2, including voice chat. Temporarily disable them while playing to see if they are causing the issue.
- Check Overlay Features: If you use Discord or other similar software, check if they have overlay features enabled for Destiny 2. Disable these features as they can conflict with the in-game voice chat.
- Restart Destiny 2: After closing conflicting applications and disabling overlays, relaunch Destiny 2 and enter a game or party to test the voice chat.
- Enable Software After Testing: After verifying that Destiny 2’s voice chat is functioning properly, you can enable the conflicting software again if desired. Be cautious about their impact on voice chat and overall game performance.
By disabling conflicting software, you can enjoy uninterrupted voice communication in Destiny 2, ensuring seamless coordination with your teammates and maximizing your gaming enjoyment.
Fix 5: Run Destiny 2 as Administrator
Running Destiny 2 with administrative privileges can resolve permission-related issues that might affect the game’s voice chat functionality. Here’s how to do it:
- Locate the Destiny 2 Shortcut: Right-click on the Destiny 2 shortcut icon on your desktop or in the Start menu.
- Select “Run as Administrator”: From the context menu, choose “Run as administrator.” If prompted by User Account Control (UAC), click “Yes” to grant administrative privileges.
- Log into the Game: The game will launch with elevated privileges. Log into Destiny 2 as usual.
- Test Voice Chat: Enter a game or join a party to test the voice chat feature and see if the issue is resolved.
- Create a New Shortcut (Optional): If running Destiny 2 as an administrator solves the voice chat problem, you can create a new shortcut with administrative privileges. Right-click the Destiny 2 executable file (usually located in the installation folder), select “Send to,” and choose “Desktop (create shortcut).” Follow steps 1 to 4 with the new shortcut.
Running Destiny 2 as an administrator grants the game the necessary permissions, which can help resolve certain voice chat issues. Enjoy seamless communication with your fellow guardians as you explore the captivating universe of Destiny 2!
Read more: Destiny 2 error code current
Fix 6: Check for Game Updates and Patches
As Destiny 2 is an ever-evolving online game, updates and patches are released periodically to address various issues, including voice chat problems. Here’s how to ensure you have the latest updates:
- Check for Updates:
- Launch the Destiny 2 game on your platform (PC, console, etc.).
- Look for any notifications or prompts regarding available updates or patches.
- If prompted, download and install the updates. If no notifications appear, proceed to the next step.
- Manually Check for Updates:
- On PC: Open the game launcher (Steam, Battle.net, etc.), right-click on Destiny 2, and select “Check for updates.”
- On Consoles: Access your console’s system settings, navigate to the Destiny 2 application, and check for available updates.
- Enable Automatic Updates:
- In your game launcher or console settings, enable automatic updates for Destiny 2. This ensures that you receive future updates without having to manually check.
- Verify Game Files (PC Only):
- If you’re playing Destiny 2 on PC, use the game launcher to verify the integrity of game files. This process will identify and fix any corrupted files that might be causing voice chat issues.
- Restart the Game:
- After installing any updates or verifying game files, restart Destiny 2 to apply the changes.
By keeping Destiny 2 up to date, you ensure that you have the latest improvements and bug fixes, including those related to voice chat functionality. With the latest updates in place, you can engage in smooth voice communication with your fireteam, fostering a truly immersive gaming experience within the world of Destiny 2.
Fix 7: Reinstall or Repair Game Files (PC Only)
If the voice chat issue persists on your PC, it may be due to corrupted or missing game files. Reinstalling or repairing the game can help resolve this problem. Follow these steps:
- Uninstall Destiny 2:
- On Windows, go to “Control Panel” > “Programs” > “Programs and Features.” Find Destiny 2 in the list of installed programs, right-click on it, and select “Uninstall.”
- On consoles, navigate to the Destiny 2 application, press the Options button (or the equivalent button for your console), and select “Delete” or “Uninstall.”
- Reinstall Destiny 2:
- On PC, log in to your game launcher (Steam, Battle.net, etc.), search for Destiny 2, and reinstall the game by following the on-screen instructions.
- On consoles, insert the Destiny 2 game disc (or access the digital version from your library), and follow the prompts to reinstall the game.
- Repair Game Files (Steam Only):
- If you are playing Destiny 2 on Steam, instead of uninstalling the game, you can try repairing game files. Right-click on Destiny 2 in your Steam library, select “Properties,” go to the “Local Files” tab, and click “Verify Integrity of Game Files.” Steam will check for any missing or corrupted files and attempt to repair them.
- Restart Your PC/Console:
- After reinstalling or repairing the game, restart your PC or console to ensure all changes take effect.
- Test Voice Chat:
- Launch Destiny 2 and enter a game or party to test the voice chat. Verify if the issue has been resolved.
Reinstalling or repairing the game can be time-consuming, but it can be a definitive solution if the voice chat problem is caused by corrupted files. By following these steps, you can restore Destiny 2 to its pristine state, where voice communication flows smoothly once more, enriching your gaming experience and strengthening bonds with fellow guardians.
Conclusion
In conclusion, armed with these empowering fixes and preventive measures, conquer the elusive Destiny 2 voice chat issues. Embrace the power of seamless communication, forging unbreakable bonds with fellow guardians. Unleash your voice, and let destiny guide you to epic victories in this enthralling online universe. Happy gaming! Top of Form
FAQs
Check audio settings, update drivers, verify network, disable conflicting software, and run as administrator.
Try advanced troubleshooting, including firewall settings, port forwarding, and updating game files.
Temporarily disabling them can help identify if they are causing voice chat problems.
Check for updates in the game launcher or console settings and install any available patches.
Prachi Mishra is a talented Digital Marketer and Technical Content Writer with a passion for creating impactful content and optimizing it for online platforms. With a strong background in marketing and a deep understanding of SEO and digital marketing strategies, Prachi has helped several businesses increase their online visibility and drive more traffic to their websites.
As a technical content writer, Prachi has extensive experience in creating engaging and informative content for a range of industries, including technology, finance, healthcare, and more. Her ability to simplify complex concepts and present them in a clear and concise manner has made her a valuable asset to her clients.
Prachi is a self-motivated and goal-oriented professional who is committed to delivering high-quality work that exceeds her clients’ expectations. She has a keen eye for detail and is always willing to go the extra mile to ensure that her work is accurate, informative, and engaging.