This topic is well known for techie people as they would be aware of what is meant by the error. In recent years, we have ended up with lots of new devices upcoming with more features and functionalities. Yet, we lack some functionalities in our devices and we people are constantly involved in the customization of functionalities in our Android phones. One such feature is sideloading which allows native users to upload or download an application on their device without using the manufacturer’s play store application. Mostly Android and windows allow this feature of sideloading whereas iOS doesn’t allow considering security issues.
This error occurs mainly while people are trying to install custom ROM to your device. Since Android is been an open-source project it paves the way for a lot of developers to innovate their ideas using it. This has led to the development of custom ROM which in simple terms is mentioned as a ‘Developer’s custom version of android projects’. Custom ROMs add more features and functionalities to android projects that are not found in the original version of android. If you have a specific requirement that is not available in the original android version then you can install a custom ROM to fulfill that function.

Now let’s understand what adb sideloading error 21 or signature verification failed error 21. Let’s get into the details about what is meant by sideloading. Because it is obvious to know the full details of the error in prior trying to fix it.
When does adb sideloading error 21 occur?
So before diving into the error let us know what is meant by ADB sideloading. We all will be very familiar with the adb commands that we use in the Command Line tool. ADB sideload varies from normal adb commands that we use. It is used to install an application that will push and install a ZIP file using a specific command on your computer. Typically it is used often by a ROM developer.
How to do Flashing of custom ROM?
We can add our own desired OS and its features to the Installed ROM that comes with the device from the manufacturer. This is done by Flashing our own custom ROM into the device using various methods. So, you can install your customized operating system into your android device. To do this process you need to root your device to gain access to admin powers or superpowers.
Rooting vs Flashing android device
| Rooting | Flashing |
| Rooting is a process to access the superpower or administrative privilege of your android device | In Flashing we usually install a new ROM |
| It performs operations that are not allowed for normal users | To operate flashing a ROM, a rooting process is performed |
| Major functions of rooting is to remove system apps, install apps that are blocked by manufacturer’s, modify keyboard themes,add extra features like widgets in the notification bar,improve the performance of the device and battery life , etc | The functions of flashing are flashing a new ROM to change the entire function of the present OS ,such as removing system apps that is no longer required, adding new features and customizing the UI. |
| Rooting removes the limitations that are set by the manufacturers to perform some functions | It replaces the original Android OS of your device with a custom ROM |
| Rooting is done to achieve flashing the ROM into your device. | While Fashing a ROM, rooting your device is performed. |
What is rooting?
Rooting allows you to access some privileges over your device to modify the software or install new software. Mostly rooting is done while we are trying to remove bloatware from our device which most manufacturers don’t allow us to do so. When you want to change your device settings or want to remove the system application go ahead with the process of rooting your device. But there are also risks involved in rooting your device. Sometimes it may end up getting attacked by malware that results in improper functioning of your device.
For security reasons manufacturers don’t allow users to do system modifications so that they could provide better support in times of malfunctioning of your device. But some users have developed this rooting method as it provides the following benefits while the process of rooting is carried on.
- Change the customization of any theme /graphic of your device layout.
- Downloading any app from any app store.
- Extends the life of the battery with added performance.
- Install custom ROM.
- The latest version of android can be updated.
What is Bootloader?
We have now got an idea of why rooting is done. While you are trying to install a ROM, Bootloader also plays a vital role. Let’s understand the function of the Bootloader. It is a tool purposed to boot the system software and helps in prioritizing the processes that should run. In present new coming phones, this bootloader is locked to prevent unnecessary access or modifications done to the system. However, if you are a developer you can unlock the bootloader to gain access to special functionalities. In simple terms, to install a custom ROM you must need to root a device and unlock a bootloader. The bootloader is unlocked to perform these actions.
- Change the software.
- Gain access to full privileges to make modifications.
- Replace the entire OS.
- Remove system apps.
- To experiment with custom build apps for android.
What is Signature verification Failed error 21?
This error occurs mainly when you are trying to install a custom ROM or during the update of a custom ROM into your device. The files you are trying to install on your device may not be signed by the manufacturer. This is the reason for such errors. This error is also named a Signature verification error or adb sideload error 21. Two types of recovery come as a lifesaver when this error occurs.
Recovery mode Android device
What is stock recovery?
By default as your device is shipped with some system apps it is also preinstalled with a recovery environment setup. The main functionality of this setup is to recover your device in case of any malfunction or errors. This is done by pressing some buttons on your device or by issuing adb commands that boot your device to recovery mode.
The default recovery environment that comes with the device is called stock recovery. As it is provided by the manufacturer it helps to resolve simple issues such as battery draining, issues with the system apps, etc. The scope of recovery is limited as you can do here just to reboot the system, clear the cache partition, and reflash the new ROM. You can only boot or flash the files that come with the manufacturer’s system.
What is Custom recovery?
Custom recovery is similar to stock recovery but what makes the difference is that it adds a feature while recovering the device. While you are trying to install a third-party android OS or custom ROM you need a custom recovery to do it. This recovery is intended to help you to flash various files of your custom ROM. Else if something goes wrong, this recovery software handles the device to work on factory reset, updating the OS, and other diagnostic tasks. There are mainly two custom recovery available in the market that is most prominent and trusted. They are Clockwork Mod Recovery and Team Win Recovery Project.
Clockwork Mod Recovery
Flashing the Clockwork Mod Recovery into your device usually involves many ways. Based on your method of rooting the device choose the appropriate methods that suit your device. Also, you have to select the Flashing process according to your device name. Most Android devices support this recovery. You can flash this recovery either by using an app or the adb fast booting method. The most convenient way to install this recovery into your device is by using the ROM manager app of your device. I’ll tell you the steps to do it. Follow the prompt given below.
- Go to the Play Store and type for ROM Manager and click on install.
- Open the app and click on Flash ClockMod Recovery.
- The app will start to install the recovery.
Team Win Recovery Project
TeamWinRecovery project is a touch-based environment and it’s very popular as it supports most devices in installing the custom ROM.TWRP recovery helps you to take a complete backup of your android device, whereas this support is not done by google or your manufacturer’s stock recovery support. Additional functionalities include flashing unsigned zip files, rooting scripts, custom ROMs/MODs, and similar things.
The most significant success of TWRP is that all other custom recovery models use volume and power buttons for navigation whereas TWRP is the first recovery model to use a Touch interface, by tapping your fingers on the screen. Anyway, both recovery methods will provide backup restore and custom ROM installation features.
How to solve the Signature verification Failed error 21 or adb sideload error?
Now, let’s dive into the solution of fixing the error,adb sideload error. So, the first step to fix the error is to install a custom recovery which we have seen above. You need to choose the custom recovery according to your device otherwise it will not work. Download the .img files and install them on your device. Make note of turning off the System Verification and unlocking the Bootloader. Doing these steps makes you install the files without any errors. The most common way of installing custom ROM is by downloading an app or by using adb devices and fast booting.
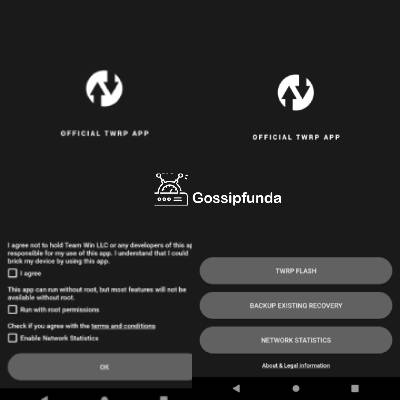
Install TWRP custom recovery through the App
The steps given below will guide you to install TWRP using the app and to fix the errors caused during the installation of custom ROM.
- Open your Google Play store and search for TWRP in the search bar.
- Install the TWRP App and open it.
- Agree to the terms and conditions and proceed to accept them.
- Select TWRP flash and click on the drop down menu to choose the custom recovery image file for your device name.
- Type your device name in the search bar and select it.
- Choose the latest version of custom recovery based on your device model.
- The next page is directed to the official TWRP page where you can get the .img files downloaded that are required to install the custom Recovery.
Install TWRP custom recovery with the method or adb method
If you face any method in the above method then this method is an alternative for it. The first step is to have a USB cable to connect to the laptop/PC and enable USB debugging in your device. I’ll tell you the way to enable USB debugging ON. Go to Settings>About Phone>Build Number 7 times .you will obtain the developer options. Click on it and enable USB debugging to be ON.
Let’s see how to do the method of fast booting.
- Go to chrome and search for the Fastboot.zip file for your device and download the file to your PC.
- NOTE: If you are using a Samsung device you will get a .tar file to flash stuff inside your device.
- The next step is to download TWRP recovery.img file that is compatible with your device and names it as recovery.img file.
- Connect your Device and Laptop using the cable along with USB debugging to be ON.
- Open the downloaded recovery.img file from your PC. Open the command window inside that folder using “Shift+Right click” in a blank space and select open command prompt from the menu shown.
- Type the command that appears in the command prompt.
adb reboot bootloader
- Then your device starts to boot in bootloader mode, enter the following command now to flash the TWRP recovery.img file:
fastboot flash recovery. img
- Once the TWRP recovery flashing is done type in the following command to fix the issue signature verification error 21.
fastboot reboot
- This command reboots the custom recovery and solves the error. That’s all .
Conclusion
Hope you would have to find a solution to fix adb sideload error 21 or signature verification error 21. Make sure to follow the steps given above carefully as it may pose a risk to your device if you install a recovery that is not compatible with your device. Install your desired custom ROM using any of the recoveries and make use of the additional features that come along with it.
Myself saranya is very passionate about researching new skills, especially in Android, and is staggered by its ample features in it. Being a graduate of B.Tech IT my interest lies in content writing technology-related articles. It’s a part of my endeavor to understand my audience from their perspective while reading an article and provide the best of my work that makes it easy to understand whoever reads it. I have happily started writing that provides the seamless solution that you are looking for.
I am ready to put my strongest asset as a technical writer and added to it I want to become an expert in all fields of writing.