If you are a Windows 11 user and have encountered the dreaded “IRQL_NOT_LESS_OR_EQUAL” error, don’t panic! This article aims to provide you with a comprehensive understanding of this issue and guide you through the steps to diagnose, troubleshoot, and prevent it from happening in the future. We’ll explore the potential causes behind this error, its implications, and user-friendly solutions to get your system back on track.
What is the IRQL_NOT_LESS_OR_EQUAL Error?
The “IRQL_NOT_LESS_OR_EQUAL” error is a Blue Screen of Death (BSOD) error that can occur on Windows 11, and it’s known to disrupt your computing experience. When this error strikes, your system will halt, and a blue screen will be displayed, stating: “Your PC ran into a problem and needs to restart. We’re just collecting some error info, and then we’ll restart for you.”
Causes of the IRQL_NOT_LESS_OR_EQUAL Error
- Faulty Device Drivers: One of the most common triggers for the “IRQL_NOT_LESS_OR_EQUAL” error is outdated or malfunctioning device drivers. Drivers are software components that facilitate communication between hardware devices and the operating system. If a driver is incompatible or corrupt, it can lead to memory conflicts, resulting in the BSOD error.
- Memory Issues: Problems with your computer’s memory modules can also cause this error. Malfunctioning RAM (Random Access Memory) or incorrect memory configurations may lead to conflicts and trigger the IRQL_NOT_LESS_OR_EQUAL error.
- Hardware Incompatibility: Some hardware components may not be fully compatible with Windows 11, and attempting to use them can lead to conflicts, causing the dreaded error.
- Overclocking: Overclocking your CPU or GPU can boost performance, but it may also destabilize your system. The increased clock rates may lead to memory or timing issues, resulting in the BSOD error.
- Malware or Viruses: Infections from malicious software can cause system instability, leading to various errors, including IRQL_NOT_LESS_OR_EQUAL.
- Windows Updates and Patches: While rare, certain Windows updates or patches can sometimes introduce new bugs, leading to the occurrence of this error.
How to fix the IRQL_NOT_LESS_OR_EQUAL Error
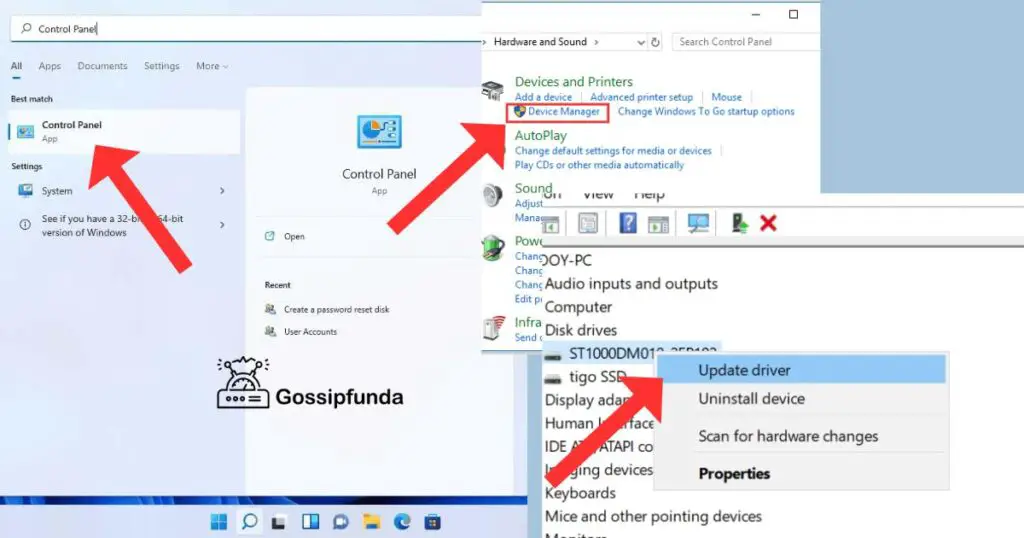
Update Device Drivers:
Keeping your device drivers up-to-date is crucial for system stability. Visit the manufacturer’s website for each hardware component and download the latest drivers compatible with Windows 11. Alternatively, you can use Windows Update to check for driver updates automatically.
- Right-click on the “Start” button and select “Device Manager.”
- Locate the device, right-click, and choose “Update driver.”
- Select “Search automatically for drivers” to update automatically.
- Choose “Browse my computer for drivers” and provide the path to the latest driver if not found automatically.
- Click “Next” and let Windows install the updated driver.
- Restart the computer if required.
- Verify the update in Device Manager by checking the driver details.
- Repeat for other devices if needed.
Test and Replace Memory Modules:
Testing and replacing memory modules can help resolve issues related to faulty RAM, which may be causing the “IRQL_NOT_LESS_OR_EQUAL” error on Windows 11. Follow these steps to test and potentially replace the memory modules:
- Power off the computer and disconnect it from the power source.
- Open the computer case and locate the RAM slots on the motherboard.
- Remove the RAM module by releasing the retention clips and gently pulling it out.
- Insert one RAM module into a memory slot and firmly press it down until the retention clips lock it in place.
- Power on the computer and boot into Windows 11.
- Run the “Windows Memory Diagnostic” tool by typing “mdsched.exe” in the Run dialog and choose “Restart now and check for problems.”
- Check for errors during the memory test to identify the faulty RAM module.
- Repeat the test for each RAM module to find and isolate the faulty one.
- Purchase a new and compatible memory module to replace the faulty one.
- Power off the computer, install the new RAM module, and reassemble the case.
- Boot into Windows 11 and run the memory test again to ensure the new module is error-free.
- Monitor the system for stability to verify if the “IRQL_NOT_LESS_OR_EQUAL” error is resolved.
Check Hardware Compatibility:
Verify that all your hardware components are officially supported by Windows 11. If any components are not compatible, consider upgrading to compatible hardware.
To check hardware compatibility for Windows 11, follow these steps:
- Review the official system requirements for Windows 11 on the Microsoft website.
- Use the “PC Health Check” tool from Microsoft (if available) to check your system’s compatibility with Windows 11.
- Verify if your computer has a compatible TPM version and Secure Boot enabled in BIOS/UEFI settings.
- Check your computer manufacturer’s website for specific Windows 11 compatibility information or tools.
- Ensure that individual hardware components (e.g., motherboard, graphics card, network adapter) are officially supported by Windows 11.
- Keep your current Windows 10 installation up-to-date with all available updates.
- Engage with online forums and communities to learn from others’ experiences with Windows 11 on similar hardware configurations.
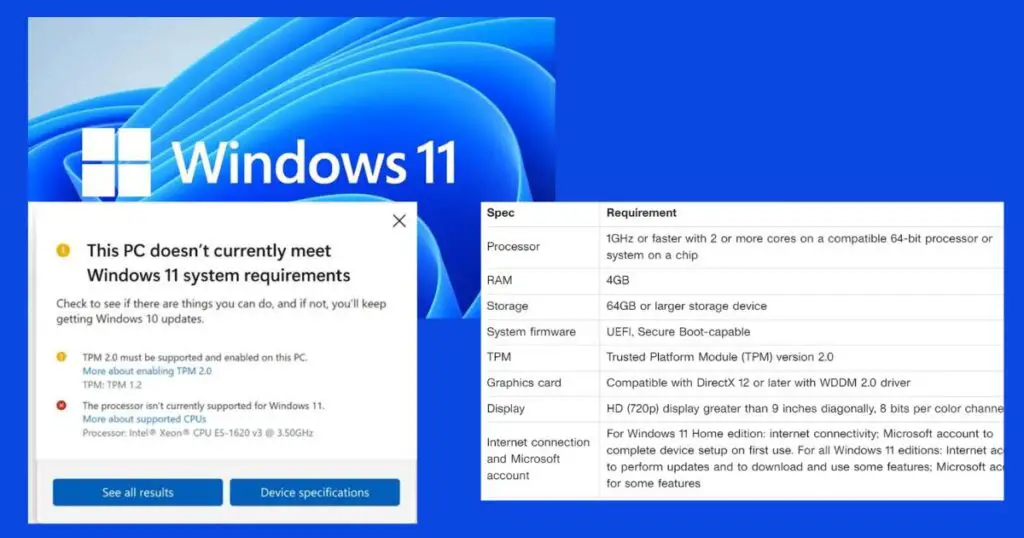
Note: Always back up important data before attempting any major operating system changes to avoid data loss.
Remove Overclocking Settings:
If you have overclocked your CPU or GPU, revert the settings to their default values. This action may stabilize your system and eliminate the BSOD error.
To remove overclocking settings, follow these steps:
- Restart your computer and access the BIOS/UEFI settings during boot (e.g., Del, F2, F10).
- Find the option to reset to default or optimized settings.
- Confirm and proceed with the reset action.
- Save changes and exit the BIOS/UEFI menu.
- Open overclocking software (if used) and revert to default or stock settings.
- Disable any saved overclocking profiles.
- Restart your computer to apply the changes.
- Monitor stability and performance for any issues.
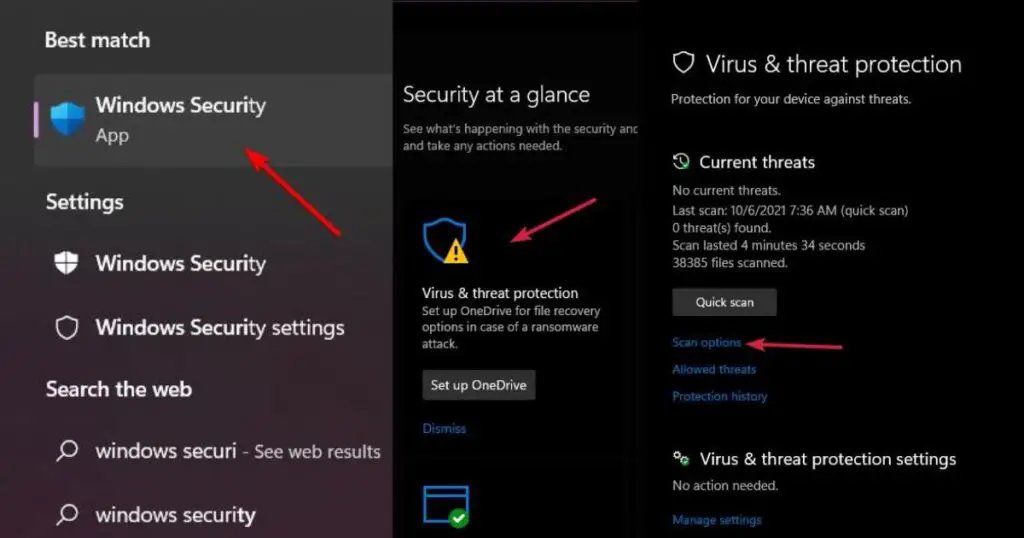
Perform a Full System Scan:
Performing a full system scan is an essential step to detect and remove malware and viruses from your computer. Follow these steps to perform a full system scan:
- Update your antivirus software with the latest virus definitions.
- Open the antivirus software from the system tray or Start menu.
- Navigate to the “Scan” or “Scan Options” tab.
- Select “Full System Scan” from the available scan types.
- Click “Start” or “Scan Now” to begin the scan.
- Monitor the scan progress and any real-time threat notifications.
- Take necessary actions when malware or viruses are detected.
- Review the scan results to ensure all threats are addressed.
- Consider running additional scans with other reputable antimalware tools.
- Schedule regular full system scans for ongoing protection.
- Keep your operating system and software updated for enhanced security.
- Practice safe internet browsing and avoid downloading files from untrusted sources.
Uninstall Problematic Windows Updates:
If you encounter issues after installing a Windows update, you may need to uninstall the problematic update. Here’s how you can do it:
- Press “Windows key + I” to open Windows Settings.
- Click on “Update & Security.”
- Select “Windows Update” from the left sidebar.
- Scroll down and click on “View update history.”
- Click on “Uninstall updates” at the top.
- Locate the problematic update in the “Installed Updates” window.
- Right-click on the update and select “Uninstall.”
- Confirm the uninstallation.
- Restart your computer when prompted.
- Check if the issues caused by the problematic update are resolved.
Preventive Measures to Avoid the IRQL_NOT_LESS_OR_EQUAL Error
- Regularly Back Up Your Data: Back up your important files and data regularly to avoid permanent loss in case of system failures or crashes.
- Create System Restore Points: Windows allows you to create system restore points that can be used to roll back your system to a stable state if issues arise.
- Use Reliable Antivirus Software: Invest in a reputable antivirus program and keep it updated to protect your system from malware and viruses.
- Avoid Overclocking: While overclocking can boost performance, it comes with potential risks. Unless you’re an experienced user, it’s best to avoid overclocking your hardware.
- Be Cautious with Third-Party Software: Install software only from trusted sources to minimize the risk of incompatible or malicious programs causing system issues.
Conclusion
The “IRQL_NOT_LESS_OR_EQUAL” error can be a frustrating experience for Windows 11 users, but armed with the knowledge of its potential causes and the solutions presented in this article, you can tackle it effectively. By keeping your system updated, drivers current, and taking precautionary measures, you can ensure a smoother and more stable computing experience. Remember that troubleshooting may require some trial and error, so be patient and methodical in your approach. If you’re uncomfortable performing these tasks yourself, seeking professional help is always a wise choice. Happy computing!
Rahul Kumar is a passionate tech journalist and gaming expert with a knack for breaking down complex game mechanics into easy-to-follow guides. With years of experience covering multiplayer shooters and strategy games, he specializes in troubleshooting gaming errors, optimizing performance, and enhancing the overall gaming experience. When he’s not diving into the latest co-op titles, you’ll find him testing new hardware, exploring hidden gaming tricks, or engaging with the gaming community to bring the most effective solutions. Follow Rahul for in-depth gaming insights, practical fixes, and all things action-packed! 🚀🎮