Encountering a non-responsive or disabled Run button in Android Studio can be incredibly frustrating, especially after investing significant time in developing your application. Whether you’re a seasoned programmer or just starting out, this issue can halt your progress and dampen your coding spirit. But fear not! This comprehensive guide walks you through the most effective solutions to get your Run button back in action, ensuring your hard work doesn’t go to waste.
Troubleshooting the Run Button in Android Studio
When the Run button in Android Studio becomes unclickable or greyed out, it typically points to underlying configuration or setup issues. Below are the most common scenarios and their respective solutions to help you navigate and resolve this problem efficiently.
1. Add Configuration
One of the primary reasons the Run button becomes disabled is the absence of a proper run configuration. Without a defined configuration, Android Studio doesn’t know how to execute your application.
- Step 1: Click on the Run menu in the toolbar.
- Step 2: Select Edit Configurations.
- Step 3: Click the + button and choose Android App.
- Step 4: Select the appropriate module for your application.
- Step 5: Click Apply and then OK.
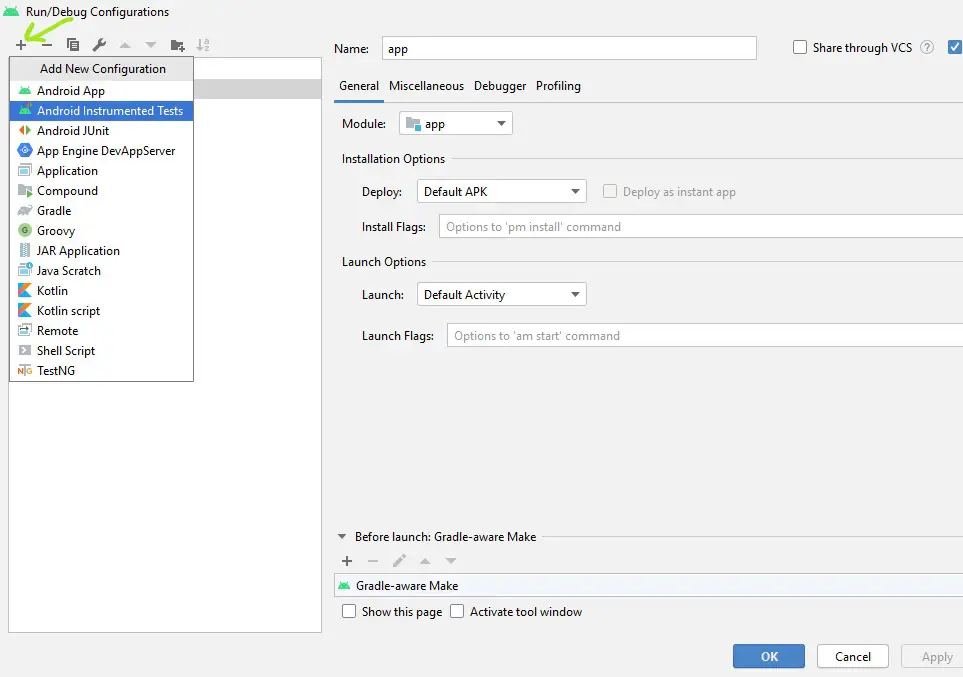
After setting up the configuration, the Run button should become active. Impact: Proper configurations ensure that Android Studio knows how to build and run your application, preventing execution errors.
2. Missing Android SDK
A missing or improperly installed Android SDK can disable the Run button. The SDK provides the necessary tools and libraries for Android development.
- Step 1: Navigate to File > Settings > Appearance & Behavior > System Settings > Android SDK.
- Step 2: Ensure that the required SDK platforms and tools are installed.
- Step 3: If missing, select the necessary components and click Apply to install them.
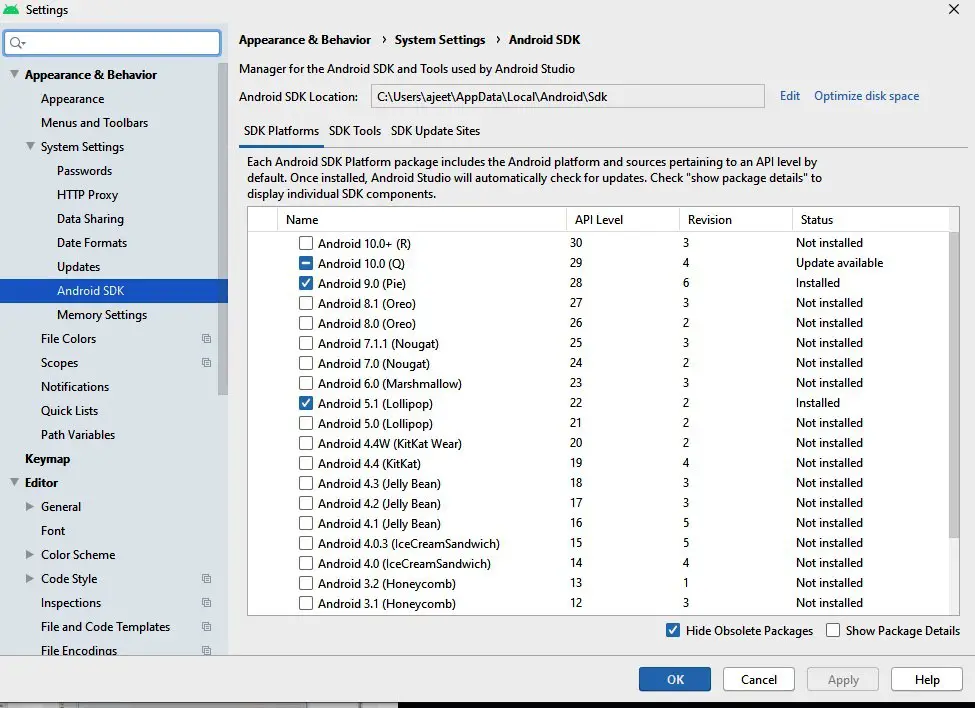
Ensuring the Android SDK is correctly installed is crucial for the seamless operation of Android Studio. Consideration: Always download SDK components from official sources to avoid compatibility issues.
3. Invalidate Caches and Restart
Sometimes, cached data can interfere with Android Studio’s functionality. Invalidating caches can resolve unexpected behavior, including a non-responsive Run button.
- Step 1: Go to File > Invalidate Caches / Restart.
- Step 2: Click Invalidate and Restart.
This process clears the cache and restarts Android Studio, potentially resolving the issue. Impact: Helps in eliminating corrupted cache data that might be causing the Run button to malfunction.
4. Update Android Studio to the Latest Version
Running an outdated version of Android Studio can lead to bugs and compatibility issues. Keeping your IDE updated ensures you have the latest features and fixes.
- Step 1: Click on Help > Check for Updates.
- Step 2: If an update is available, follow the prompts to install it.
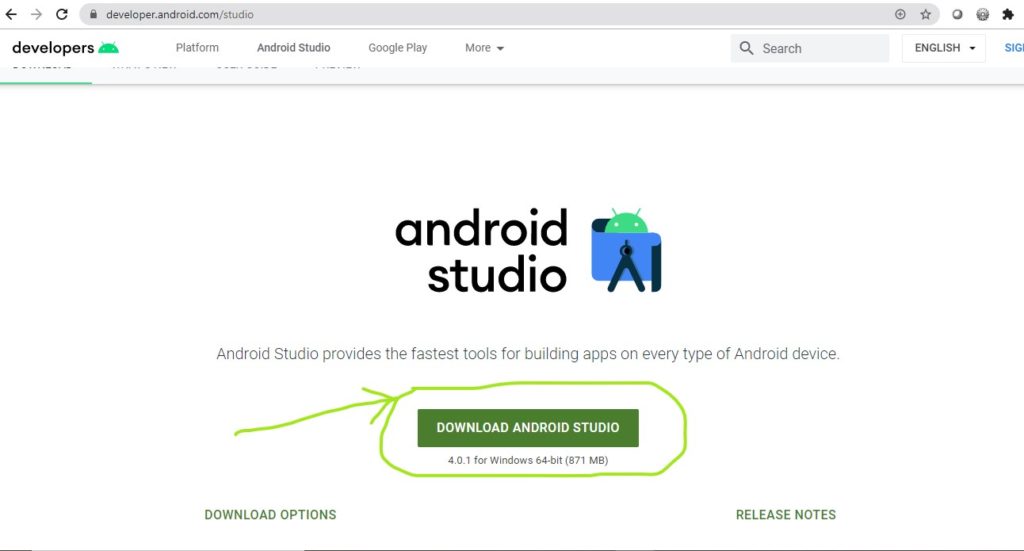
Regular updates can prevent many common issues. Consideration: Always back up your projects before updating to avoid any unexpected data loss.
5. Ensure System Requirements are Met
Android Studio requires specific system configurations to function optimally. Inadequate hardware can lead to performance issues, including the Run button not working.
- Operating System: Windows 10 (64-bit), macOS 11.0 (Big Sur) or higher, Linux (64-bit)
- RAM: Minimum 8 GB recommended
- Disk Space: At least 8 GB of free space
- Screen Resolution: 1280 x 800 minimum
| Windows | macOS | Linux | |
|---|---|---|---|
| Operating System | Windows 10 (64-bit) | macOS 11.0 (Big Sur) or higher | GNOME or KDE desktop environment on Linux |
| RAM | Minimum 8 GB | Minimum 8 GB | Minimum 8 GB |
| Disk Space | 8 GB SSD recommended | 8 GB SSD recommended | 8 GB SSD recommended |
| JDK Version | Java Development Kit 11 | Java Development Kit 11 | Java Development Kit 11 |
| Screen Resolution | Minimum 1280 x 800 | Minimum 1280 x 800 | Minimum 1280 x 800 |
Verify your system meets these requirements to ensure smooth operation. Impact: Adequate system resources prevent lag and unresponsiveness in the IDE.
6. Reinstall Android Studio
If all else fails, reinstalling Android Studio can resolve persistent issues that aren’t fixed by other methods.
- Step 1: Uninstall Android Studio from your system.
- Step 2: Delete the Android Studio configuration folders located in %USERPROFILE%/.AndroidStudio or ~/Library/Preferences/AndroidStudio on macOS.
- Step 3: Download the latest version from the official Android Studio website and install it.
Reinstalling ensures a fresh setup, eliminating corrupted files or settings. Risk: Make sure to back up your projects before proceeding to avoid data loss.
7. Check for Plugin Conflicts
Conflicting plugins can disrupt Android Studio’s functionality. Disabling or updating plugins can help restore the Run button’s functionality.
- Step 1: Navigate to File > Settings > Plugins.
- Step 2: Disable recently installed or suspicious plugins.
- Step 3: Restart Android Studio and check the Run button.
Managing plugins ensures that only compatible extensions are active. Impact: Prevents third-party plugins from interfering with core IDE operations.
8. Verify Project Build Settings
Incorrect build settings can prevent your project from running. Ensuring that your build configuration is correct is essential.
- Step 1: Open Build > Clean Project to remove any build artifacts.
- Step 2: Then select Build > Rebuild Project.
- Step 3: Address any build errors that appear in the Build Output window.
Proper build settings ensure that your project compiles without errors, allowing the Run button to function correctly. Impact: Resolves compilation issues that might be blocking the execution of your application.
9. Use a Physical Device for Testing
Sometimes, emulator issues can prevent the Run button from working. Testing on a physical device can bypass emulator-related problems.
- Step 1: Connect your Android device to your computer via USB.
- Step 2: Enable USB Debugging on your device.
- Step 3: Select your device from the device dropdown in Android Studio.
Using a physical device ensures that emulator glitches don’t hinder your development process. Impact: Provides a reliable testing environment, free from emulator-specific issues.
10. Contact Support or Community Forums
If you’ve tried all the above solutions and the Run button still isn’t working, reaching out to the community or official support can provide additional assistance.
- Step 1: Visit the Stack Overflow Android Studio tag to seek help from experienced developers.
- Step 2: Submit an issue on the Google Issue Tracker for official support.
Engaging with the developer community can provide unique insights and solutions tailored to your specific issue. Consideration: Provide detailed information about your problem to receive accurate assistance.
Android Studio Version History (2020-2025)
| Version | Release Date |
|---|---|
| 4.0.1 | July 2020 |
| 2020.3 (Arctic Fox) | August 2021 |
| 2021.1 (Bumblebee) | April 2022 |
| 2022.2 (Chipmunk) | November 2022 |
| 2023.1 (Dolphin) | May 2023 |
| 2023.2 (Electric Eel) | October 2023 |
| 2024.1 (Flamingo) | April 2024 |
| 2024.2.1 (Ladybug) | September 2024 |
| Ladybug Feature Drop | January 2025 |
| 2024.3.1 (Meerkat) | January 2025 |
System Requirements for Android Studio (2025)
| Component | Windows | macOS | Linux |
|---|---|---|---|
| Operating System | Windows 8, 10, or 11 (64-bit) | macOS 10.14 (Mojave) or higher | 64-bit Linux with GNOME, KDE, or Unity |
| RAM | Minimum 8 GB (16 GB recommended) | Minimum 8 GB (16 GB recommended) | Minimum 8 GB (16 GB recommended) |
| Disk Space | Minimum 8 GB (SSD recommended) | Minimum 8 GB (SSD recommended) | Minimum 8 GB (SSD recommended) |
| JDK Version | Bundled JDK (Java 17 recommended) | Bundled JDK (Java 17 recommended) | Bundled JDK (Java 17 recommended) |
| Screen Resolution | Minimum 1280 x 800 | Minimum 1280 x 800 | Minimum 1280 x 800 |
| CPU | Intel/AMD (with VT-x or AMD-V enabled) | Intel/Apple Silicon (M1, M2 with Rosetta 2) | Intel/AMD (with virtualization support) |
| Graphics | Dedicated GPU recommended (latest drivers) | Dedicated GPU recommended (latest drivers) | Dedicated GPU recommended (latest drivers) |

Myself Shreya Choudhary, a Computer Science Engineer. Freak to hunt new technologies, go though there working process, and use them. More interested in creating games rather than playing. Most of the time spent reading new hi-tech news, blogs, stories, up-coming technologies, and everything that’s related to tech. Dream of working on my own developed Operating System one day 😉
Other then tech stuff, I am more of an outdoor person, loves to travel, hunt new places and cultures. Meet new people, know new inspiring stories and lifestyles.
