Phones have become a quintessential part of our regular lives nowadays. Smartphone users know that phones, besides being just great in general, can also act as great tools for research and planning. Whether one is looking for nearby restaurants or booking a flight for the weekend or simply researching some topic to satisfy a curiosity. Simply put, phones have become a go-to device for a variety of tasks. But one should know, all that is being done on a phone is stored as history.
So if one wants to know what a phone has been storing during the time it is being used by the user, anyone other than the user, or even while not being used, the process is rather simple. In this article, we’ll walk you through how to view search history on phone. Users can then learn to view, delete, and even block their search history, by following some simple steps.

What all constitute a search history on phone?
With all the various types of tasks, one can perform on their phone, discussing what constitutes a search history becomes important. The search history on your phone is just a record of all the searches you have performed on the phone. In general, all the data that the browser stores about its users can be considered search history. But not to worry, as all browsers do allow all users to access their individual search histories and edit them the way they want. In this article, we are going to discuss the ways one can go through to view and edit the search histories from the most popular mobile web browsers:-
- Chrome Browser
- Firefox Browser
- Opera Browser
- Brave Browser
But viewing search history on phones can also mean the search history from individual apps, like Google maps, YouTube, etc. Clearing local history, which is just the history stored locally on a particular device, also makes the list. But browsing history is majorly the history that Big Tech companies collect and store. In this article, we are going to discuss each of these topics, individually.
Browser Search History
Phone users can access the internet through the help of software known as a browser. Bowsers help you navigate the vast sea of information that is on the Internet. But everything searched on the browser does get stored as history. Now this history, no matter whatever browser is used, can be viewed and altered. But the steps to do all that on different browsers are different. And in case a user has multiple devices with different browsers on each device then the user might have to go through the same processes repeatedly so as to make the search history to their liking.
Now that, we have the basics covered let’s get to the different types of browsers that users usually interact with, and let’s dive right into the ‘how to’ of it all.
Google Chrome Browser
Chances are if it’s an Android phone, Google Chrome is the default web browser. From the house of Google, we have the most popular Android browser. Android phones generally come with two browsers pre-installed out of the box. And since most people know about Google Chrome they prefer to keep it as their default browser and keep using it. The key feature that differentiates Chrome from all other mobile browsers is its ability to sync with Google Chrome desktop. Unlimited browsing tabs, and deeper integration with Android due to its inherent nature, make it ideal for basic browsing.
Also, the latest updates in its material design and the latest Android features before all other browsers, are key attributes that contribute to its overall appeal. Though not as abundant in its features list, Chrome still offers some pretty cool ones, such as – secured ‘payment methods’ storage, data-saver mode, inbuilt integration of Google Translate, and group tabbing.
Google offers four variations of its Chrome browsers. The regular Google Chrome is the most stable and the most popular. Chrome Beta is Google’s offering for users who want the latest and greatest. It gives its users a four to six-week preview of all the features that are to come onto the regular Chrome, basically to test out the quirks and determine their appeal. Chrome Dev and Chrome Canary are similar to Chrome beta with each of them bringing a little earlier previews of the new features. In terms of stability, all the variants follow a descending order, respectively.
Regular Google Chrome usually comes pre-installed in most Android devices. But for the devices that don’t have it installed by default, it is available along with all the other Chrome variants, to be installed from the Google Play store.
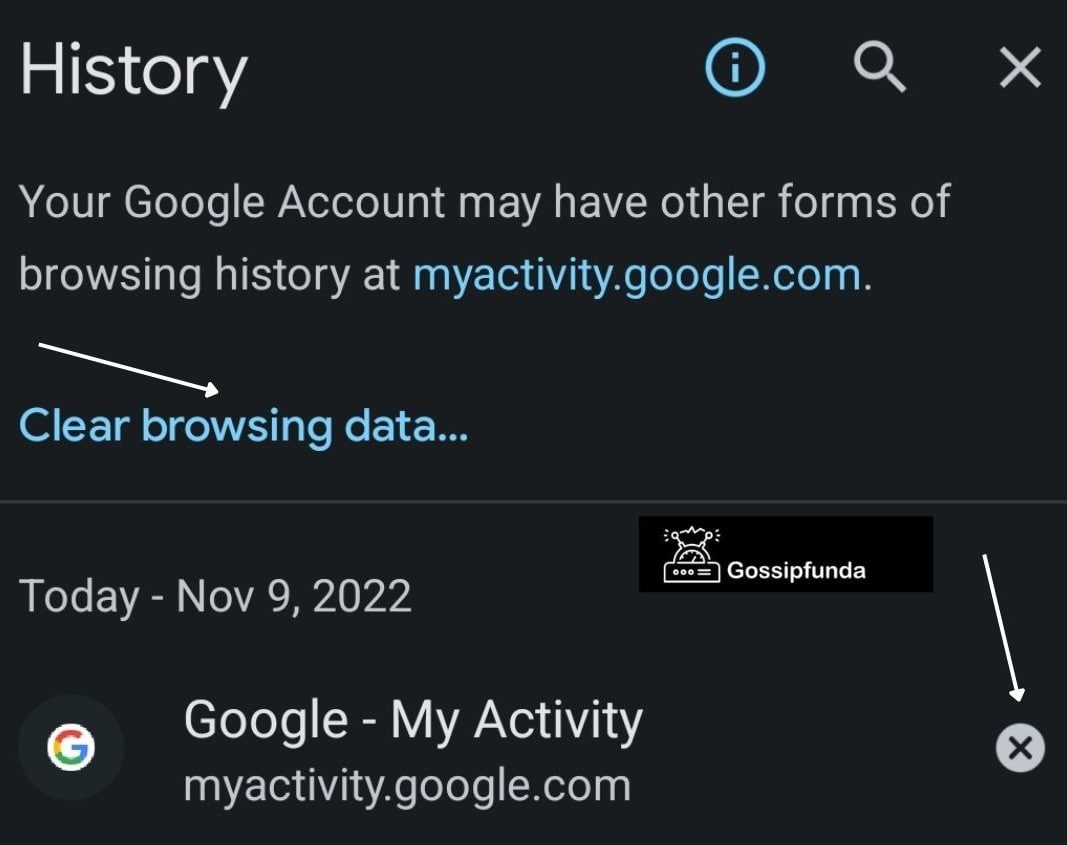
Google Chrome and all it’s variants share the same base structure. What that means is, the same steps are to be followed on each to get to the ‘History page’. The history page shows the user all the webpages they have visited on Chrome during the last 90 days. If sync is enabled, then the History page will show webpages visited across all the synced devices for much longer. Now, let’s have a look at the steps to view the History page and edit the search history on it :-
Seeing user history
To proceed first of all the user needs to open the Chrome app on their respective Android device.
- From the upper right corner, tap on the three vertical dots.
- From the pop-down menu click on the “History” option.
- To visit any of the displayed sites, tap on that particular entry.
- If the user wants to open any particular site in a new tab, or in the Incognito tab, or copy its link, the user needs to touch and hold that particular entry.
- From the upper right corner, tap on the three vertical dots and select the desired option.
Clearing user history
In the History page the user has the option to either delete the entire history or individually delete entries.
To Clear all browsing data, the user needs to be on the History page.
- Click on the link: “Clear browsing data…”
- Within the “Time range”:
- To clear a portion of the history, select the dates.
- To clear everything, select All time.
- Tick the check box next to “Browsing history”.
- Tap on the “Clear data” button to delete all the browsing/search history.
Deleting items from the user’s history
In case the user doesn’t want to clear all of the search histories, they have the option to be selective about it. Users can very simply delete only certain parts of their history. There is even an option to search for something specific. On the History page, the user needs to search the particular entry from the Search bar.
- From the History page, the users can find the entry they want to delete.
- SImply tapping on the “Remove” (cross) button on the right removes that particular entry.
In case the user wants to select and delete multiple entries:
- Just touch and hold all the entries that are to be deleted.
- Simply tapping on the “Remove” button on the top right corner can remove all the selected entries.
If a user doesn’t want Chrome to save their browsing history at all, they can also choose to browse in private with the Incognito mode. To go to incognito mode, the user simply needs to open the Google Chrome app. Click on the three vertical dots in the upper right corner. From the drop-down menu, select the “New Incognito tab” option, and the user gets to the incognito section.
What is “My Google Activity”?
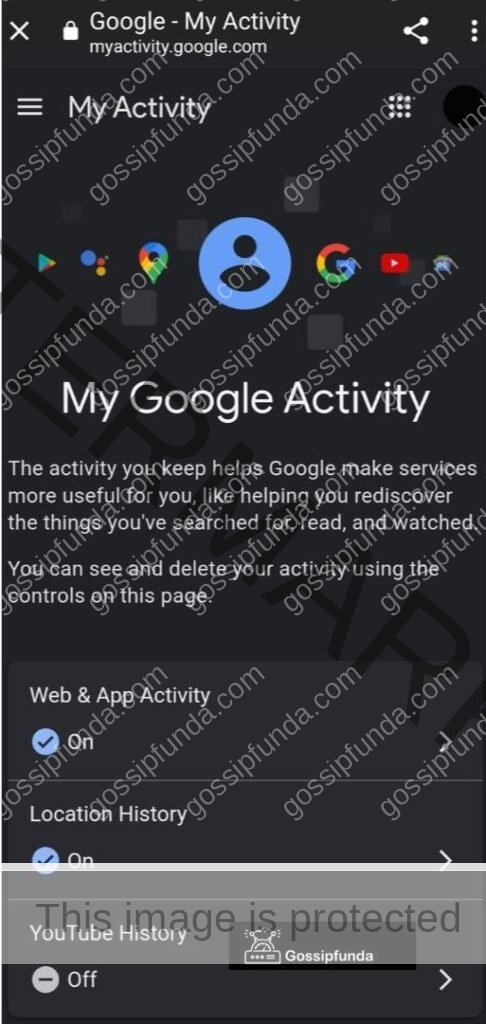
Google offers a “My Activity” feature wherein users are put in control over their search history and account data settings. From within this feature, the user can monitor their activity over several of Google’s services, including Google Maps and YouTube.
To access the “My Google Activity” page, the user simply needs to open their browser’s search tab and type “https://myactivity.google.com/myactivity”. On opening the user is greeted by the main Activity controls page consisting of three activity controls: Web & App Activity, Location History, and YouTube History. The Web & App Activity deals with web and app search history-related settings. With the help of this page, users have the access to control the amount of data shared with Google from their account.
Users can view and edit the search history on their phone, from this section as well. After selecting the “Web & App Activity” controls, the users get to this page :-
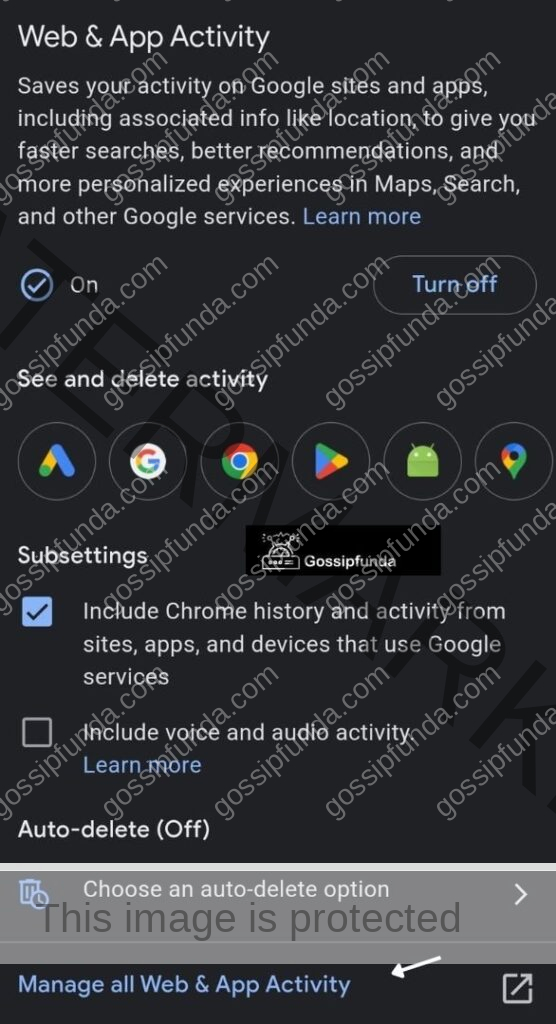
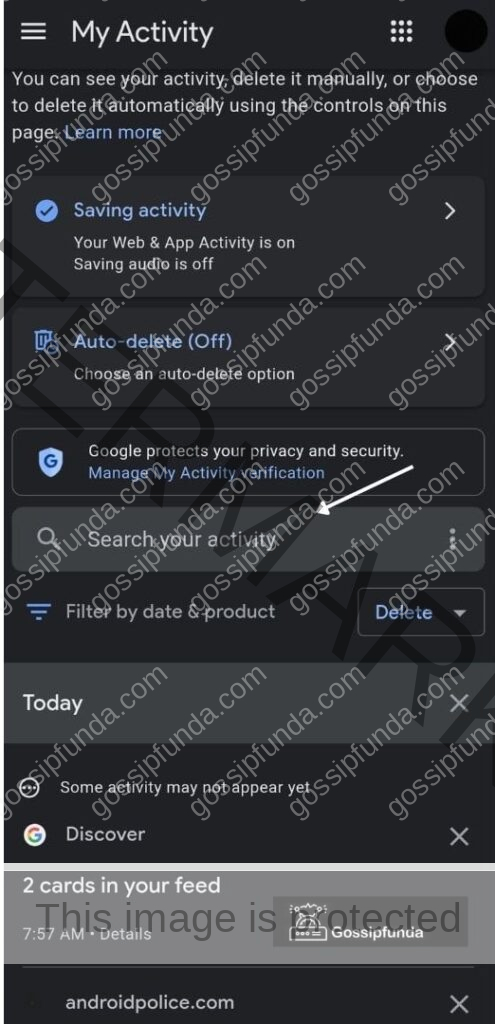
At the lowermost section of the page, the user can select the “Manage all Web & App Activity” option. That takes the user to the My Activity page where the user can see all their web activity and edit them using the same process as the History Page.
With Google Chrome synced on the phone and the desktop, deleting the data once in one device will remove it from all devices.
Firefox Browser
From the house of Mozilla comes the Firefox line-up of browsers. The term ‘browsers’ was used because they offer two browsers and users can use either one depending on their choice. The standard Firefox Browser is the more popular one. Loaded to the brim with awesome features like cross-platform syncing, protection from tracking, integration of an in-built password manager, etc. Apart from all that it just offers a solid browsing experience all around. The second offering is Firefox Focus, a privacy browser built with security and privacy in mind. Though geared towards a niche audience, Focus is a pretty popular browser among the security enthusiasts of the World. Focus lacks some of the functionality of the standard Firefox browser, but makes up for it with all its offered privacy protection features.
Firefox is an easy choice for users who use it as their default desktop browser due to its cross-syncing capabilities. On signing into the Firefox account on all devices, the passwords, history, and bookmarks get auto-synced on all the devices. Customization capabilities on Firefox seem almost limitless, with different themes and extensions that a user can use can tweak almost all corners of their browser. A visually distinguishing aspect of the Firefox browsers is their integration of the ‘search URL’ bar at the bottom of the screen. Not to worry though, cause with all the customization capabilities it is quite possible to move the bar up to the more traditional top area.
The standard Firefox Browser and Firefox Focus are both available to be installed on Android devices from the Google Play store. Offered by Mozilla these are both excellent to-use and feature-rich Android web browsers. Aside from these, just like Google does with its Chrome line-up of browsers, Mozilla too offers more experimental versions of Firefox: Firefox Beta for testers, and Firefox Nightly for Developers.
Accessing and deleting browsing history
- Open the Firefox app and open the History panel present on the home screen.
- User can view their search history in the list.
- To delete the browsing history, the user needs to click on the “Clear browsing history” button, at the bottom of the History panel.
- On the confirmation pop-up, press ‘OK’ to clear the history.
Deleting selectively from browser history
- Open the app and click on the menu button, present either below or in the upper right corner depending on the configuration.
- Now select the ‘Settings’ option.
- If the ‘Settings’ section is not available, select the ‘more’ option first and then select ‘Settings’.
- From the presented options click on the ‘Clear private data’ button.
- Now from the list, select the items to be cleared and then confirm by clicking on ‘Clear data’ button.
Option to clear all data on exit
Firefox provides the users with an option to auto-delete all selected data: browsing history, bookmarks, saved passwords, etc., each time on exiting the app.
- Open the app and click on the menu button, present either below or in the upper right corner depending on the configuration.
- Now select the ‘Settings’ option.
- If the ‘Settings’ section is not available, select the ‘more’ option first and then select ‘Settings’.
- Open the ‘Privacy’ section and select the ‘Clear private data on exit’ button.
- A pop-up window is presented, where the user can select the types of information: browsing history, bookmarks, saved passwords, etc., that they would like to delete each time on exiting the app
- On the confirmation pop-up, press ‘set’ to put the changes to effect.
Firefox needs to be closed using the ‘Quit’ option on the menu, for this option to happen.
In case any of the above options do not work, the application needs to be force-stopped and then restarted.
Opera Browser
When it comes to variety with Android browsers, Opera certainly doesn’t disappoint. With a number of offerings under its domain, Opera has made a name for itself. The flagship browser, Opera Browser: Fast & Private, has the feature of cross-device syncing with the desktop version. Its well-known traits include autofill and an in-built adblocker. Opera Touch is Opera’s lightning-fast browser option mainly geared towards single-handed usage.
It features tracking and ad-blocking. Opera Mini – fast web browser is the lighter variant and is mainly popular for its data saving features, in that it boasts a very impressive ninety percent data consumption reduction. It also features a nifty ad blocker, an offline reading mode for data saving, etc. There is also a variant named Opera GX: Gaming Browser.
As the name already suggests it is a gaming browser that shares similar features-set as the others, besides including a gaming news feed, assorted themes, cross-syncing between the desktop and mobile versions, etc. Other than these, there are also the beta versions of Opera which are more experimental and basically provide the users with earlier previews of new features.
As has been the case with all the browsers on the list, Opera has a desktop browser as well, that can be synced with the mobile app to max utilize all the benefits. Opera is different from the rest of the best Android browsers with a unique approach to its data-saver mode. What it does is it compresses both videos as well as standard web pages to consume less data and have faster load times. With its built-in free VPN-like feature which provides the user with a virtual IP address, Opera certainly stands out. Boasting as many features as it does, Opera still manages to deliver solid and fast browsing experiences.
All versions of Opera are available to be installed on phones from the Google Play store.
Browsing history on the Opera browser can be accessed by clicking on the ‘History’ button, present on the Home screen.
Clearing the browsing history
- Open the app and click on the three vertical dots, in the upper right corner.
- From the pop-down options, click on ‘Settings’.
- Find the Browser section.
- Click on the ‘Clear browsing data’ button.
- Select the data to be deleted or simply click on ‘select all’.
- On the confirmation pop-up, press the ‘Clear data’ button to clear the history.
The website shortcuts of the deleted web pages are removed from the ‘Top Sites’ section on the Home screen.
Brave Browser

Brave Browser is one of the youngest Android browsers in the scene at the present moment. Announced in 2016 it comes packed with lots of features, with the main unique selling point (USP) being its built-in ad blocker. Also, It has the capability to block third-party cookies, and scripts. It is based solely on the HTTPS architecture. It is built with security in mind. A highly functional browser with good speed and reliability. Not to mention that it is absolutely free with no in-app purchases or ads. The browser is Chromium-based and has a Basic Attention Token (BAT) system which enables the users to pay for websites. Brave has its very own privacy-minded search engine set as the default.
The load speeds on Brave, while not as fast as the other top competitors on the list, are still comparable. Given Brave’s policy to strip out ads and trackers should in theory make it have even slower load times, but hey no one is complaining.
Brave Software hosts the Brave Private Web Browser, for users to install on the Google Play store. Users can also install the browser from the “Brave.com” website.
To view and clear Brave’s browsing history on an Android phone, the process is rather simple.
- User needs to open up the Brave browser on their phone.
- Now from the upper right corner, tap on the three vertical dots and go to the Settings menu.
- From there select History the option and get greeted to the History page.
- Now the user can tap on the “Clear Browsing Data” button to start viewing and clearing the search history.
Ways to recover deleted browsing history
A phone’s browser history becomes super helpful when users want to access websites with valuable information quickly. In this article, we have already discussed how to view and delete browsing history. In case a user inadvertently deletes a useful website, they will need a way to get it back. Here, we are also going to guide users through the methods to recover deleted browser history.
Cross-syncing browsing history across multiple devices is a technique that is going to come in handy when we are trying to recover lost history. An Android phone user gets the ability to save all the data on a Google account or other Google-based services such as Google Drive. This helps during the recovery of browsing history in case of accidental deletion. So without wasting any further time, let’s get to the nitty-gritty of it.
Recovery of deleted chrome history from Google account
Having Google synchronization on the Android phone to “ON”, syncs all of the web files in the Chrome browser across all the devices that the user owns. Ensuring that, it is a simple few steps, following which, Through your Google account, the user can quickly recover their browser history instantly.
Steps to follow for the history recovery:
- Open the Chrome app.
- On the search bar enter the link: “https://www.google.com/settings/”
- Fill up the Google account credentials.
- Click on the ‘Data & Personalization’ button.
- Open the ‘Things you create and do’ section.
- Press on the ‘view all’ button.
- Find the Google Chrome’s icon and click on it
- Select the ‘Download Data’ option to recover the deleted browsing history.
Google Maps search history (Location history)
Google Maps has become one of the most important tools in our daily lives. Navigation has never been easier. Maps rely on the GPS location information of the user. So naturally, the GPS location history gets stored in its database as well. Let’s simplify what all constitutes search history in Google Maps.
Location History
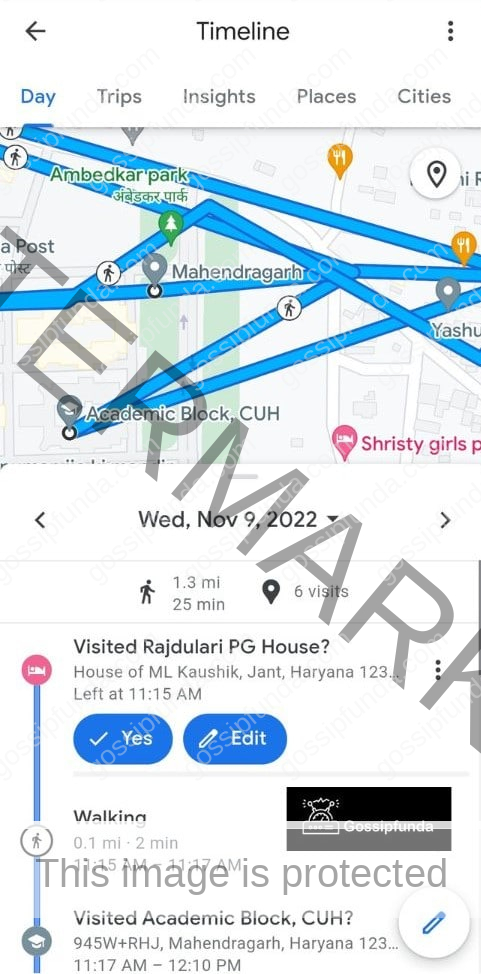
Turned off by default for your Google Account, Location history can only be turned on when opted in, and can be paused at any time from the Google Account’s Activity controls. User has total control over everything that gets saved in their Location History. The Google Maps Timeline shows the user all the places that they have been to and this can be edited. The Google Maps Timeline can be used to delete the Location History.
From the Google account, a user needs to go to the “Location History” section and choose if the account on that particular device can report location history to Google. The user also has the option to choose to report location history from all their devices. All the user needs to do for this is find and select the “Devices on this account,” option.
Google receives Location History for each device where a user is signed in and has the Location Reporting turned on and then compiles a timeline around all of it. The location reporting setting for each signed-in device can be changed and given a limit as to which devices are to provide location data. Then those data get included in the Location History.
Some location data always gets recorded for Google’s Web & App Activity, as a part of the use of services, like Search and Maps, even after Location History has been turned off.
Deleting the Location History Information
Google Maps Timeline lets the user manage and delete their Location History information according to their desire. All or even parts of Location history can be selected to be deleted.
Once Location History information has been deleted it cannot be found again.

Clearing all location history
- Open the Google Maps app on phone.
- Open the profile from the account section in the upper-right corner.
- Select the ‘Timeline’ option.
- Find the three vertical dots and click on them.
- Click on ‘more’ and then click on ‘Settings and privacy’ from the presented options.
- Find the ‘Location settings’
- From the presented options select, ‘Delete all Location History’.
- From there on, proceed with the on-screen instructions to complete the task.
Clearing a select range of location history
- Open the Google Maps app on phone.
- Open the profile from the account section in the upper-right corner.
- Select the ‘Timeline’ option.
- Find the three vertical dots and click on them.
- Click on ‘more’ and then click on ‘Settings and privacy’ from the presented options.
- Find the ‘Location settings’.
- From the presented options select, ‘Delete Location History range’.
- From there on proceed with the on-screen instructions to complete the task.
Any day from location history Clear
- Open the Google Maps app on phone.
- Open the profile from the account section in the upper-right corner.
- Select the ‘Timeline’ option.
- From the presented options click on the ‘Show calendar’ option.
- Select the day that is to be deleted.
- Click on ‘more’ and then click on ‘Settings and privacy’ from the presented options.
- From the presented options select, ‘Delete day’.
- From there on proceed with the on-screen instructions to complete the task.
Removing any stop from location history
- Open the Google Maps app on phone.
- Open the profile from the account section in the upper-right corner.
- Select the ‘Timeline’ option.
- From the presented options click on the ‘Show calendar’ option.
- Select the day with the stop.
- Click on the stop that is to be deleted
- Click on the ‘Delete’ button.
- From there on proceed with the on-screen instructions to complete the task.
Auto-deletion of location history
Location History can be chosen to be deleted within three, eighteen, or even thirty-six months.
- Open the Google Maps app on phone.
- Open the profile from the account section in the upper-right corner.
- Select the ‘Timeline’ option.
- From the presented options click on the ‘Show calendar’ option.
- Select the day that is to be deleted.
- Click on ‘more’ and then click on ‘Settings and privacy’ from the presented options.
- Scroll to the ‘Location settings’ option.
- Click on the ‘Automatically delete Location History’ option.
- From there on proceed with the on-screen instructions to complete the task.
YouTube search/view history
The videos watched by users on YouTube get stored as watch history. YouTube allows users to view, clear, or pause this watch/search history. Videos that are watched while history is paused won’t get stored in the history.
View, clear, or pause watch history
Users can find the videos that they have viewed on the YouTube app or website while being signed in, on myactivity.google.com. Changes made to an account’s watch history get reflected on all signed-in devices. On YouTube, we get two types of histories. Watch the history for the videos watched and search history for the videos searched, on the YouTube app and website.
Viewing watch history
- Open the YouTube app.
- Click on the profile icon from the upper right corner.
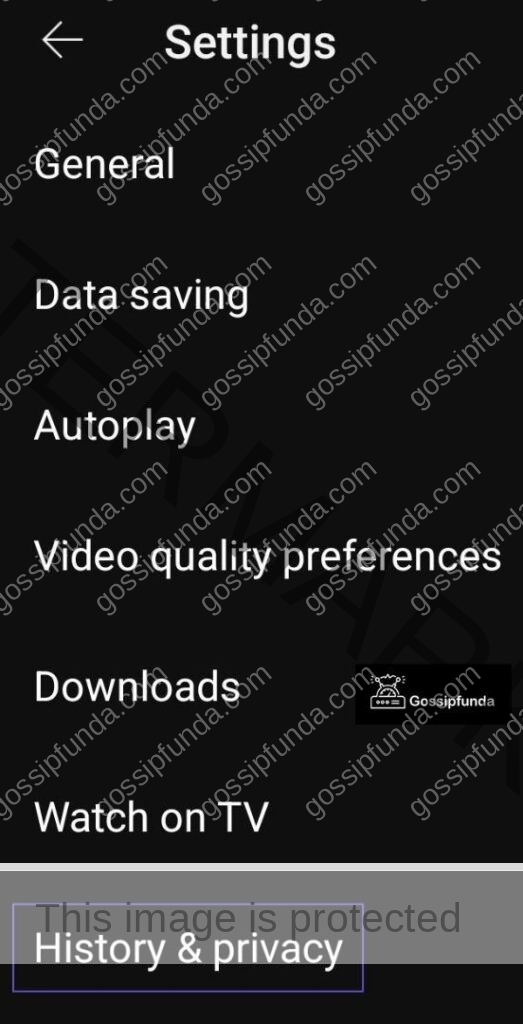
- Go to Settings.
- From the presented options select ‘History & privacy’ option.
- Click on ‘Manage all activity’.
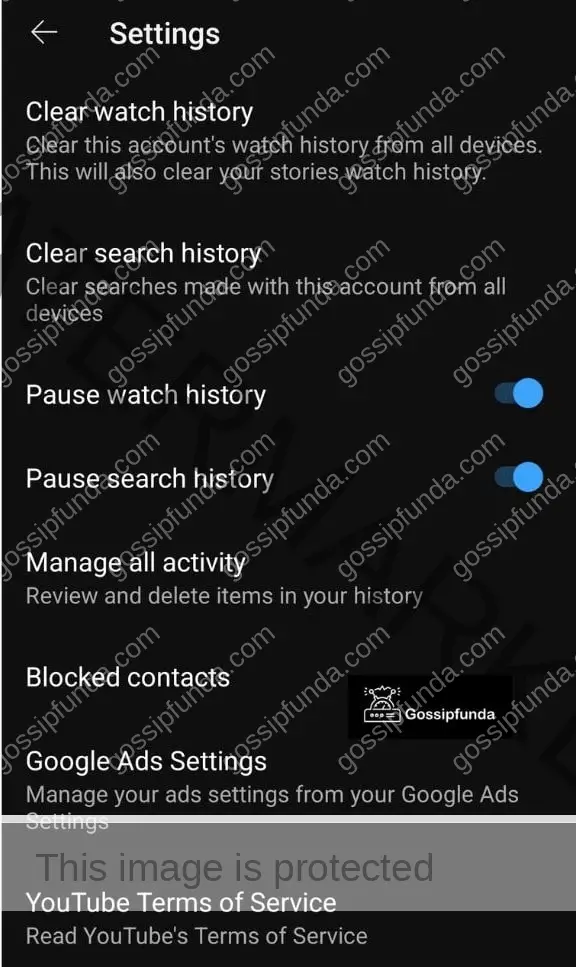
Clear the search and watch history
- Open the YouTube app.
- Click on the profile icon from the upper right corner.
- Go to Settings.
- From the presented options select ‘History & privacy’ option.
- Click on ‘Clear search history’ to delete all the search history.
- Click on ‘Clear watch history’ to delete all the watch history.
How to view or delete your YouTube search history
YouTube search history can be accessed from the My Activity page. From there, the user can:
- View their search history.
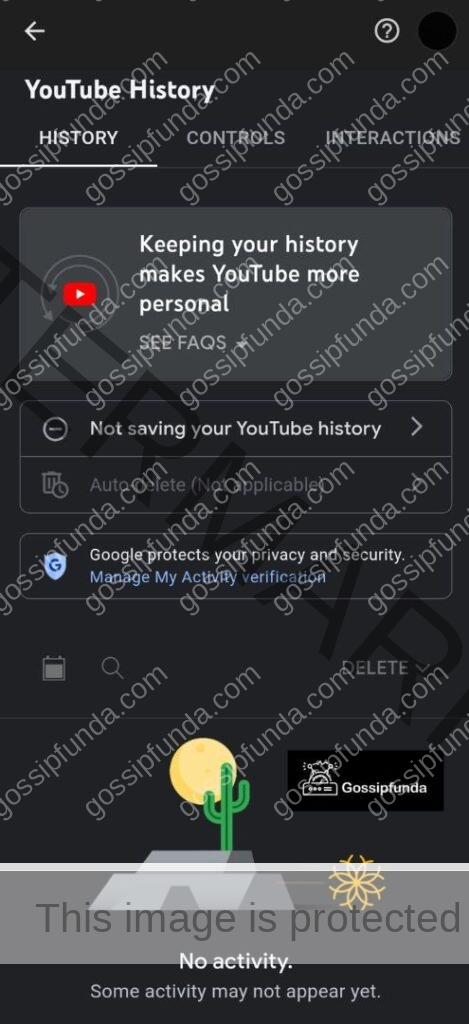
- Clear their entire search history.
- Remove individual searches.
- Pause their search history
Delete individual searches from history
- Open YouTube app.
- From the search tab, the suggested search history gets presented as a drop-down list
- Click and hold on to any search result with a History timeline icon next to it.
- Click on the ‘Remove’ icon on the pop-up to delete the individual entry.
Pause search and watch history
- Open YouTube app.
- Click on the profile icon from the upper right corner.
- Go to Settings.
- From the presented options select ‘History & privacy’ option.
- Click on ‘Pause search history’ button.
- Click on ‘Pause watch history’ button.
Opt Incognito Mode
Search history doesn’t get saved while using Incognito Mode
.
- Open YouTube app.
- Click on the profile icon from the upper right corner.
- From the presented options click on ‘Turn on Incognito’ button, to get into Incognito (private) browsing section.

Conclusion
This article covered all there is regarding how a user can view search history on phone. Apart from all the major browsers and applications that are mentioned, there are others too. The process to view and edit search history on those services will be similar to this too. Hopefully, this article has helped users in their queries. That’s all from my side in this article, see you in the next one.
FAQ
A phone search history includes, all web searches made on browsers, YouTube, Google Maps, etc. Other than that local search history and history regarding searches made on other apps can also be included in this. One can view this history on their phone, at will following few simple steps. Users can also choose to clear or edit this history in any way they desire. The process to follow in each case, is mentioned is details in the above article.
My Activity of any Google account is the place where users can view and manage their web activities. Those include all the browser searches, and visited web-pages, and sites. It also includes the history regarding all the YouTube videos that have been watched and the location history from Google Maps of all the places that a user has searched about and visited.
Though there are different browsers out there, the procedure to see the browsing history is mostly similar. In any case, the user has to open the browser app, get to the settings menu and select the history and privacy option. From there, the user gets to the web history page and can browser through the entire search history. There are also options to edit this list, like clearing individually or clearing all.
Search history is saved to a user’s Google Account as part of the Web & App Activity. The section also contains information about activity from all other Google services like Maps and YouTube, etc.
Hello folks, I am your friendly Internet-hood content writer Anish Mishra. I am an engineering student and that entails me tackling several goals on a day-to-day basis. But among all those goals one that is personal to me and one that stands out as one of the most important is to provide quality content to solve the queries that all of you guys have. So let me do just that and be of service. Thanks!