Color in the image can be done in many ways, but the two most popular methods are using Adobe Photoshop or Blender. In this article, we’ll show you how to replace the color in an image using both Adobe Photoshop and Blender. When it comes to image editing, there are a variety of different techniques that can be used to change the colors in an image. we will focus on two specific software programs Adobe Photoshop and Blender we will show you how to use each program to replace colors in an image.
While both programs can be used to achieve a similar result, the process for each program is slightly different. Therefore, it is important to familiarize yourself with both programs before attempting to replace colors in an image. Different software has different tools for color correction. In this article, we will teach you how to replace the color in the image using Adobe Photoshop and Blender. First, open the image in Adobe Photoshop. Go to the “Image” menu and select “Adjustments” > “Replace Color…”. In the “Replace Color” dialogue box, You can select the color you want to replace, and then you can replace it. Then, click on the “Find Similar Colors” button and adjust the “Fuzziness” slider until you are happy with the result. Finally, click on the “Replace” button. Read on if you are ready to learn how to replace colors in an image using Adobe Photoshop and Blender!
What is the color replacement?
Color replacement is a color correction technique that uses the original image to determine the missing colors, then replaces them with the closest equivalent colors in the image. This results in a natural-looking, accurate rendition of what you’re trying to achieve. If your image has been taken on a high-contrast subject, or if there are large areas of similar colors that need to be changed, color replacement is an excellent choice for your project. Color replacement is a simple way to change the colors on your website without having to use Photoshop or other complicated software. The trick is using hexadecimal values and a few simple CSS rules.
Hexadecimal values are created by combining two other numbers, 0s and 1s. When you put them together, they create a string of 16 characters that represent the color you want to change, or the hex value for that color, by putting these hex values inside of an HTML element with your desired background color set as its background property. You can easily change the colors on your site without having to use any other tools! Color replacement is a process that helps you use your existing images to create a new design. It’s pretty straightforward: you take an image and replace the color of one or more objects with another color.
Tips for successful color replacement
Color replacement is a tricky thing. It’s also an essential part of good design, and we’re here to help you get it right. First off, don’t be afraid to try something new. Color is a huge part of our aesthetic, so if you don’t like how something looks, it’s okay not to use it. Sometimes you’ll find that your favorite colors just don’t work with the new design and that’s okay! It might be time for a change!
Also, remember that color can be used as both a complement and a contrast so don’t forget about that. For example, if you’re designing a logo for A company, try using black as the contrast color against another color such as red or orange. This will help draw attention to key details in your design while also making sure it doesn’t look too overwhelming. Finally, remember that sometimes less is more when it comes to color especially when there are multiple colors in your design! We suggest using fewer colors than usual when doing something like redesigning your logo or website. Because this will make everything easier on the eyes and make it easier for people who are working with limited technology (like tablets).
The benefits of color correction
Color correction is like a time machine, allowing you to travel back in time and make your photos look incredible! If you’re looking for the best way to edit your photos, you’ve come to the right place. We’ll show you how to get perfect color correction results every time. The benefits of color correction. There are many reasons why you might need to correct your images before they’re published. For example, you might have taken a photo in a low-light setting, but the color isn’t quite right. Or maybe you’re shooting a portrait and want to make sure the model’s skin looks just right. Either way, there are ways to fix your problem that don’t require spending hours on Photoshop or editing software, and these tips will get you started.
Use an external monitor. The best way to see what’s going on in an image is with an external monitor. This way, you can see how the color looks from all angles without having to crop or edit the image itself. The screen should be at least 24 inches in size and be able to show 72 pixels per inch (ppi) resolution or higher. Make sure that it has an HDMI input as well because this is what allows you to connect it directly into your computer system without needing any additional cables or adapters first! Use reflection mode. Reflection mode is one way to get around having a large external monitor sitting beside you while working on your images!
When to use color correction
Color correction is a process that can be used to make your photos look more vivid. It’s like an artist’s paintbrush, with the ability to change the color of your photo in a way that will make it stand out from the crowd. Color correction is especially helpful when you have a shot that looks too dark or too light. It’s also great for shots where you want to add some pop to an otherwise dull image, or where you want to bring out details in an image that might not have been seen clearly before.
It’s easy to use just pick the correct color levels on your camera and you’re all set! Color correction is for more than just brightening up your photos. It’s also a great way to make sure that your photos don’t look washed out, dull, or flat. Color correction can be used to soften a photo’s background and brighten up the foreground to create a more vivid and dynamic look. It’s like using a filter on your photos except you’re doing it in post-production! Here are some tips for when to use color correction:
- Use color correction in landscapes to create a sense of depth and distance. If a photo has strong shadows or contrast between light and dark tones, try adding some warmth with a filter (like Soft Light, Color Balance, Vivid Light, or Pin Light) before applying the color correction. This will help balance out the image and make it feel less flat or monochromatic.
- Use color correction on portrait photos that might otherwise appear too washed out or pale (like skin tones). Try adding warmth (such as by using Vibrant Color) before applying color correction so that those areas don’t appear too dark or cool next to brighter parts of the image.
What are the benefits of using Adobe?
Adobe is a great tool for color replacement in images. It can be used to improve the clarity of your photos and make them more vivid. Adobe’s color replacement features can be used to replace objects or people in your images. They can also be used to enhance the mood of a photo by changing the colors in a snap. Adobe has several different tools that allow you to choose from hundreds of thousands of colors or shades of gray and help you replace whatever color you want with another one. You can even create custom palettes
Here are some of the benefits:
- It’s easy! Just click on the color you want to replace, then click on the new color, and you’re done.
- You can use custom palettes, so if you want a more dramatic effect than just changing colors, you can use your own palette instead of relying on presets.
- You can easily adjust other settings like opacity or layer blend modes while you’re working (which means less time spent figuring out how to do something).
Why is it important to replace colors in images?
If you’re like most people, you might not have given much thought to the fact that your photos aren’t exactly what they seem. When you take a picture, it’s not just a snapshot of an instant in time it’s a record of your experience. The colors and lighting in your shot may not match what you remember seeing when you took the photo, because of things like weather conditions, sunlight, or personal preference. Even if the lighting is perfect and everything else looks like it should, the colors might be off. You can use a tool called color balance to get rid of this discrepancy by adjusting the individual values (the reds, greens, blues, and other hues) of each color channel in your photo.
A good color scheme should be able to help readers identify specific parts of the page and make it easy for them to navigate between sections and different types of content. For example, you might use a bold red color scheme for headers and subheaders, but use a lighter red for body text. This makes reading through your pages a breeze! You can also use different shades of the same color in your header or subheader so that readers can easily see where they need to go next in order to get back on track with their reading. Additionally, using different colors throughout your site helps keep it visually interesting. By breaking up large blocks of text into smaller bits so that readers don’t get bored with looking at one section over another when they scroll down too quickly!
What makes Blender the best tool for the job?
The best part about Blender is that you can create very complex paintings without having to spend hours doing so. It’s also incredibly easy to learn how to use this program since it has tons of tutorials online that show you how to use each feature. Blender is the best tool for replacing colors in images because it can do it faster, better, and more efficiently than Photoshop or any other program. With Blender, you can paint directly on the image and use filters to change the color of the painting. You can even add text to your paintings and change their color, size, and style.
First of all, Blender has a built-in color mixer to help you choose colors for your image. This means you don’t have to go through a lot of trial and error like you would with Photoshop or Gimp. Second, it is faster than Photoshop when it comes to generating or editing images. For example, if you need to change the color of an object in your image from red to yellow, Blender will take less time than Photoshop to get those colors right. Thirdly, Blender’s renderer is much better at dealing with large amounts of data than Photoshop’s renderer. This means that if you wanted to render out a large number of objects in your image (like trees) with different colors. Then Blender could handle that task much more quickly than Photoshop could.
How to replace color in images using Adobe?
In this tutorial, we will learn how to replace colors in images using Adobe.
- First, open your image in Photoshop.
- Then, select the Lasso Tool from the Tools Panel or use the keyboard shortcut Ctrl + L. Draw a selection around the part of your image you wish to change.
- Next, go to Select > Inverse and press OK. This will create a selection that takes out all of the backgrounds except for what you have selected in this case, the object or object parts that are still highlighted after inverting.
- Now choose Select > Mode > Adjustments> Replace color and enter 2 px for both Width and Height (this will shrink down the size of your selection). Next, click OK twice to exit each dialog box. This will contract down your selection so it doesn’t take up too much space on screen anymore.
- Click anywhere on your background canvas with black color and press Alt+Backspace (on Windows) or Option+Delete (on macOS), which will replace it with white color by default; this is called “Replacing Color” mode because it attempts to find an exact match between two different colors (usually one foreground color and one background color).
Use the Replace Color dialog box
Adobe has a great new feature that allows you to replace colors in your photo with different colors. It’s called Replace Color and it’s super easy to use. Just click on the Replace Color box in your photo and choose the color you want to replace. Then, click on “Replace” to begin the process. You can also modify other settings like brightness, contrast, and saturation before you click “Replace.”
- Step 1: First and foremost step is to Select the area of your image that you want to replace with a new color.
- Step 2: Go to the Replace Color dialog box by going to Mode> Adjustments and then clicking on the Replace Color option.
- Step 3: Select a new background color and select whether or not you want this new color to be transparent or opaque.
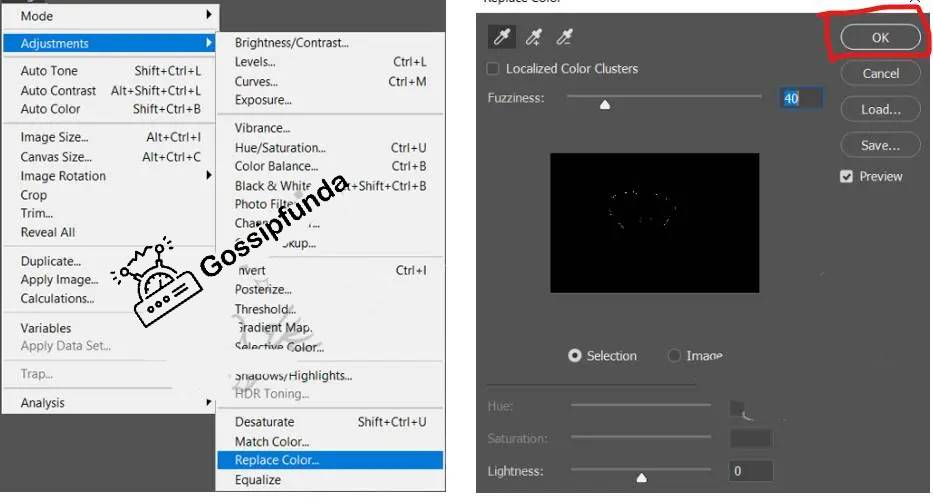
- Step 4: You can also play around with different settings such as hue, saturation, and lightness before confirming your changes with the OK or Cancel buttons at top of the dialog box.
Use the Color Replacement tool
The Color Replacement tool is a powerful tool that can help you to transform your images in various ways. It allows you to replace the color of one pixel with another by clicking on it. In this article, we will discuss how to use this tool and how it can help you to improve your images.
To use this tool, first, you need to select it from the toolbox. Then choose a brush tip in the options bar. Generally, the blending mode is set to color so you basically should enable it. For the Sampling option, you can choose any one. First, go to the Limits menu, and select any one of those according to your edit requirement.
For instance, we will have to choose a low chance, so that you can replace colors that are veritably similar to the pixel you click, or the pixels you raise the chance in order to replace a broader range of colors. Which will produce a smooth edge in the corrected areas and also the select Anti-aliased. Choose a color that has a good focal point and then replace the unwanted color (see Select colors in the toolbox). Click on an area where there is unwanted color and drag in an area where there is wanted color until all unwanted color has been replaced with the wanted color (if needed).
How to replace colors in images using Blender?
If you’re looking for a way to replace colors in images, consider using Blender. It’s a free and open-source 3D design application that is available for both Mac and PC. You can use Blender to create different types of scenes, including landscapes, characters, and even animated movies. The software is very flexible and has a wide range of functions that allow you to create anything from simple to complex projects.
Blender also comes with a built-in renderer that allows you to preview your work as it develops. You can see how things look as they change over time and make adjustments accordingly. The best part about Blender is its flexibility. You can do so much with this tool! You can import images or other files into the program and then start editing them right away. Or if you’d like more control over what kind of image you’re creating, you can choose from pre-made scenes or create your custom one in just minutes!
Steps to make it easy
Color grading in Blender is a bit different from other programs. Here’s how to change the colors in an image:
- Choose New from the File menu. This will open a new window where you can name your new file and choose an image to import it into.
- Import the image by clicking on it and dragging it into your project window (where the white space is). You should see an icon appear in the lower-right corner of your screen, indicating that your image has been added to your project.
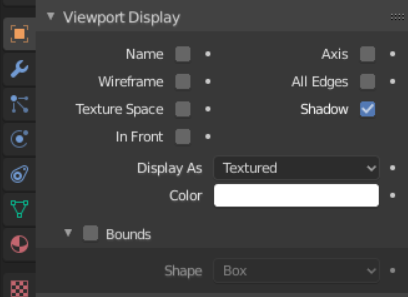
- In this same viewport, go up to Properties and click on Color. The Color Properties box will appear on top of everything else in that viewport area. To change the color of something in Blender, simply adjust its Hue value by clicking on one of three boxes at the top left corner of this box (red, green, or blue). You can also double-click on each box to change its hue value by 1.
Which method is better?
Adobe Photoshop and Blender are both great tools for replacing color in an image. Though they have different strengths and weaknesses, the two programs share a lot of similarities that make them both suitable for the task at hand. In both programs, you can create new layers and masks to edit specific parts of your image without affecting other parts. In Photoshop, you can also use a variety of filters to change your image’s color or contrast quickly and easily.
One major difference between Adobe Photoshop and Blender is that Blender doesn’t support layers as Adobe does. This means that if you want to make changes throughout your image (as opposed to just on one layer), then you’ll need to use a more advanced editing program such as GIMP or Inkscape instead. The best way to replace the color in an image is with Adobe Photoshop. Adobe Photoshop is a powerful image editing tool that has been used by professionals for over 20 years. It has a wide range of features that allow you to achieve the results you want quickly and easily. You can change the color, brightness, contrast, and other properties of your images without having to use any additional software or plugins.
On the other hand Blender
Blender is an open-source 3D modeling software used by professionals as well as amateurs who are interested in making 3D models. Blender’s most popular feature is its ability to create realistic renderings of objects with realistic lighting effects, including shadowing and reflections. If you’re looking for an image editor that will let you change the color of your images quickly and easily without using any additional software or plugins then we would highly recommend Adobe Photoshop over Blender because it offers more capabilities than Blender does when it comes to color correction on images.”
How to make your color changes permanent
You can make your color changes permanent in Photoshop by using the “Auto Color Correction” option. Here’s how:
- Open a new document and make sure it’s the same size as your original document.
- Go to “Layer” -> “New Adjustment Layer.”
- Select “Auto Color Correction” from the drop-down menu, and then click OK.
- In the dialog box that appears, choose your color correction profile from the pull-down menu at the top of the window. This will appear to be a check box with a plus sign next to it (if there’s no check mark, try opening an existing color profile).
- Click OK. The green check mark indicates that you’ve selected a good profile. You can click on it if you want to use it again later on!
Blender
It’s easy to make your color changes permanent in Blender. You just need to follow these steps:
- Add a material that you want to tint, like a new texture or a texture mask.
- Go to the “Modes” tab and select “Seamless Drawing.”
- Click on the color wheel on the left side of the interface and change the hue value for each channel you want to tint (e.g., red, green, blue).
- Select all of the channels that you want to be tinted by clicking on them one at a time and then clicking “Ok” in the pop-up box that appears when you click it.
Other things to consider when editing your images
When you’re replacing the color in your images, you have to consider a variety of things. First, what are the limitations of your product? If your product has a small number of colors, or if it’s made of material that can’t tolerate drastic color changes. Then you may not be able to change its color using CSS alone.
Second, what are the strengths of your product? Consider how well it performs under different lighting conditions and in different surroundings. Is there something about your design that will make it harder for people to differentiate between different shades? For example, if your product is black-and-white, but you want it to appear more vibrant when viewed under bright light or on a dark background (rather than in other situations). Then you’ll need to include additional instructions in your code.
Third, what do you want users to think when they look at your product? You may have a specific feeling or experience you want them to have when they see it, for example, an overwhelming sense of sadness or joy. If this is true for your design as well as for each aspect of it (color schemes included). Then be sure to include instructions with each change so that users can find ways around any obstacles they might encounter along the way.
To wrap things up
In conclusion, to replace colors in an image, you can use a few different software programs. Adobe Photoshop and Blender are two of the most popular options. Each has its own unique set of features and tools that you can use to achieve the desired results. This guide showed you how to replace colors in an image using Adobe and Blender. First, you opened the image in Adobe Photoshop. Next, you used the color picker to select the color you wanted to replace. Finally, you exported the image as a PNG file and imported it into Blender. Blender has a variety of tools that you can use to replace colors in an image. Thanks for reading!
Hi, I’m Neha, an avid reader and writer of technology tips and tricks, and an expert on smartphone apps. I have been writing for Android, iOS, and Windows tips for a long time. I love to help people learn more about technology so that they can be more productive and comfortable with their devices.
When not writing articles about technology tips and tricks and sharing them with others, I spend my time traveling around the world, searching for new places to explore myself. I’m currently on a mission to get off the beaten path, and explore some of the most technology hidden on our planet before it’s too late!


