If you are looking to upload your Twitch stream on youtube then you came to the right place. In this article, we are going to see how you upload twitch streams in different ways.
Twitch is a live-streaming platform and we all know that it takes the experience to the next level. But if you don’t know much about Twitch then, it allows you to broadcast your live stream of playing games, crafts, and much more. Since the launch of Twitch in 2011, it managed to attract millions of users to its platform. And in (early) year 2020, it managed to get 4 million broadcasts. It’s a very popular platform since users can stream their activities and read viewers’ comments in real-time. The platform offers a number of categories for its users to enjoy, and it makes it easy to find relevant content.
Now, viewers get a notification whenever the stream they follow starts a new broadcast or posts anything. This is how Twitch keeps the viewers engaged and increases active views on its platform. If you are looking to get similar viewer interactions on youtube then you can do it since Youtube also has similar notifications. And as a content creator, you can get more views by uploading your stream on another platform Youtube. Now let’s see how you can upload your Twitch streams on Youtube and increase your viewer count.
What is Twitch VOD?
Twitch VOS stands for “Video On Demand” and it allows you to record previously streamed content. This allows you to provide briefings in case you missed any live streams.
You can watch any VOD of your favorite streamer and never miss any live stream. But, remember that VOD doesn’t last forever and it will be removed after 2 weeks after that live stream. If the streamer has the “Partner Status” or haveTurbo then their VODs will be saved for 60 days.
How to enable Twitch VOD?
If you want to enable VOD for your content, then you can do it with a few simple steps. This will help your viewers from missing any of your content and also increase your views. Your views will find the VODs under the “video” tab on your channel. Now let’s see how you can enable VOD for your channel:
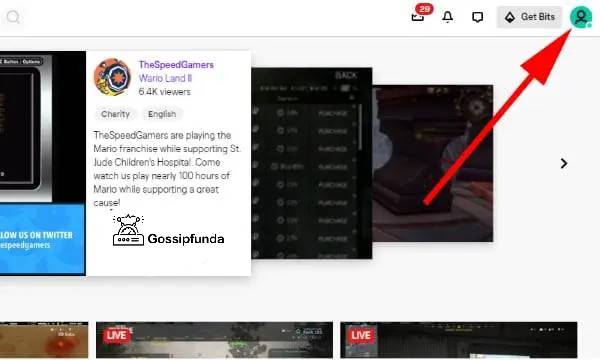
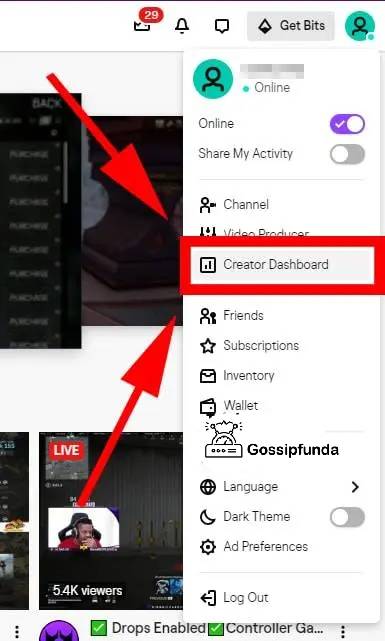
- Open Twitch and click on your profile icon (located at the top right corner of the screen).
- Now select the “Channel & video” section and look for the “Stream Key & Preference” menu.
- Click on “Creator Dashboard” from the options and you can enable VODs from here.
- Now, open the “Settings” tab and there you should be able to find “Stream” section, select it.
- Look under “VOD settings” and there should be an option for “past broadcasts”.
- Now you can just slide the toggle to enable or disable it.
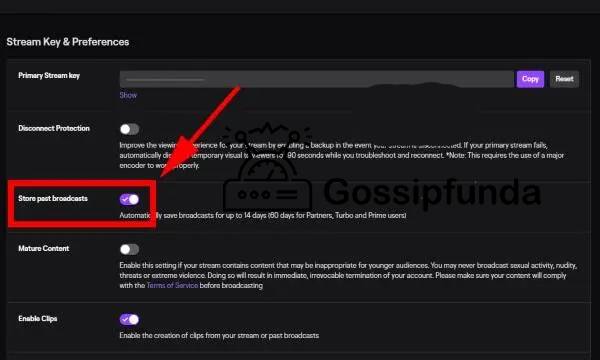
- Head over to the “Stream” section in “Settings” and now a new page should open.
- On the new page, go to “VOD Settings” and there you should be able to find the “Store Past Broadcast” toggle under “Stream Key & Preference”.
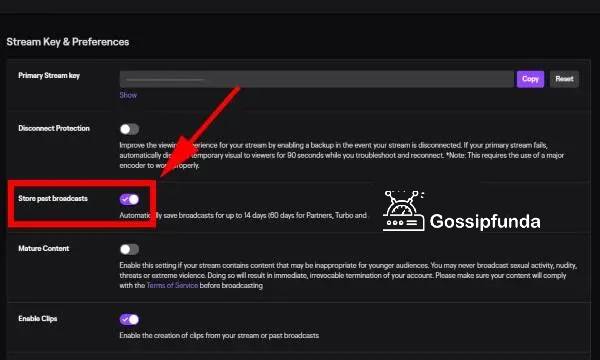
- If the toggle is ON under the “VOD Settings”, then you are all good, But if not, then tap the toggle and you are all done!
How to make Highlights on Twitch?
Let’s see how you can make a highlight on twitch in under 2 minutes:
- Open your Twitch Dashboard and go to the “Content” section.
- Now open “Video Producer”, click on “All Video” and change to “Past Broadcasts”.
- Here you will be able to see your past videos, click on “Highlight” and a new tab should open.
- In the new “Twitch Highlighter Tool” tab, select the part of videos that you want to highlight and then click on “Create Highlights”.
- Now wait for the clip to be processed and once the video highlight is created, you are all done!
These clips can be shared on Twitch as well as with your friends with a link provided by Twitch. Remember to use Highlights only to showcase special moments which will grab viewers’ attention.
Whenever you create any clip, it is saved automatically in the “Clips” section. Here users can see all the clips and share them as well. This will increase viewer engagement along with attracting new viewers. Best part about clips is that you can download any clip on your laptop/computer to use later. The awesome thing about clips is that viewers can create their clips of your stream and share them.
If you want to create your clips, then follow the steps mentioned below:
- Choose the Twitch channel on which you want to create a clip.
- Now click on the “Clapper board” icon and you should be able to edit the stream.
- Here you can create a clip that can be anywhere from 5 to 60 seconds long.
- Once the clip is created, you can give it a title and publish it. You can share the videos with viewers on different platforms since they have auto-generated links.
How to upload your Twitch Streams to YouTube
In the previous sections, we have covered different video types offered by Twitch and are benefits of uploading streams to youtube. If you want to catch up on any of the topics, please check the previous section. Now let’s see how we can upload your Twitch Streams on YouTube with a few simple steps:
- Open Twitch and click on the arrow next to the Twitch website or click on your profile picture.
- A menu should open, select “Video Producer” from the list.
- All your videos should be visible, click on the three vertical dots on the video you want to upload to youtube and a drop-down menu should open.
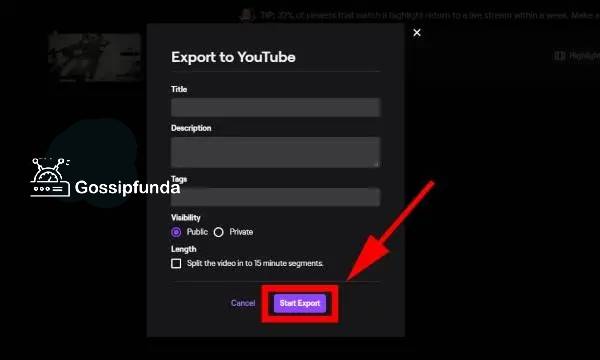
- Click on the “Explore” tab from the drop-down menu and a menu will pop up. Somethings required by any Youtube video: Title, Tags, video description, viewer age rating, and more. (Enable the checkbox if you want to auto split the youtube video.)
- Once done, click on “Start Export” and your video will be uploaded on youtube.
NOTE: You also have the option to edit the videos before you upload them on youtube. To do this, you need to save the video on your computer and use third-party video editors to edit it. Once you are done with editing, you can upload the video on youtube manually.
Read Also: How to close tabs on android
Summary
In the article, we saw what is Twitch VODs, clips, and highlights and why they are used. Along with it, we also saw what are the advantages of uploading your streams on youtube. How this can increase your viewer count and viewer satisfaction. If you have missed any of these sections, we will suggest you visit them again to understand the concepts.
In the last section, we saw how we can upload your Twitch stream on youtube. Now, remember that you can edit the streams as well before you upload them. Sometimes watching regular pre-recorded streams can get boring and viewers can lose interest. This is why editing those streams can make a huge difference. The best way to know what will work for you is by checking your competition and trying different things out.
We would suggest that you do research on your viewer demographic and statistics to see what type of content will work best for you. For some creators, short videos like highlights work the best for example Call of duty streamers upload clips and highlights. But for other creators like Dota players, uploading a whole stream unedited works the best. You will have to see what will work best for you and get the most views with minimal new videos.
If you have any queries, then feel free to drop them down in the comment section below. We are more than happy to help out our readers with tech queries.
Frequently Asked Questions
Your VODs can be stored for anywhere between 14 days to 60 days, depending upon your level. All your VODs will be saved for 60 days if you are Twitch Partner or have Twitch Turbo. However, if you are not part of any such service then your VODs will only last for 14 days before they are deleted.
NOTE: You have the option to download the videos on your computer before they are deleted automatically. These videos can be stored on any External hard disk to use in future projects. This is very useful since the videos can be converted into Highlights and permanently store on Twitch. If you want to see highlighted work for your channel, the only way to know is to try.
Twitch VODs are the previously saved videos of your live streams, which you can access later. You have the option of saving the parts you like or saving the entire stream. Then you can make it visible so your viewers can see it if they missed the live stream or just want to rewatch.
On the other hand, highlights are short videos that are edited from previous streams. These short videos are saved permanently on Twitch and your viewers can watch them anytime they want. Streamers use these highlights to showcase achievements and must-watch clips. Highlights can only have a maximum length of 3 minutes, unlike VODs which can be the entire stream.
If you don’t know what are the benefits of uploading Twitch streams to Youtube or want to know more then check out this section. If you are not interested in the same, then you can skip to the next section.
If your viewers are not able to see your live stream or want to rewatch then they will have an option for it. Not only it will improve your viewer satisfaction, but it will also attract new viewers. If some viewers are watching your content regularly on Youtube, then there are high chance that they will watch your live streams more.
Twitch is a very popular streaming platform and as you become more successful, it is not wise to keep all your eggs in the same basket. You may want to post on youtube to have not only backup options but also to increase your reach.
The number of Twitch streams on youtube is increasing over time due to the opportunity for monetizing and more views. If you are getting views on your Youtube channel, then you can mobilize the content and earn more from the same content.
If you are not regular with your live streams, then your viewers will shift to other streamers. You can reduce this by uploading streams on youtube which will keep your viewer count relatively stable. Even if you are consistent with your streams, viewers will have the option to see previous streams wherever they want. Since Twitch VOD does not last more than 14 or 60 days (depending on your Twitch status).
Before we can start with the steps on how you can upload Twitch streams on youtube. We need to check if we have everything required to do the same.
The first thing we need is to have streams on your Twitch account which we will be uploading. And then you need a youtube account, if you don’t have one then you need to create one. But apart from these two things, you need these things as well:
Twitch account with content uploaded (Archived stream)
Access to PC
Youtube channel with proper details
Video editing tool (optional)
If you have all of these things on hand, then move to the next section for steps on how to upload streams on youtube. But if not, then set up everything before you move on to the steps.

I am a Computer Science Engineer, have a passion for coding, sketching, and teaching. I took part in various college technical activities and was Mr. Fresher in the 1st year along with the college’s face. Spends most of the time learning new things and coding small codes for little fun and also as academic, keeping Python 3, Android as priority language for coding.
I love writing tech tips with 100% success and enjoying this new side of life. Finding a passion for new things and letting unlock my creativity and hoping to learn new scientific stuff on the journey of life and being grateful for smaller things.