Creating an ID photo is usually quite a struggle. There are all the standards to consider, lines in photo studios to stand in, or desktop software to master. If you are not willing to deal with all these pesky problems, there is an easier solution. You can easily take passport photos with your own iPhone. In this article, we’ll tell you How to Take a Proper Passport Photo with Your iPhone.
Before we actually delve into ID photo creation, we need to take a brief look at some of the guidelines you need to follow to take a proper ID picture with your smartphone.
- Make sure to find a room with enough lighting. Since you are probably going to take a passport photo at home, you need to make sure that you get the lighting right. Avoid shooting yourself while sitting in the sunlight. This kind of lighting will create stark shadows behind you that are not allowed on ID photos. A subtle natural light from the window will be enough.
- Wear appropriate clothing. There is no particular need in shooting yourself while wearing formal clothing. The outfits you wear on a daily basis are more than fine. Just make sure to avoid overly flamboyant looks, offensive prints, or overly revealing clothing. Just a general piece of advice – try to look presentable in your ID image. Make sure to learn how to look good in passport photos and you’ll be fine.
- Get an assistant. Snapping a picture while holding your phone with a selfie stick isn’t a good idea. This is why you need an assistant – a friend or a relative – who would snap the picture of you with your iPhone. Just make sure that the assistant stands at least 5 feet away from you.
- Mind your posture and facial expression. You need to keep your back straight, your shoulders relaxed and your facial expression neutral. Smiling, frowning, or grimacing is not permitted. You might need to take dozens of images before you end up with one that would satisfy you, but it will be worth the struggle.
Do not miss: How to access iCloud photos on pc?
How to Take a Proper Passport Photo?
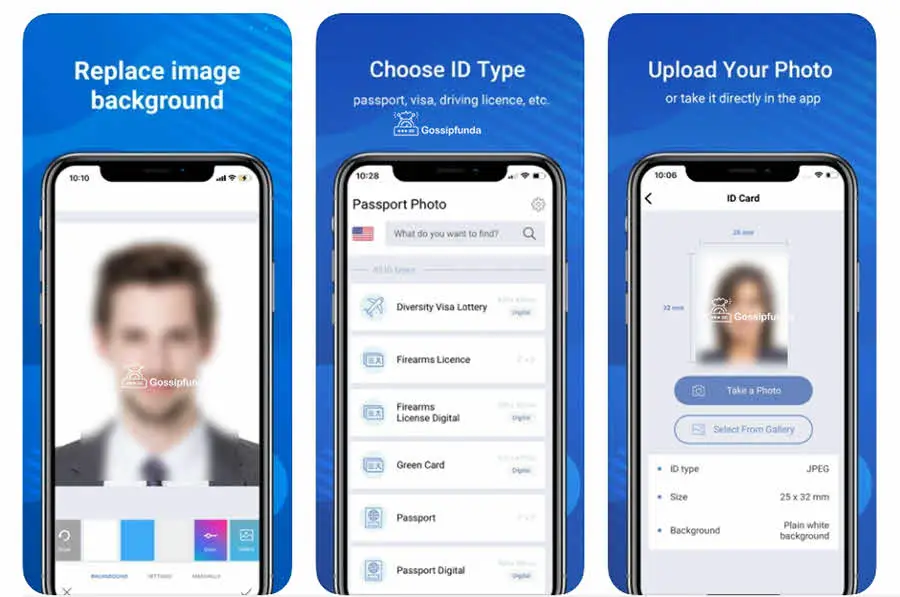
Now that you know how to look your best in an ID photo, let’s move on to how to take the actual picture. While you can certainly use the regular camera application, it is much better to have a specialized application installed. Go with Passport Photo & ID Maker. This is a very intuitive application that will allow you to create passport and visa photos in a few taps. The application is loaded with convenient templates and tips that will ensure that your passport photo taken on your iPhone will be 100% compliable. Let’s have a look at how to work with Passport Photo & ID Maker.
Pick the ID Type
First off, you need to install the application to your iPhone. Then, once you open it, you need to pick the country and the ID type you are interested in. There are credentials options for more than 130 countries.
Snap a Picture
Once you choose the ID type, you’ll need to take your picture. Make sure to use the markers on the screen and align your face with them.
Crop Your ID Pic
In case you need to adjust your face within the grid – do it manually. If everything is fine, then allow the application to crop the image according to all the ID standards.
Change Your Outfit
This step is completely optional, but will be useful for those users who couldn’t find a proper outfit for the picture. Passport Photo & ID Maker comes equipped with a digital wardrobe of 60+ items that you can apply to your picture in a single tap.
Save Your ID Photo
When you are satisfied with the result, be sure to save your ID image. In case your iPhone is hooked up to a printer, then print as many photos as you need on the paper of your choosing.
And that is it. Now you know how to take a passport photo on your iPhone. This means that you no longer need to use photo studios or go to Walmart to snap an unflattering image and that you are in total control of the way your ID photo will look like. All of that is thanks to a few guidelines and a convenient mobile application.
I am passionate about my work. Because I love what I do, I have a steady source of motivation that drives me to do my best.
I’m not comfortable with settling, and I’m always looking for an opportunity to do better and achieve greatness. I have a keen interest in the technical field. Apart from this, I am a social media influencer.