Some movie sequences are shot in reverse, which adds to the mystery. To generate amusing films for uploading to YouTube or other social media sites, Some individuals have attempted to make the movie play backward. Reversing video is a well-known special effect with several applications. It can enlighten an audience and slow-motion instant replay can be used too. Reversing video footage stretches back to the dawn of cinema. Louis Lumiere created the first documented usage of the reverse effect in a 90-second picture called “Demolition of a Wall” in 1896. Workers pull down a wall in it, and then the camera rewinds, and the wall rises as new. Lumiere worked hard to produce his reverse effect.
Today, video editors may effortlessly rewind fast-paced sporting events or make hilarious reverse YouTube videos. Backward video play is getting increasingly popular. In truth, this impact is nothing new. This effect has been utilized for decades, but with technological advancements, numerous applications can now generate this type of effect.
There are several methods for playing any video backward, but for the most basic, you may read the list of methods provided below the jump to learn more about this issue.
Learn more: reverse song search with a single click
KINEMASTER
When you first launch KineMaster, a homepage will greet you with the preference of beginning a new project or carrying on with an existing one. Tap the middle button with the plus sign to start a new project, then choose a segment of your video to use. Where you plan to publish the video has a significant impact on the aspect ratio that you select. The ideal aspect ratio for YouTube is 16:9, while Instagram prefers 9:16. You can use 1:1 on smaller screens.
You can create your video in a wide variety of sizes. Tap Media again to access the Media folder. These are crammed with folders that contain pictures and videos. Select the video clip you want to edit. Your selected video clip will be imported into the project window for editing. choose the checkbox in the upper right corner to save the video. Keep doing this. If more video clips need to be added When you select the video clip you want to edit, the border will show up in light yellow and you can trim it. Select the scissors icon in the Trimor Split option. In the upper right corner. To open multiple trimming options in the same area,
There are four choices available.
- Trim to Right of the Playhead,
- Trim to Left of Playhead,
- Split at Playhead
- Split and Insert Freeze Frame.
The shortened video will then be shorter in length. To see your work, play the video while editing. If you are happy with the results, save them by tapping the checkmark at the top.
Text can also be added to your video. Select text from the options listed above. Enter your text and click OK to display it. You may change the video’s size. By sliding the text.
This application contains a plethora of appealing animation effects.
VIDEO STUDIO
VideoStudio is the simplest method to reverse video. You can modify the pace of a movie to produce some intriguing video editing methods, but you can also reverse the trajectory of your video and Make some filmmaking magic and reverse what you’ve captured to generate some innovative, interesting outcomes to utilize in a variety of settings. To work on a clip, just right-click on it and select Time Remapping from the context menu. Scrub through the video in the Time Remapping box until you reach the section where you want to apply the reversal. Click the Play button or drag the cursor to the correct spot, then pick a clip segment to flip by clicking the Mark In and Mark Out buttons. A white line denotes a specific portion of the video. Press the back button once more.
To see the result, click the Play the time remapping result button. To delete a section or add another speed effect, choose the in and out portions and apply the effect; to remove an effect, select the relevant thumbnail and click the Remove selected clips button. In this video studio, You may also experiment with speed by increasing or decreasing the pace of your movie. You can do it depending on the pace at which you want to play your reverse video. This is not difficult to accomplish; simply change your pace to your liking. This is the coolest program for getting your videos in reverse effect, and you can even alter the pace and direction of your movie.
Instagram is a picture and video sharing social networking website launched in 2010 by Kevin Systrom and Mike Krieger and later bought by Facebook Inc., currently known as Meta Platforms. Users may contribute content to the app, which can then be altered using filters and grouped using hashtags and geotagging. Posts can be shared privately or with the whole public. Users may explore the material of other users by tag and location, check viral content, like photographs, and follow various users to add their stuff to a personalized feed.
First, you need to open Instagram then click on the little camera on the top-most left corner of your phone. And here you have all your modes which you have to use. You have a live normal boomerang, you have super zoom, and also you have rewind mode. So you just need to make a super cool video in that mode. And then play that video right after making it. Then the video will play in reverse effect. You can also select the video from your gallery to convert it into a reverse video. You simply need to open the gallery and select one of the videos to get it done. And that is how you can make or select the video to get it done into reverse effect.
SNAPCHAT
Snapchat has quickly become one of the most popular communication apps for young people and teenagers from all over the world. It has begun to become more popular than Facebook Messenger Because of the unique capacity for a post (called SNAP) to vanish after a certain amount of time Which gives the user the impression of some anonymity more than the Facebook messaging software,
Snapchat is a little bit different from what you want to do. You want to just record right off the bat. And once you have recorded it you can swipe to the left and you will have your filter. And then go to the one where you see the little arrows pointing backward. What that will do is put your video in reverse and now this is a trick to make cool videos. Anybody can make normal videos but it takes a lot to make cool reverse videos on Snapchat. It is the most straightforward method for creating reverse videos. You can even select the video from your gallery to change it from normal video to reverse video.
Shotcut
How to reverse a video in shotcut and create a backward playing video clip there were two ways to approach reversing a video in shotcut the first is to change the full clip into reverse and the second is to change just a small segment of the clip generally speaking a small segment would already be in the timeline and edited in some way and you just want that small segment to be reversed we are going over both of those scenarios in this tutorial and we are starting by reversing the full video clip
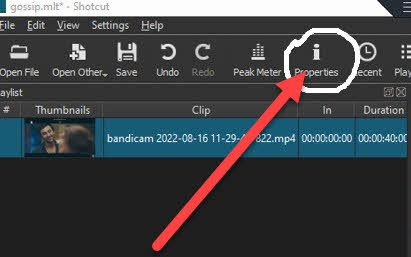
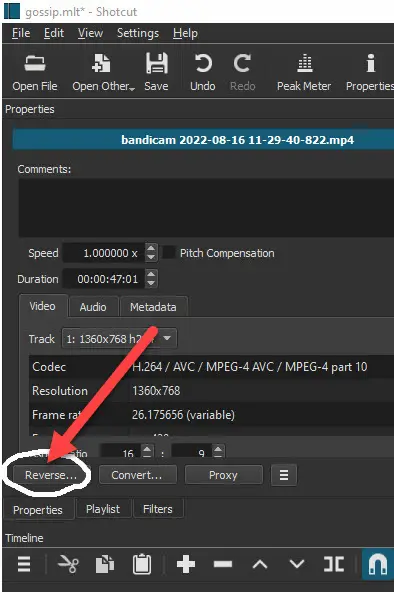
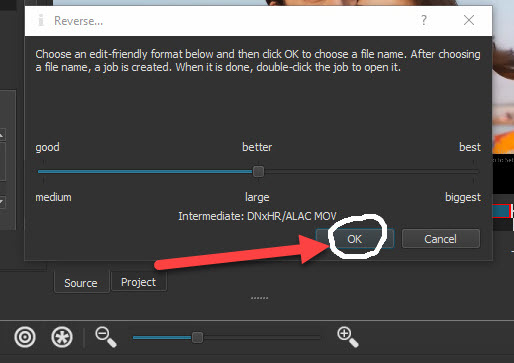
Now we want that reverse so come up to it, make sure you got it selected. It will be marked in red and then come after properties. Reverse select your quality and click OK over in the jobs panel. That’s going to convert and then reverse the video. If you got a proxy as I do as well after the reverse is completed there will also also be another job for pops up where it converts it into its proxy. Now I get what’s happened there. Could sound quite confusing. So if we take a look very quickly at the projects folder, you’ll see that I’ve got my original that plays in the forward standard way, and then I’ve got the reverse clip. And then I’ve got the proxies with the standard normal one and reverse one as well.
So when all of the jobs have been completed it will look something like this or you may only have two files if you do not have proxy enabled. Let’s go back to the playlist, you’ve now got the reversed version of the clip in the playlist if you drag it back onto your timeline. And then play. The whole thing will be in the reverse. Now you may have just noticed that I muted the sound and that’s been because it will now be playing in reverse as well. You’ve got two options here.
First of all, you could right-click and detach the audio and then simply delete it. That will mean the sound no longer plays at all, and then you can come up to your all-word playing sounds. And drag it into an audio track. This means although the video is playing reverse the audio will play forwards. Alternatively, you could remove the audio here and use a completely different soundtrack as well. It does depend on what you’re trying to do in your audio, but hopefully, that’s giving you enough of a pointer. And I just realized that you do need to address your audio when you reverse a video.
So now moving on to method two, this is where you have a full video clip or a full video with lots of video clips and you just want one small section to be played. In reverse rather than the whole thing. Now you could do what we’ve done here and then find that segment and cut it out. However, that is quite a hard way of doing that. So, the best way to do it is what will go over now. remove both of these clips and then drag on the forward playing clip. onto the timeline. Let’s play through the video, find where we are going to cut the video, and then reverse that section of it. So that will be fine.

I’m using S to cut or you can use this button here. And then. Just about here we want to cut it again. So now we want to play this part in reverse. What I want to happen is for the full videos to play forwards and then run backward for a couple of seconds and then run forwards again without any kind of cut. So that’s moving that up there. I am going to copy and then paste and then paste. Remove that space and what I’ve done there is the video will play through. All the way to this point here. This video clip will play in reverse and then it will play forward again.
So it’s nice and smooth, so I’ll focus on all this video clip just here if you make sure you couldn’t select it or have the red box around the edge. Right Click Properties you can come up to properties just here go over to reverse select your quality and okay in the jobs you now see it says reverse but it’s also got this weird kind of number after it and what that means. Is it just a small section that correlates to the number that you can see chopped off, but you can see it just here as well? If I now look back into my folder view, I’ve got my clip by full reverse clip and then this small section. It’s been reversed as well.
Conclusion
Thank you for reading. We hope that by following the steps in this article, you will be able to reverse the video and I hope that all of the suggestions we’ve provided with you today are simple to follow and will assist you in reversing videos. If you have any further questions or need assistance, please contact us. We would be delighted to assist you.
I am passionate about my work. Because I love what I do, I have a steady source of motivation that drives me to do my best.
I’m not comfortable with settling, and I’m always looking for an opportunity to do better and achieve greatness. I have a keen interest in the technical field. Apart from this, I am a social media influencer.